10分钟跑通 Hermes Agent 保姆级安装使用教程,从零打造专属AI助手,一款越用越聪明的 AI Agent。
视频教程:https://www.bilibili.com/video/BV1yQR8BhEhm/
前言
你是否有过这样的体验:每次打开 AI 对话窗口,都要重新交代一遍自己的身份、偏好和工作背景;Agent 每次执行任务都像"第一次上班",之前的经验全部归零,你不得不反复手动修同样的 bug。
如果有一个 AI 助手,部署只需几分钟,能记住你们的每一次对话,把执行经验沉淀成可复用的 Skills,还能24 小时守在微信、飞书或电报里随时响应——它不是在完成"一次任务",而是在持续学习你的工作方式。
这就是 Hermes Agent。
作为一个开源、自托管的 AI Agent 系统,Hermes 不仅支持 Kimi、GLM、Claude、Gemini 等主流模型,更以"长期记忆 + 技能进化"为核心设计:它会铭记教训、沉淀技能、压缩上下文,让同样的任务越跑越快、越跑越省 Token。相比同类产品,它的工具调用更透明、迁移成本更低(一条指令即可从 OpenClaw 迁移),是真正面向长期任务的个人 Agent 系统。
在本指南中,我将带你从环境准备、模型配置、TUI 对话到消息网关接入,手把手完成你的第一次 Hermes Agent 部署。

站长交流群:767557452
Hermes Agent 简介
Hermes Agent 是一款开源、可自托管、具备长期记忆与技能沉淀能力的轻量化 AI Agent,专为中文用户的使用环境与需求优化,核心优势如下:
 部署极灵活:支持本地电脑、VPS、Docker、WSL2 等环境,覆盖 Linux/macOS/Windows 全系统,国内镜像加速安装;
 长期会进化:跨会话记住你的项目、偏好与工作习惯,把解决过的问题沉淀为可复用 Skill,越用越懂你;
 工具超全面:支持 MCP、终端、文件、浏览器、图片、TTS 等 40 + 工具,可通过 cron 实现日报、备份、巡检等自动化;
 全平台在线:可接入QQ、微信、飞书、钉钉、Telegram、Discord 等消息网关,随时随地响应;
 模型全兼容:支持 Qwen、GLM、Kimi、MiniMax、Claude、Gemini 及 OpenAI 兼容接口、本地模型,适配国内网络。
HermesAgent官网:https://url.zeruns.com/HermesAgent
准备
我这里使用一台Linux系统的云服务器作为演示,你也可以用自己的 树莓派、Mac、小主机 等等设备来部署,但选用云服务器可能会更方便,比如你想做一个网站,你可以给他指令让他把网站写完后直接部署出来可以直接访问。
推荐一些云服务器:
- 雨云 香港五区大带宽VPS评测,2核2G 500兆 仅需19.6元/月:https://blog.zeruns.com/archives/932.html
- 酷鸭数据 香港VPS 性能测评,三网直连,2核2G 5M 仅需6.9元/月:https://blog.vpszj.cn/archives/2646.html
- 北少云 香港A区VPS,2核2G 10兆 仅需18元/月,三网直连:https://blog.zeruns.com/archives/933.html
- 其他性价比高的服务器推荐:https://blog.vpszj.cn/archives/41.html
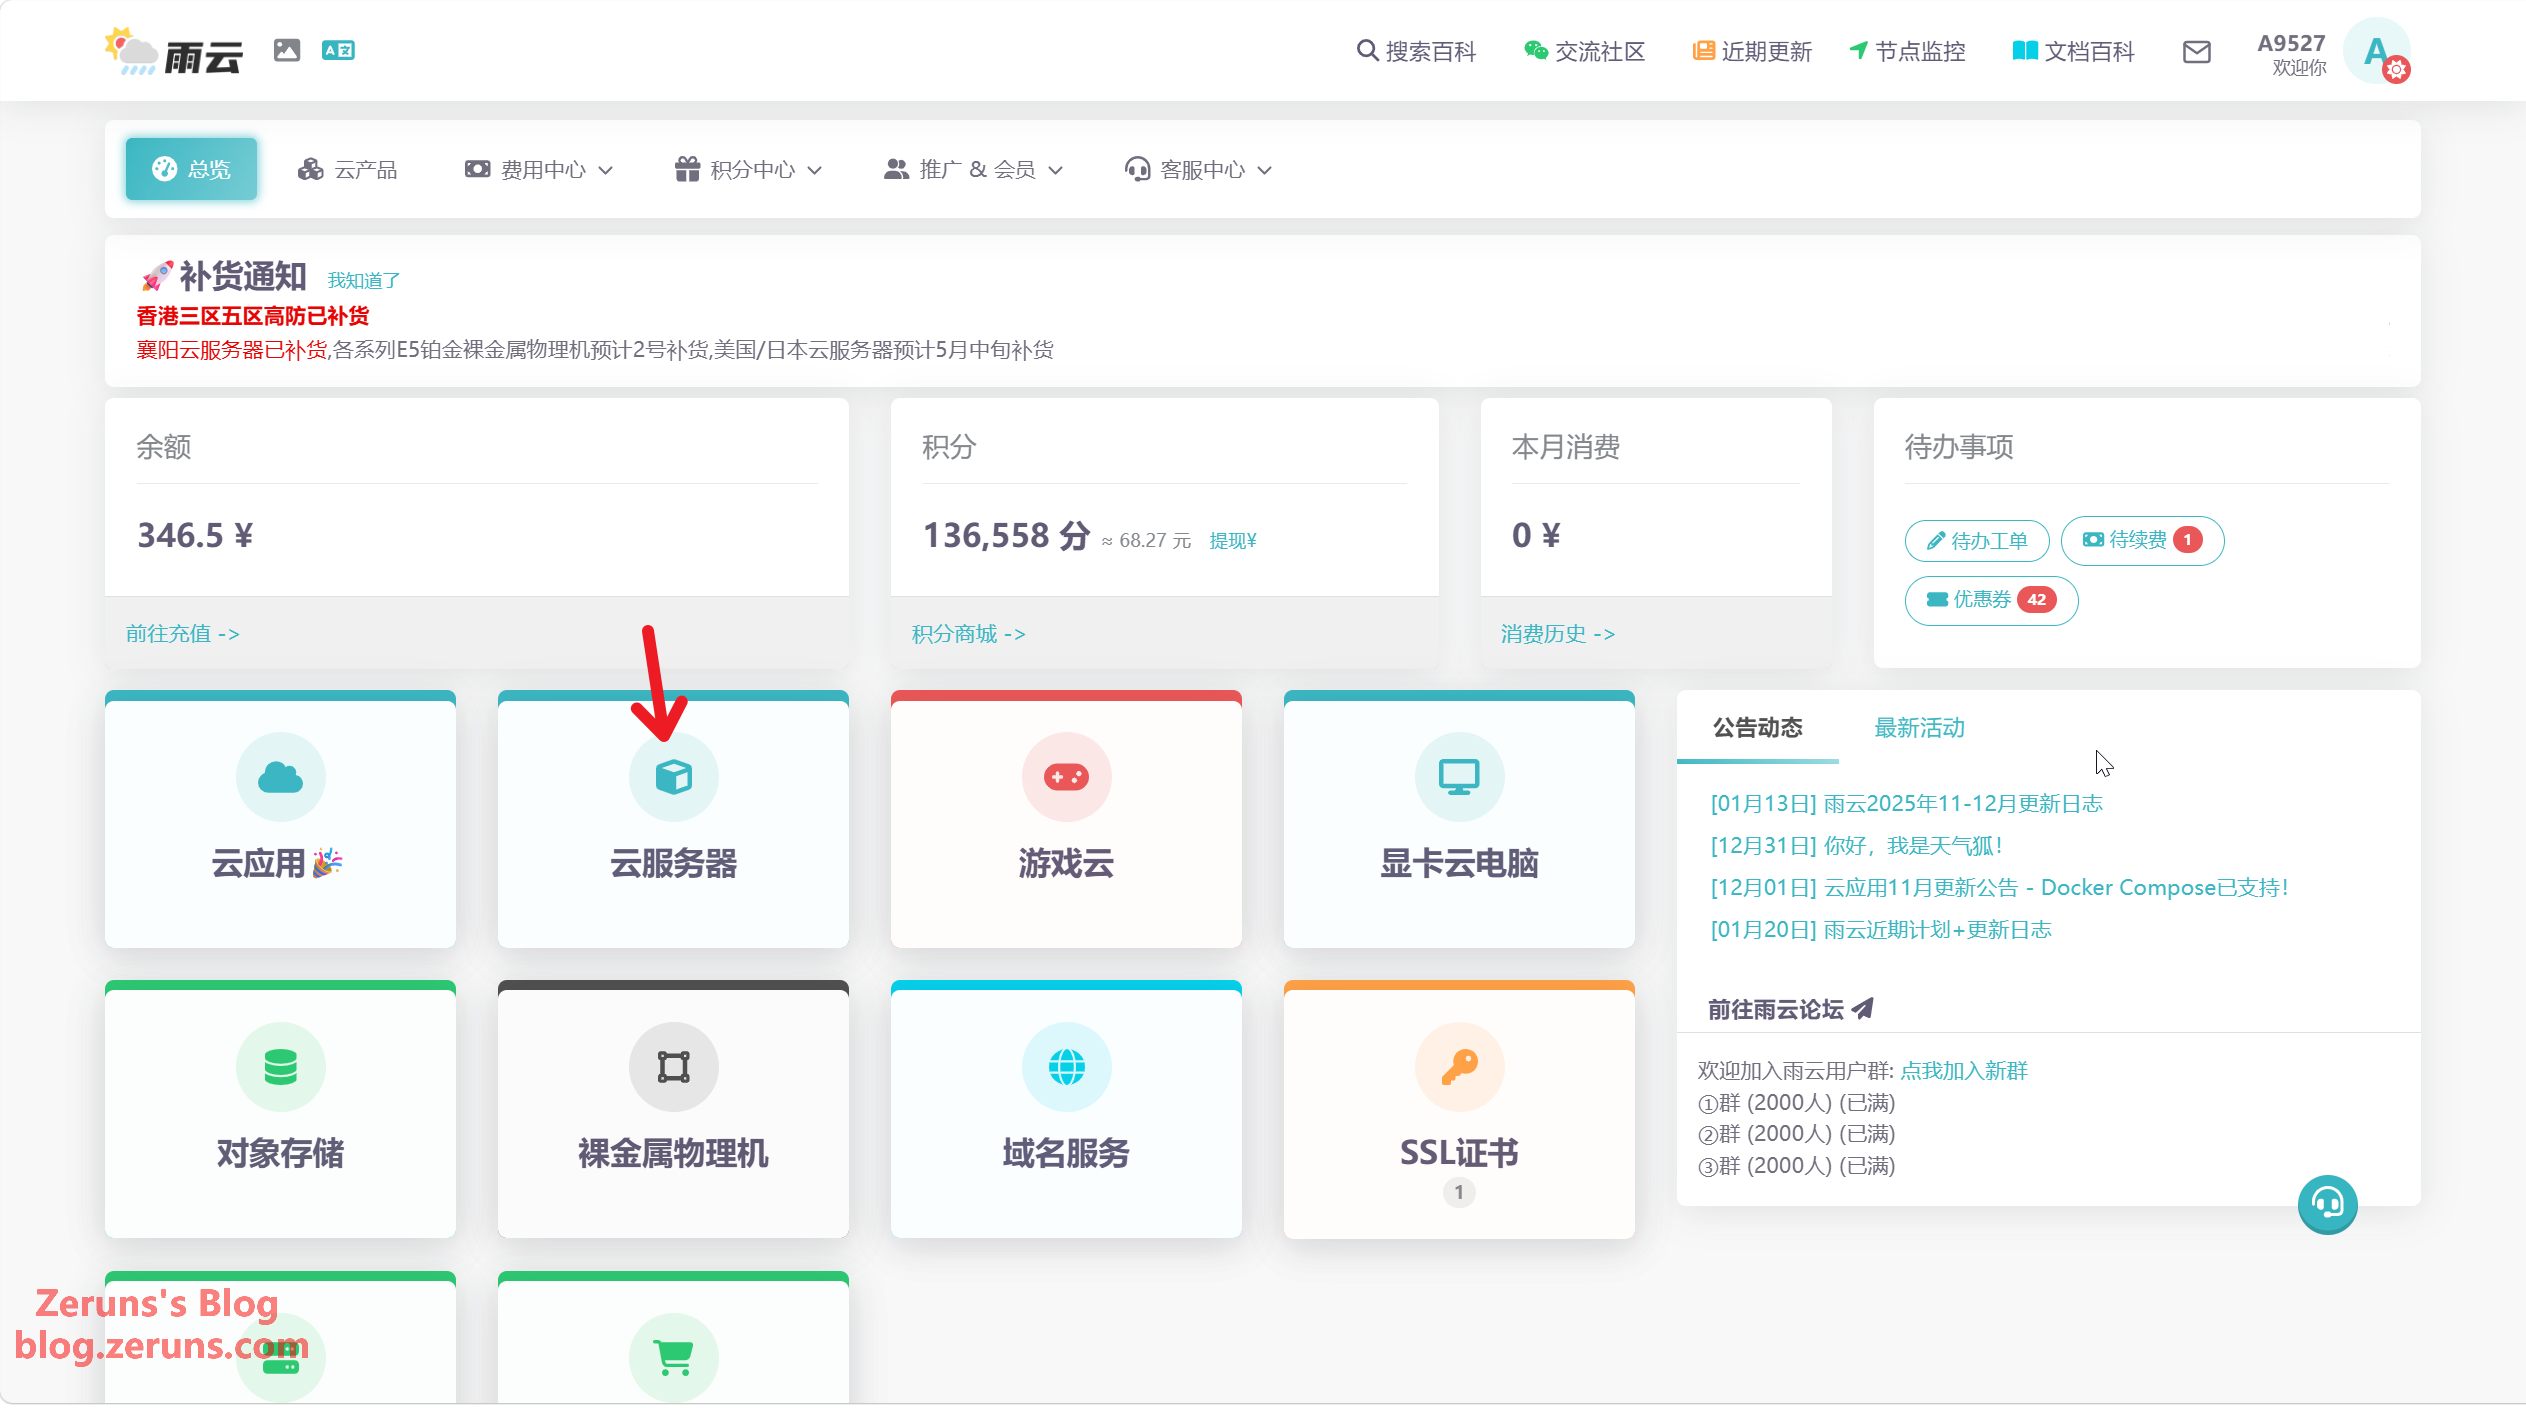
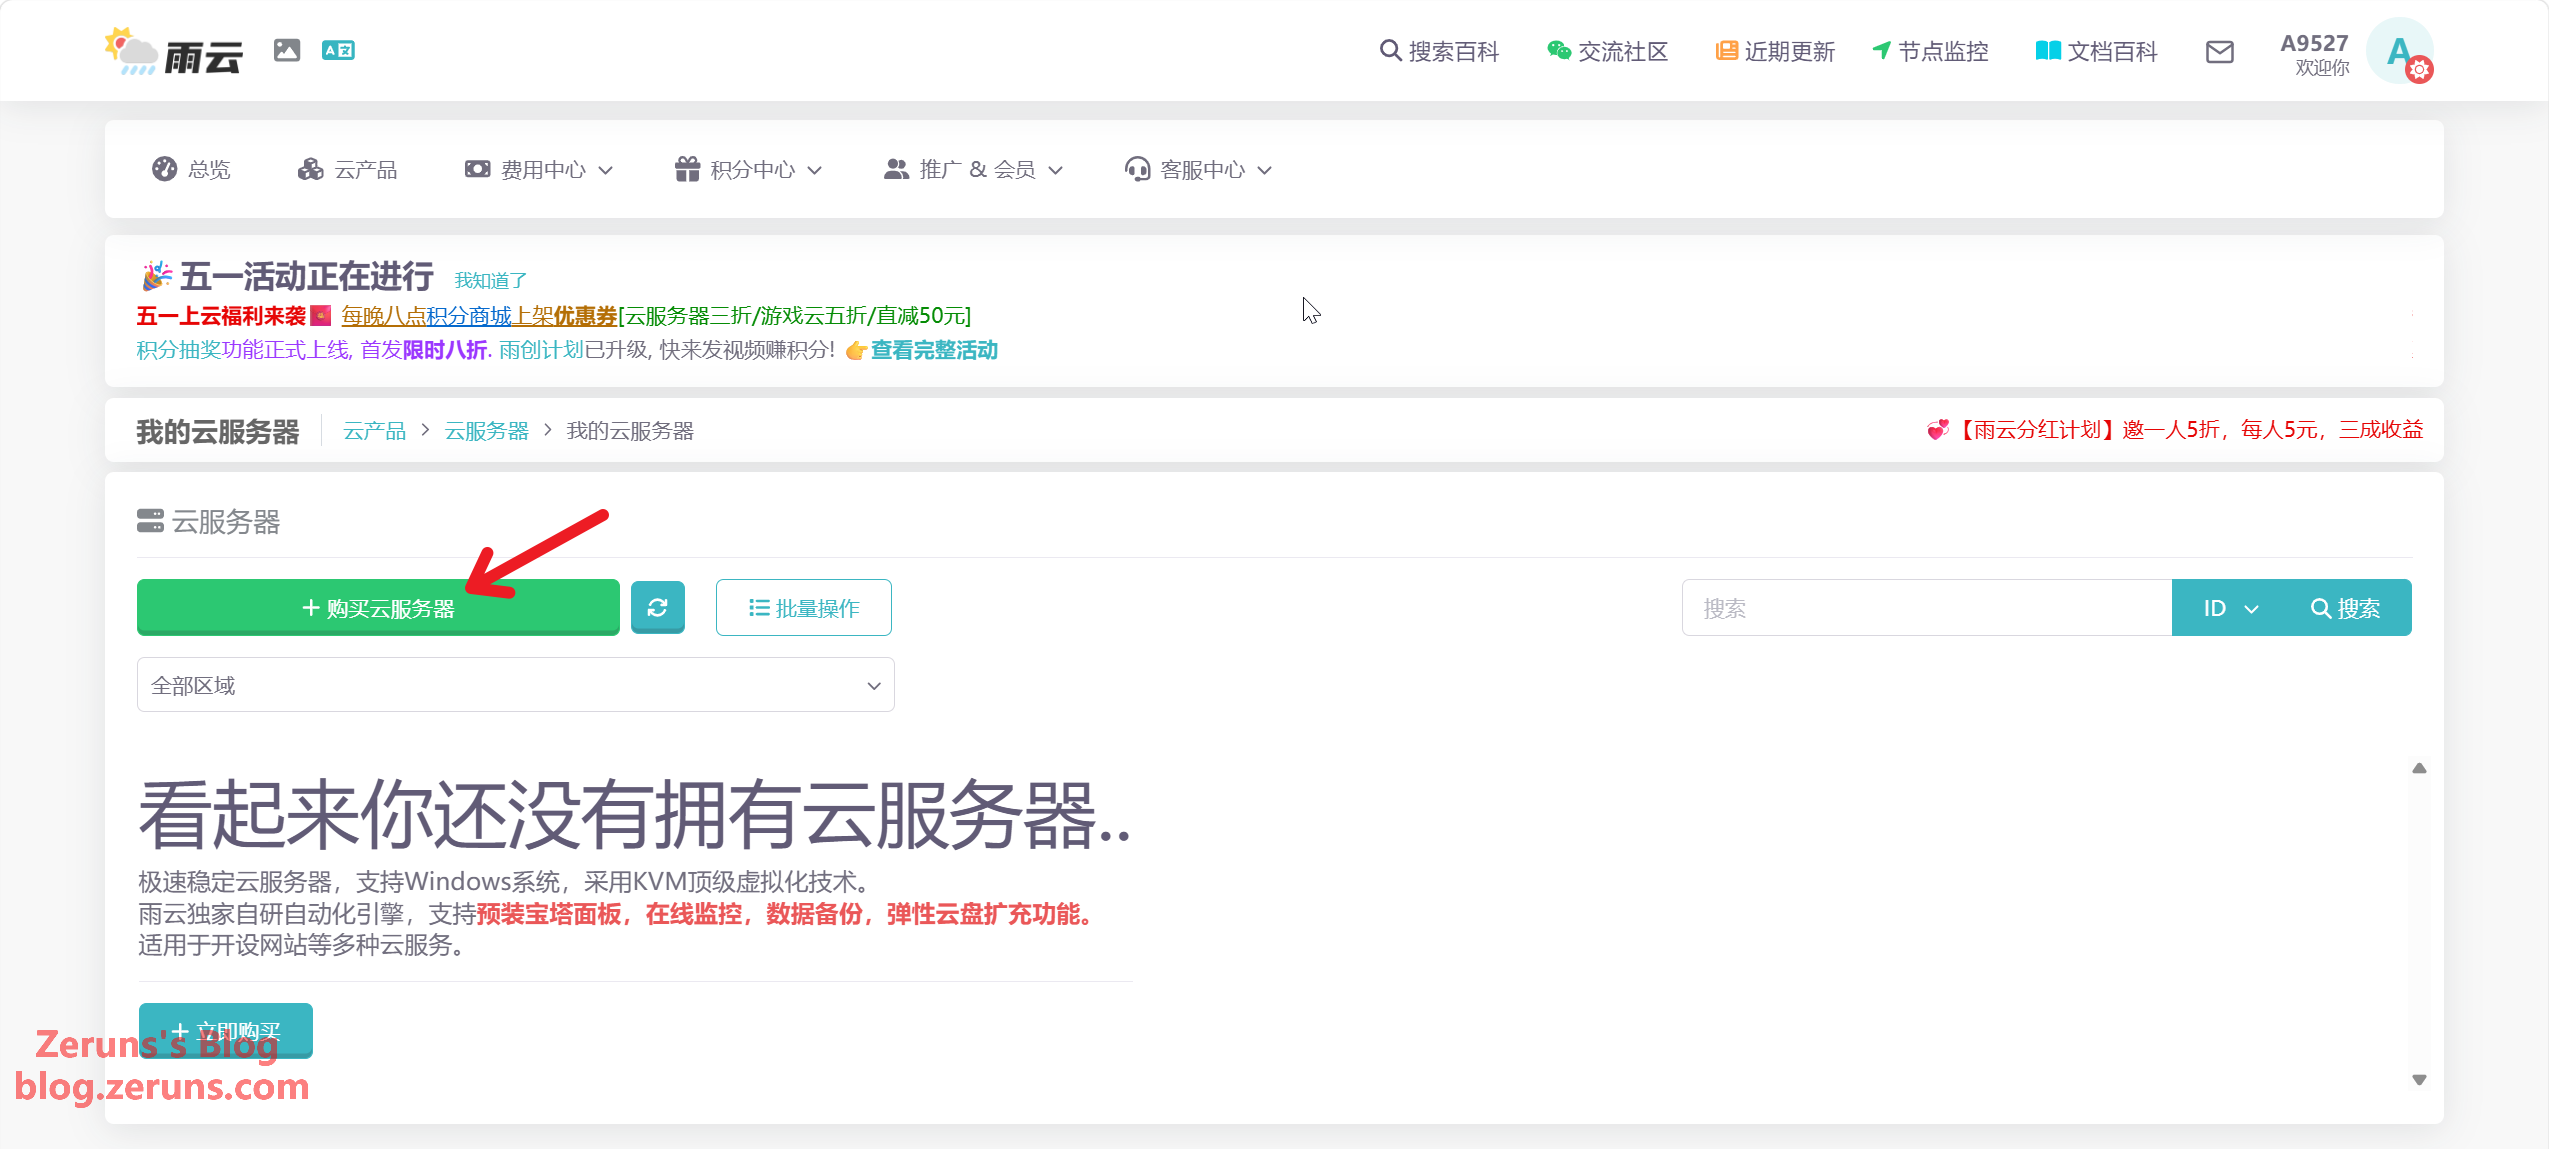
我这里用雨云的云服务器作为教程演示,首先通过下面的优惠链接或优惠码(zeruns)注册雨云账号,注册好后登陆进到控制台,点击 云服务器→购买云服务器
- 雨云优惠注册地址:https://rain.zeruns.com/?s=eeclub
- 雨云优惠码:zeruns
- 使用优惠码注册可获得首月5折优惠券,还可在积分商城领取专属8折新购券,8折券可叠加官方的年付7折优惠,也就是5.6折。
接着根据自己需求选择服务器地区和配置,我这里选香港二区,2核2G的配置,如果需要搭网站的建议选香港/日本/美国,无需备案。
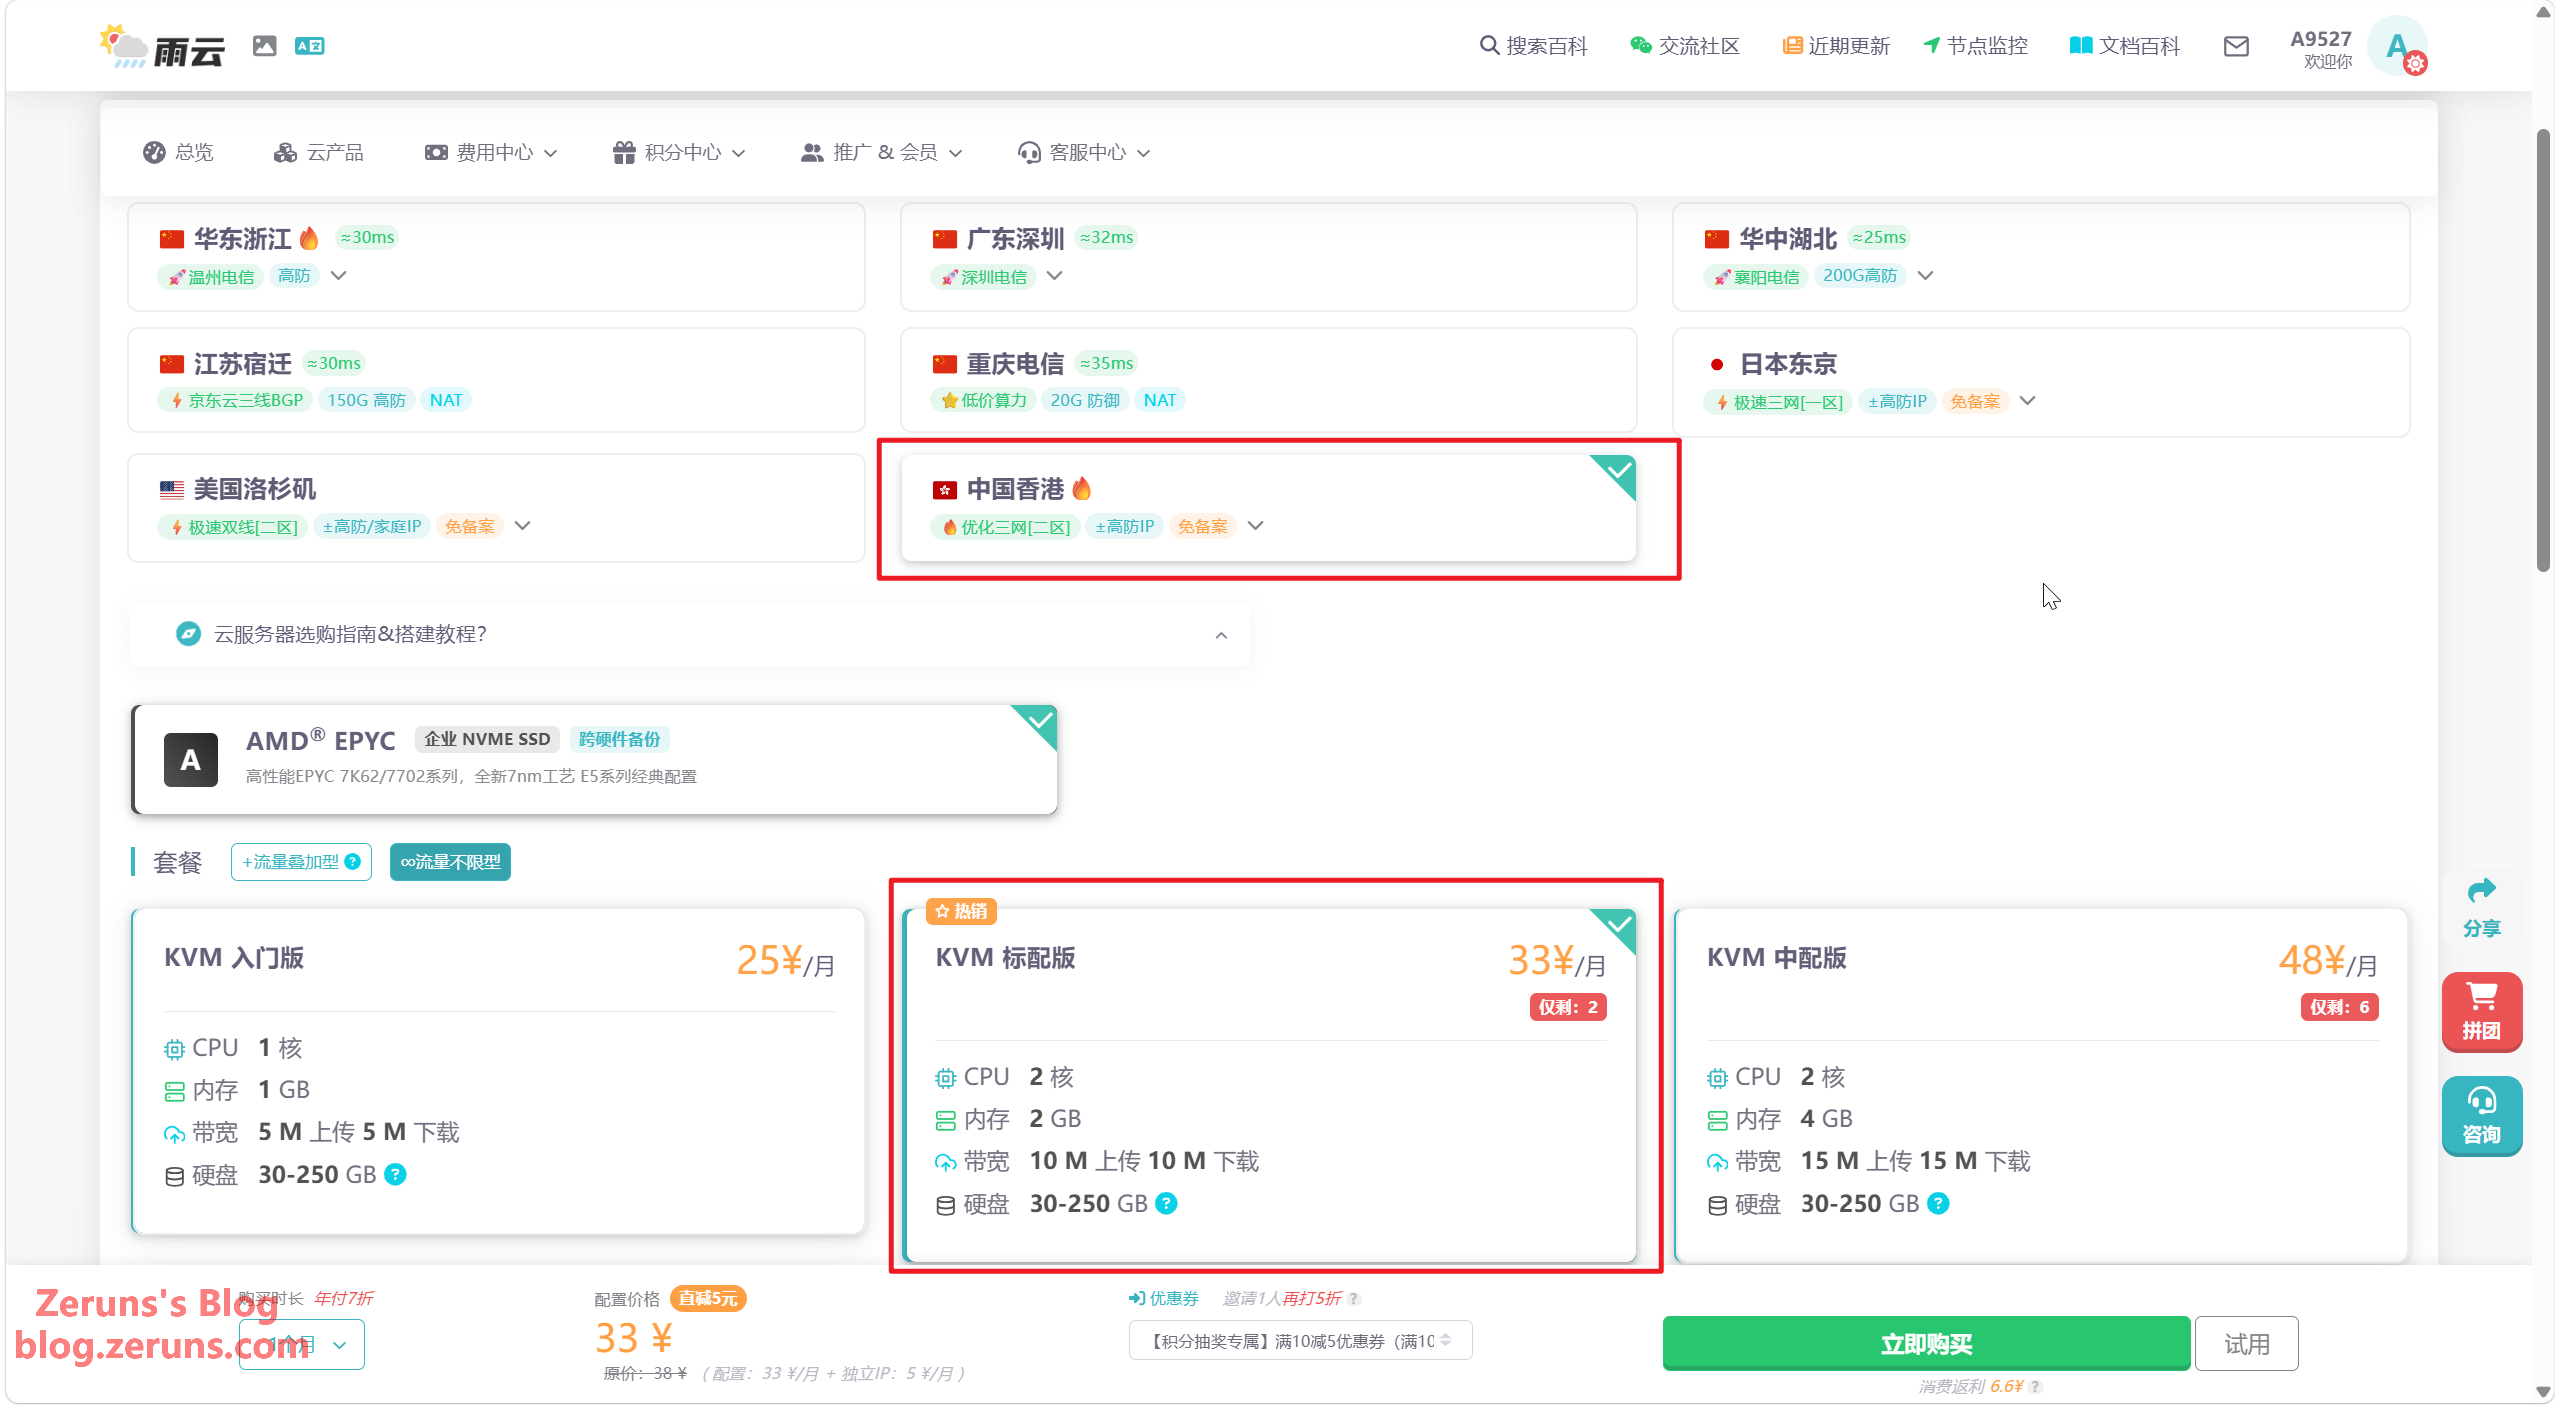
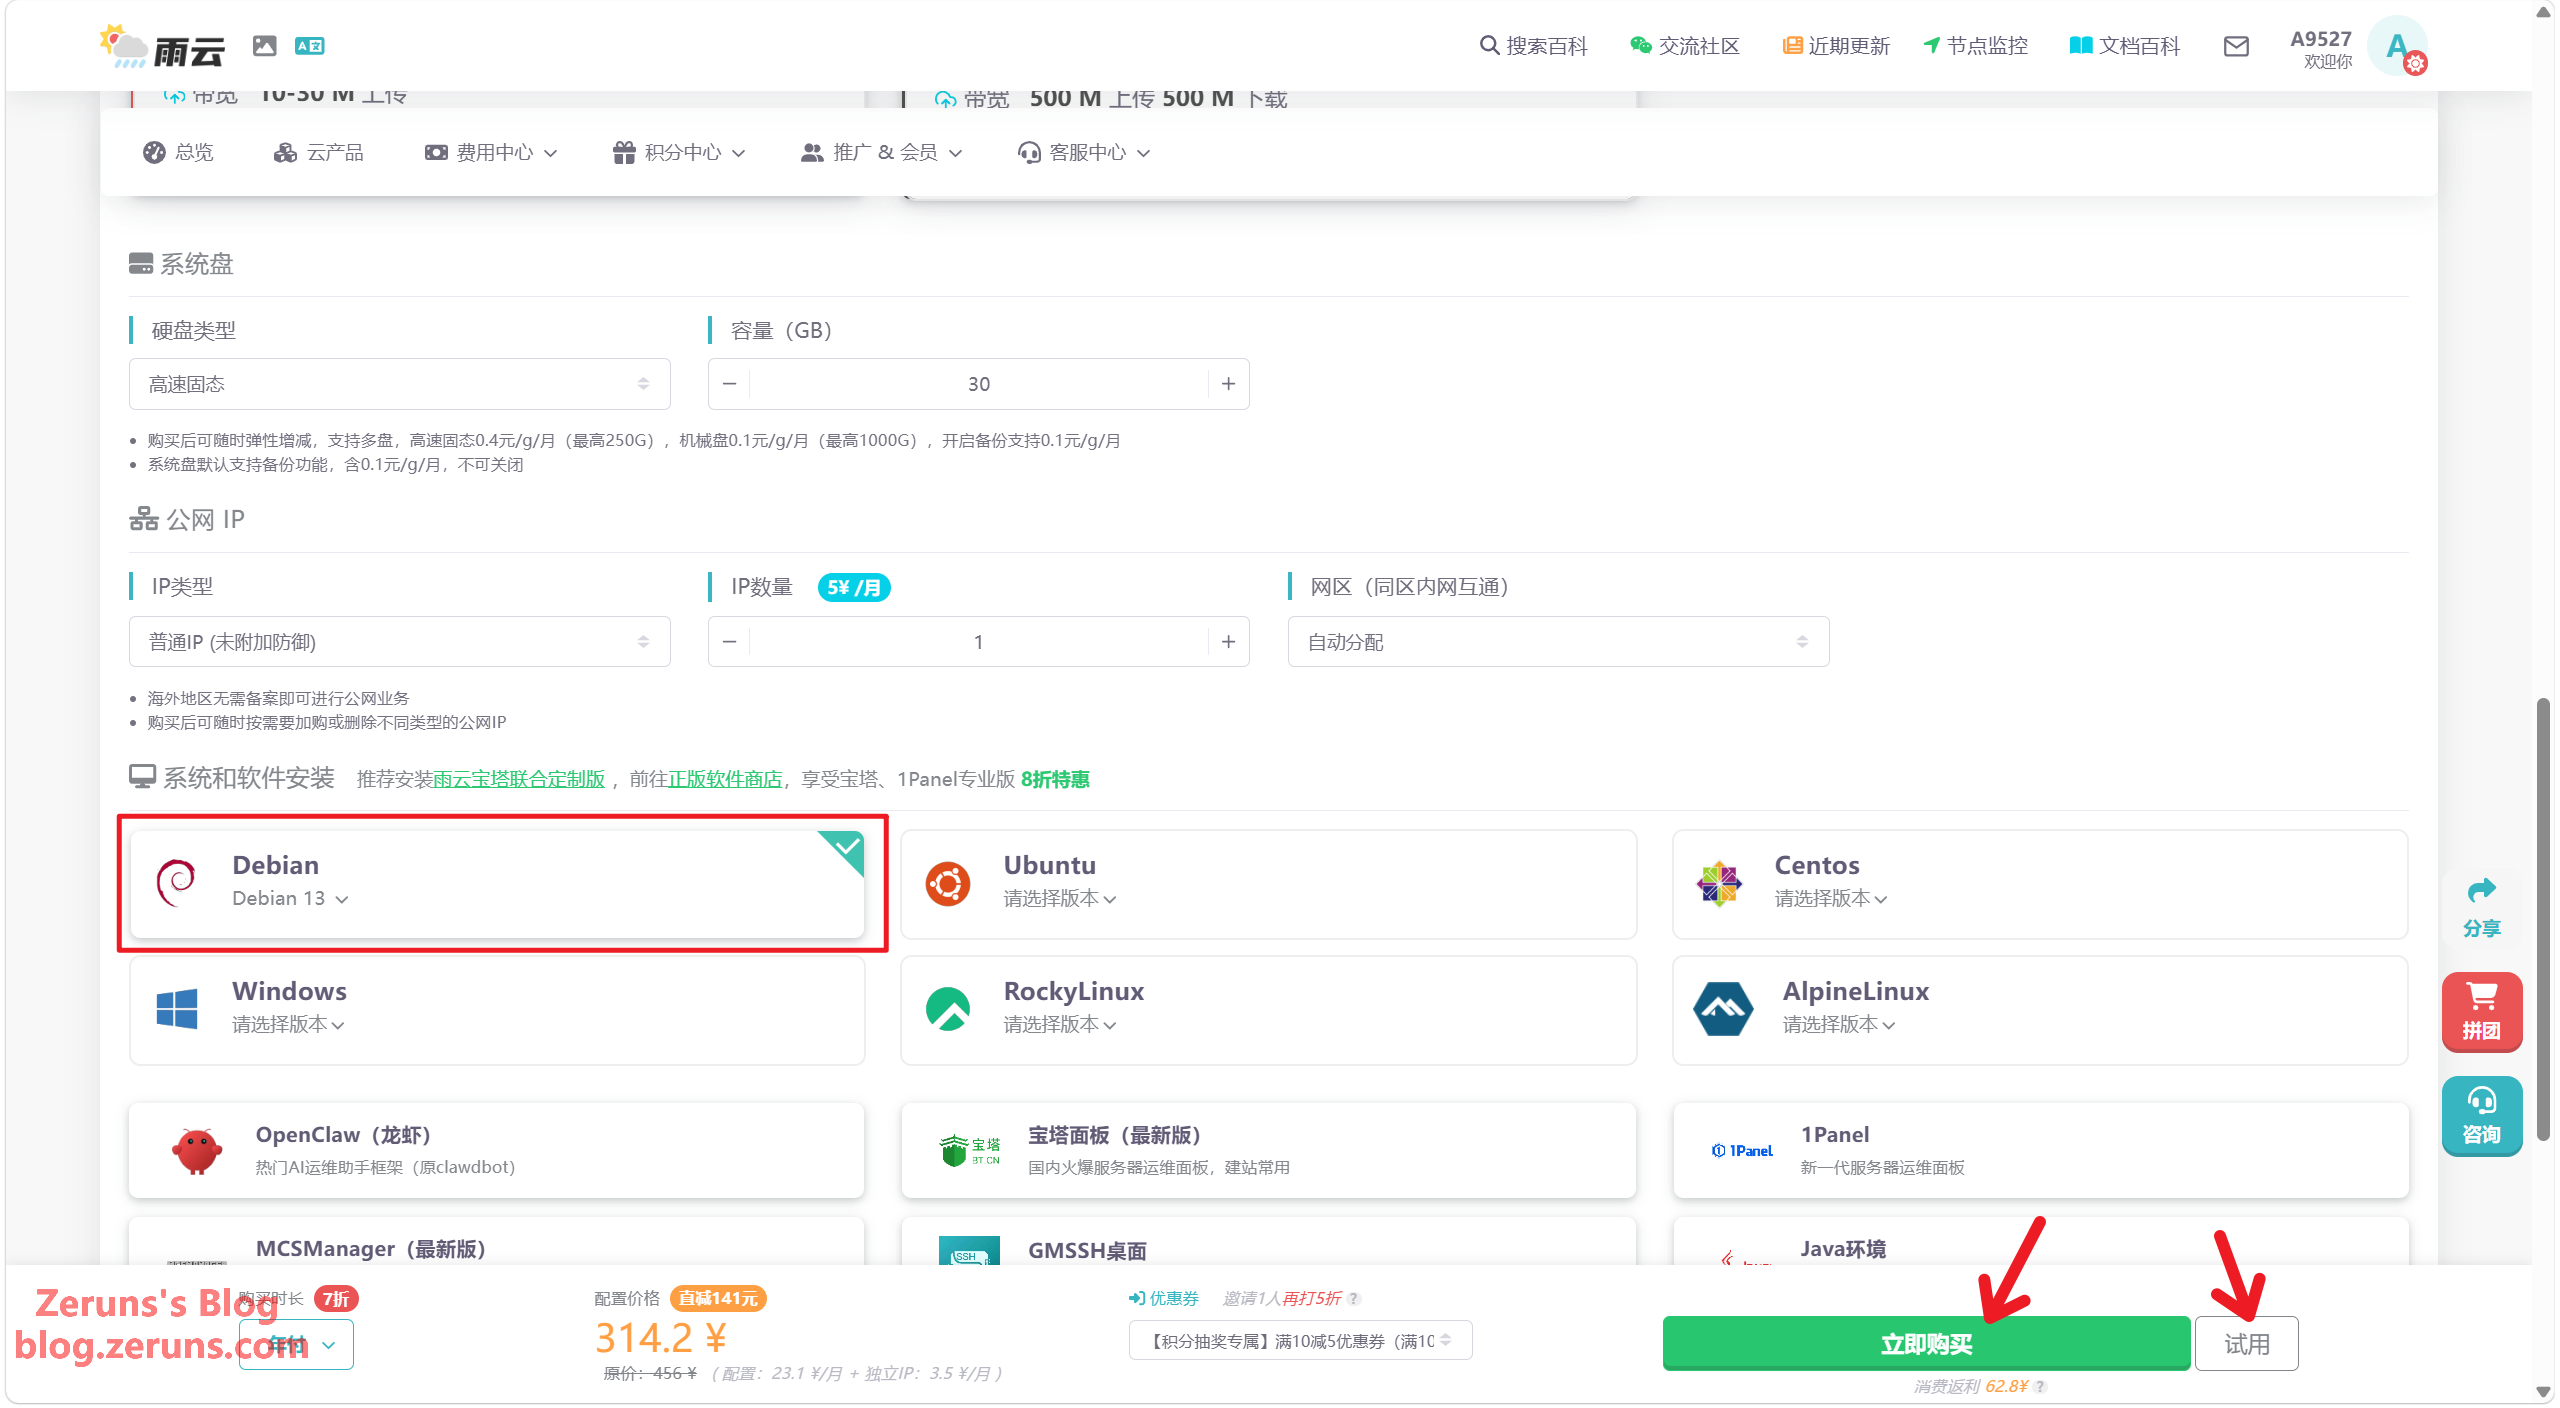
系统选Debian13,选好后点击立即购买或试用,可以1元试用1天。
购买后即可在我的云服务器这里看到你买的云服务器,点击管理。
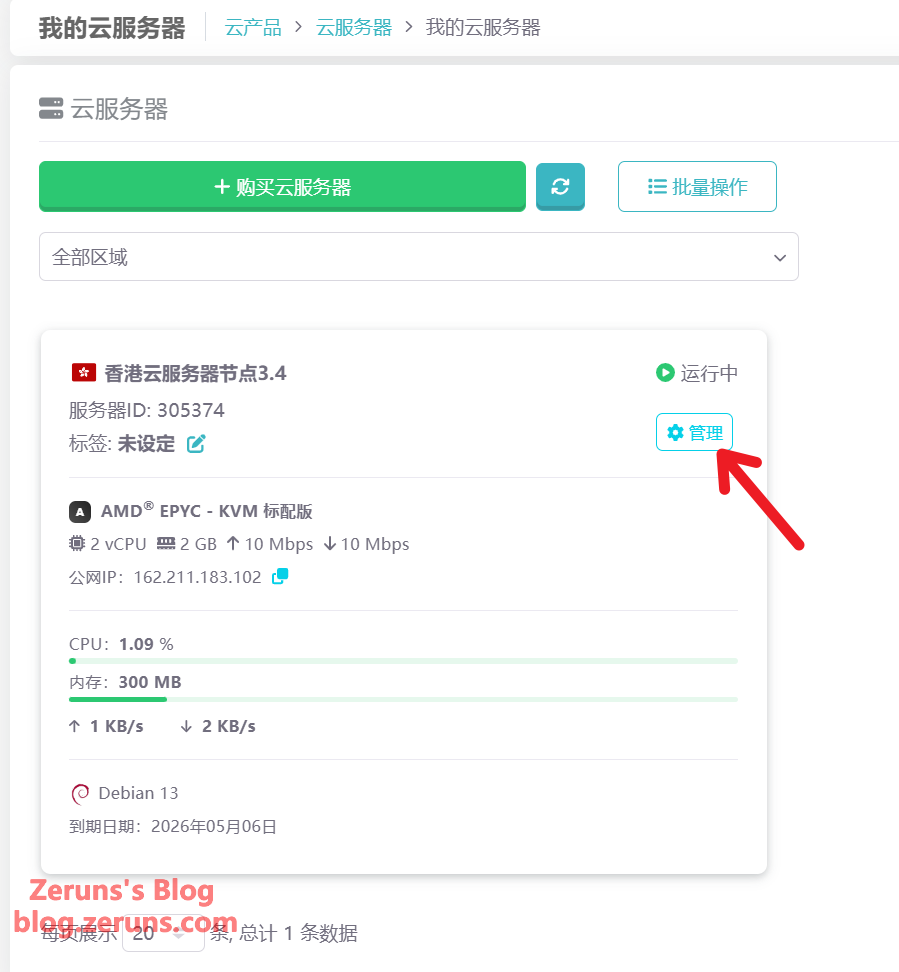
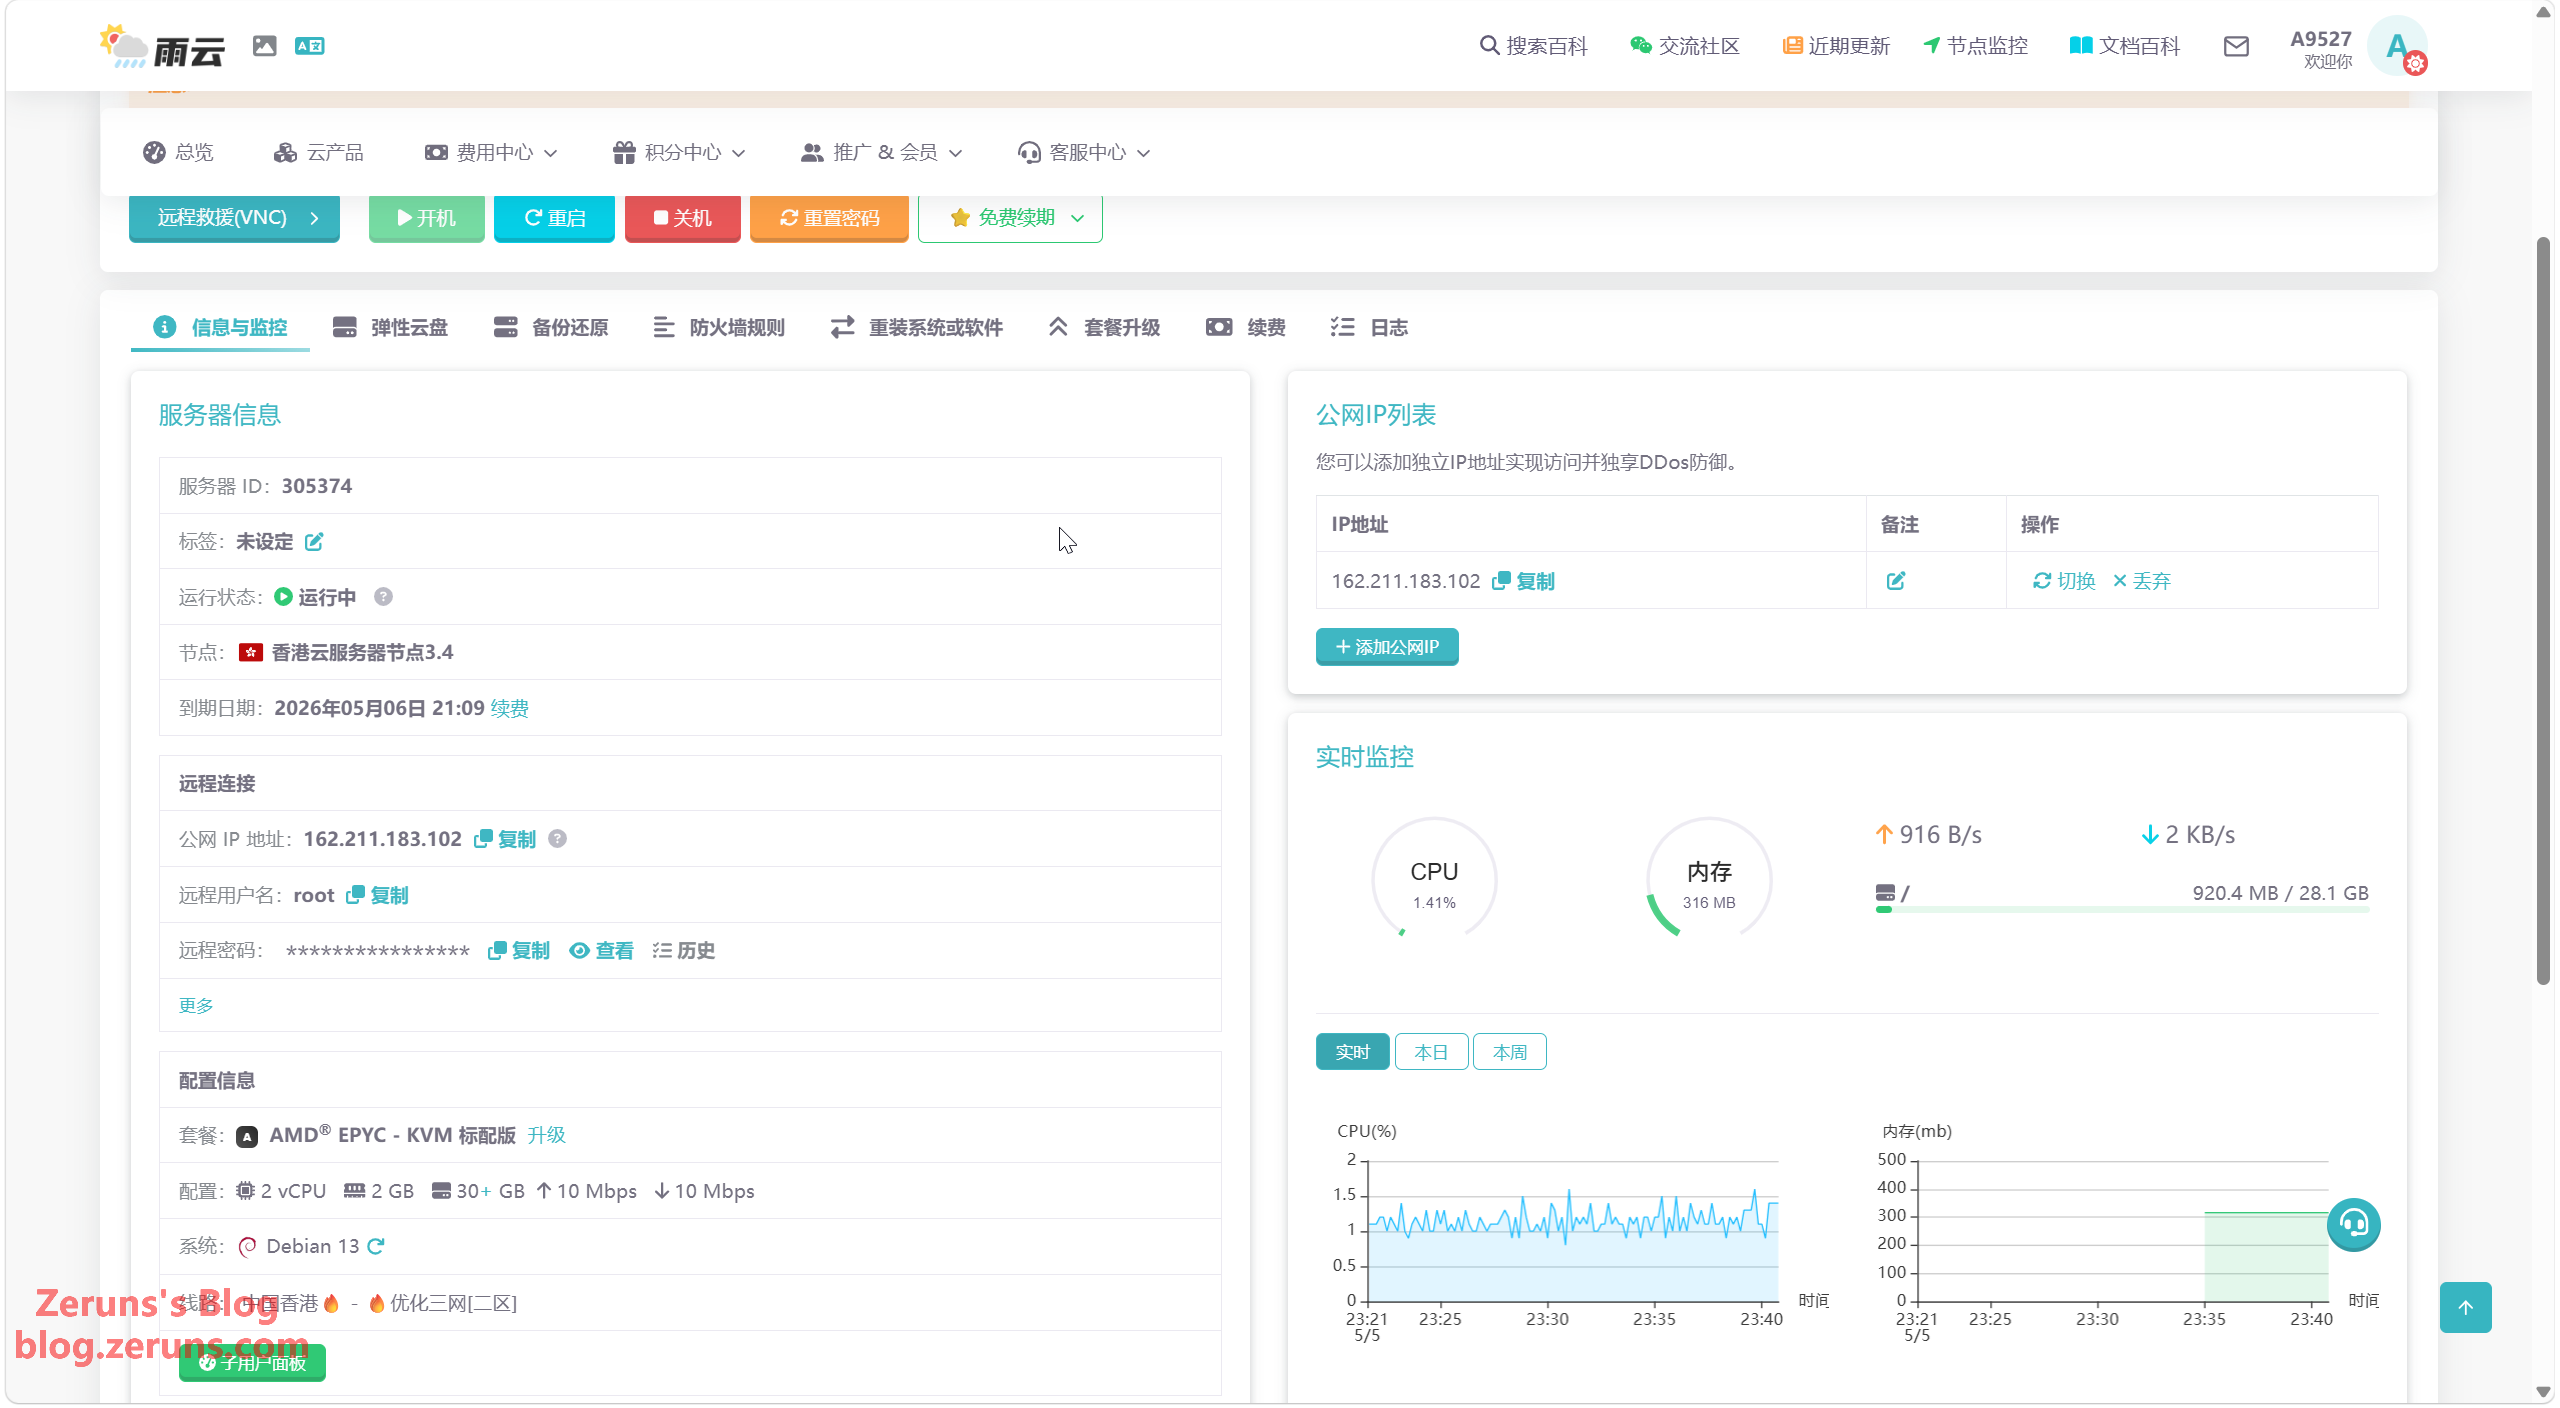
接着就可以看到云服务器的信息了,在这里重装/切换系统,可以升级配置。等待服务器创建完成就可以进行下一步了。
接着需要等待服务器创建完成,在这期间我们可以先准备一下大模型平台的API,我这里推荐几个平台:
- Ucloud AstraFlow:https://url.vpszj.cn/uc_astraflow
- 阿里云(此链接可领9折优惠券):https://url.vpszj.cn/alicloud
- 硅基流动(此链接注册送16元代金券):https://url.vpszj.cn/siliconflow
- 各家ai大模型api平台推荐与简介:https://bbs.eeclub.top/t/ai-api-2026-6-9/388
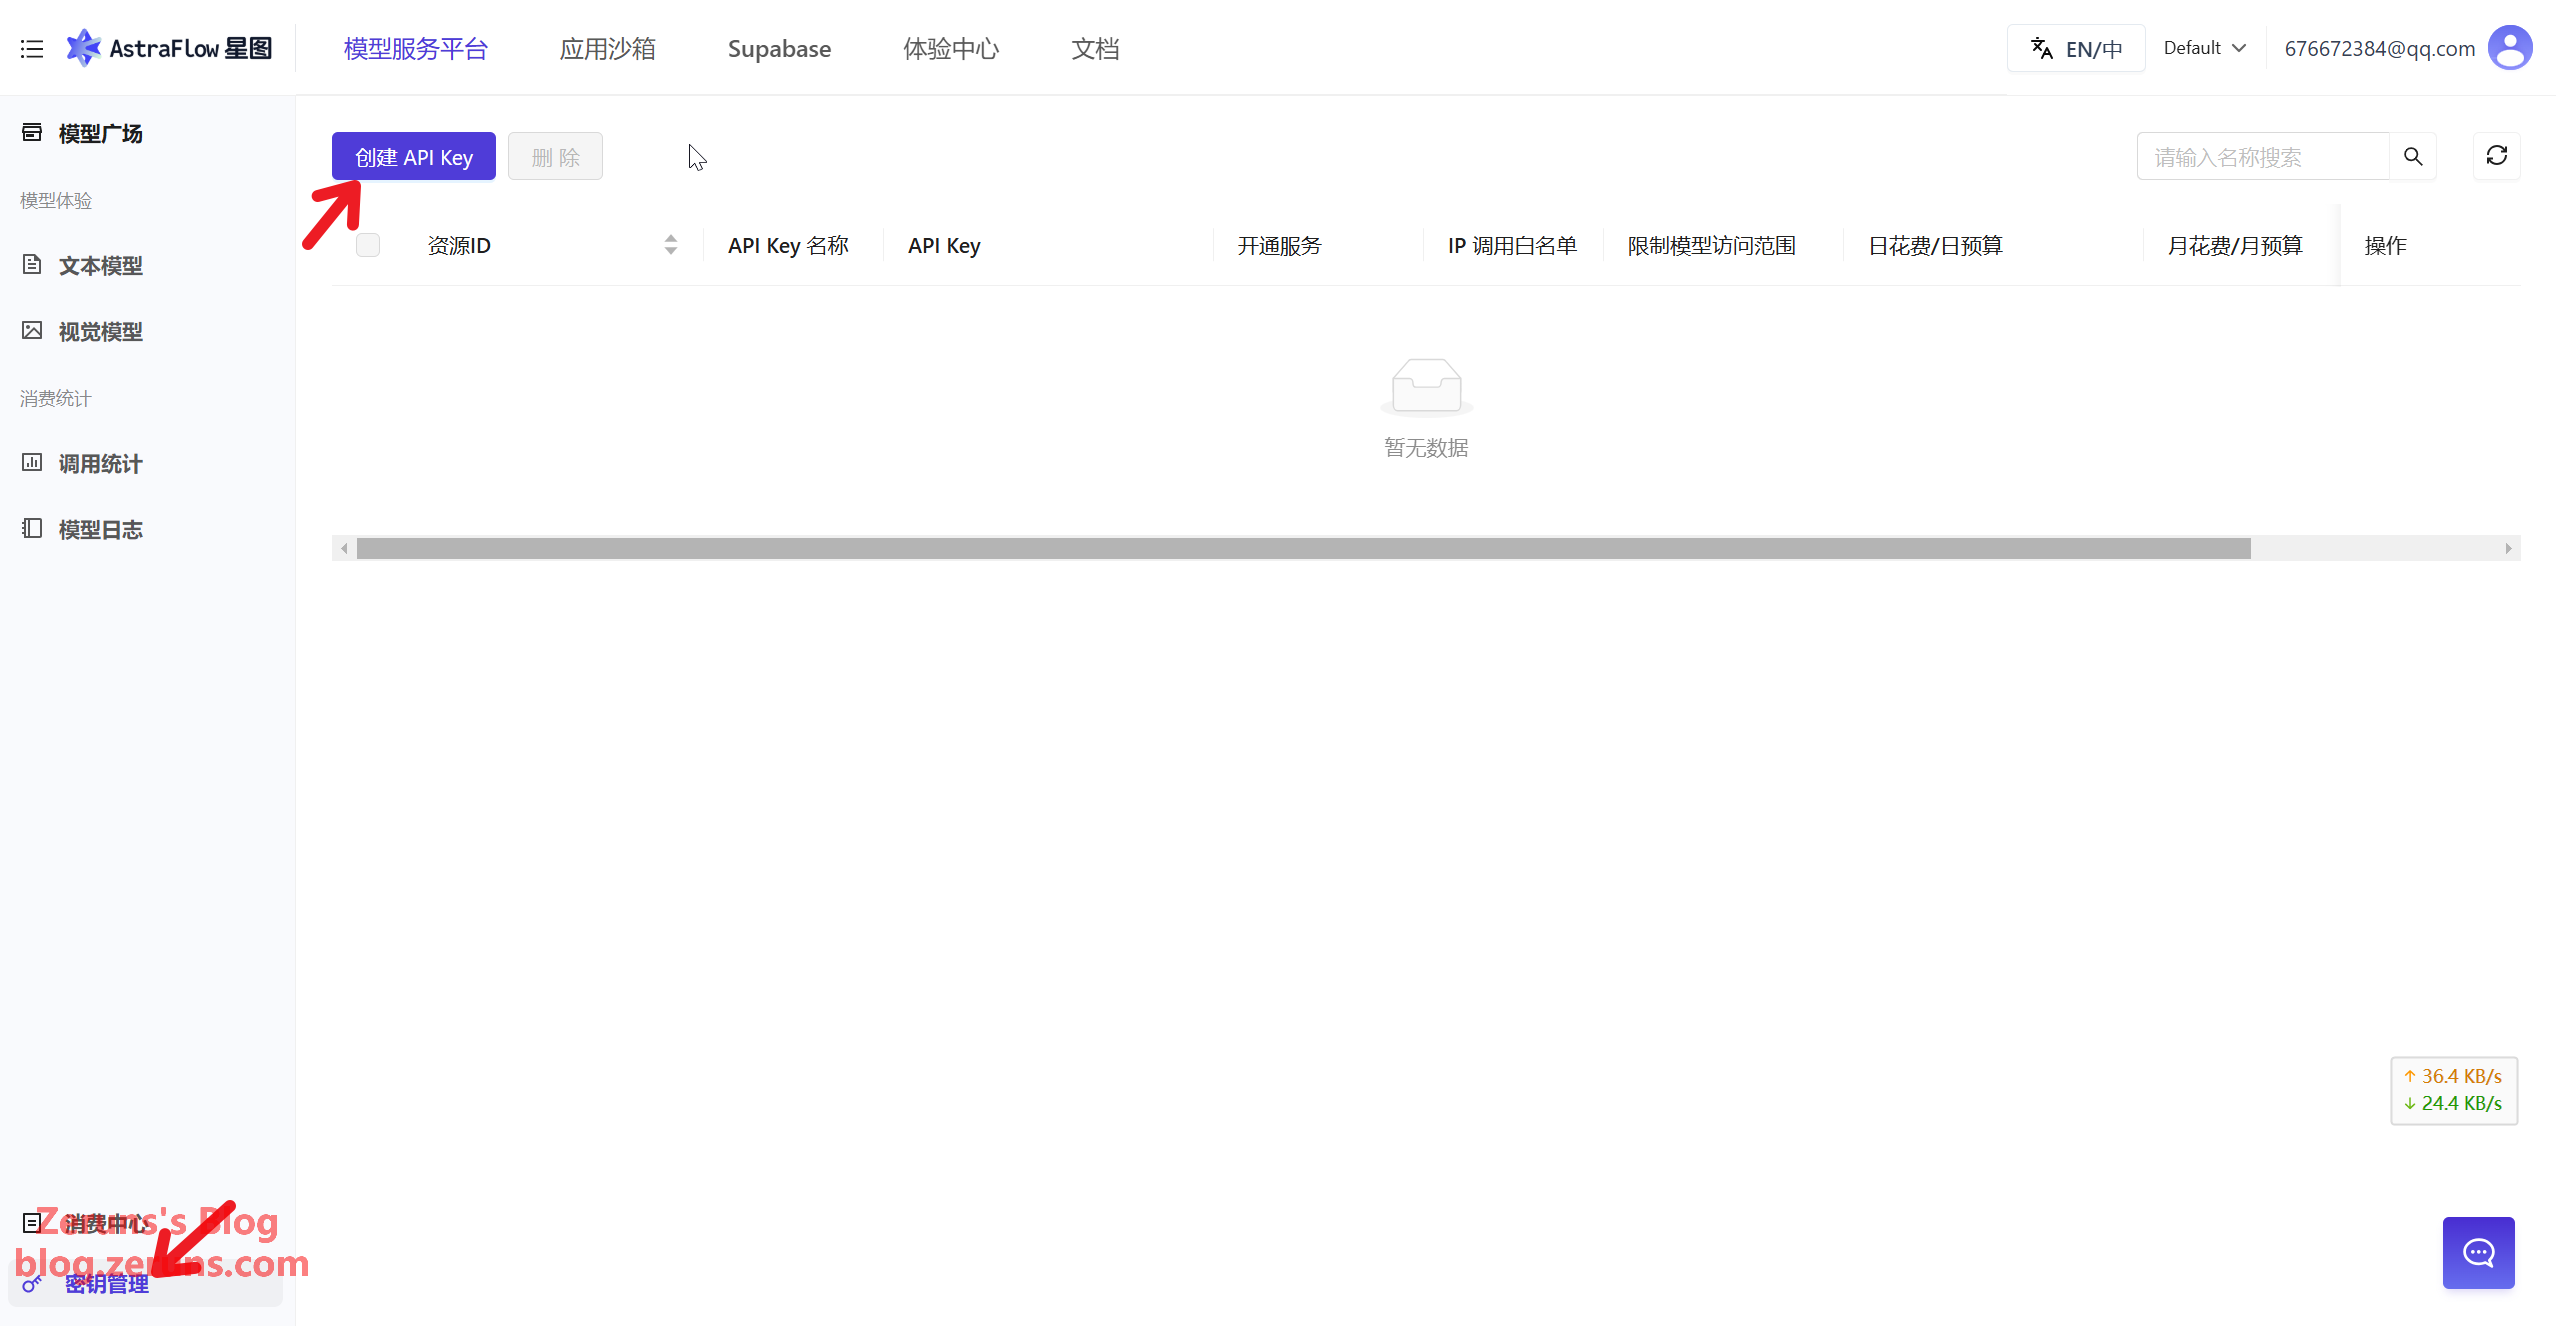
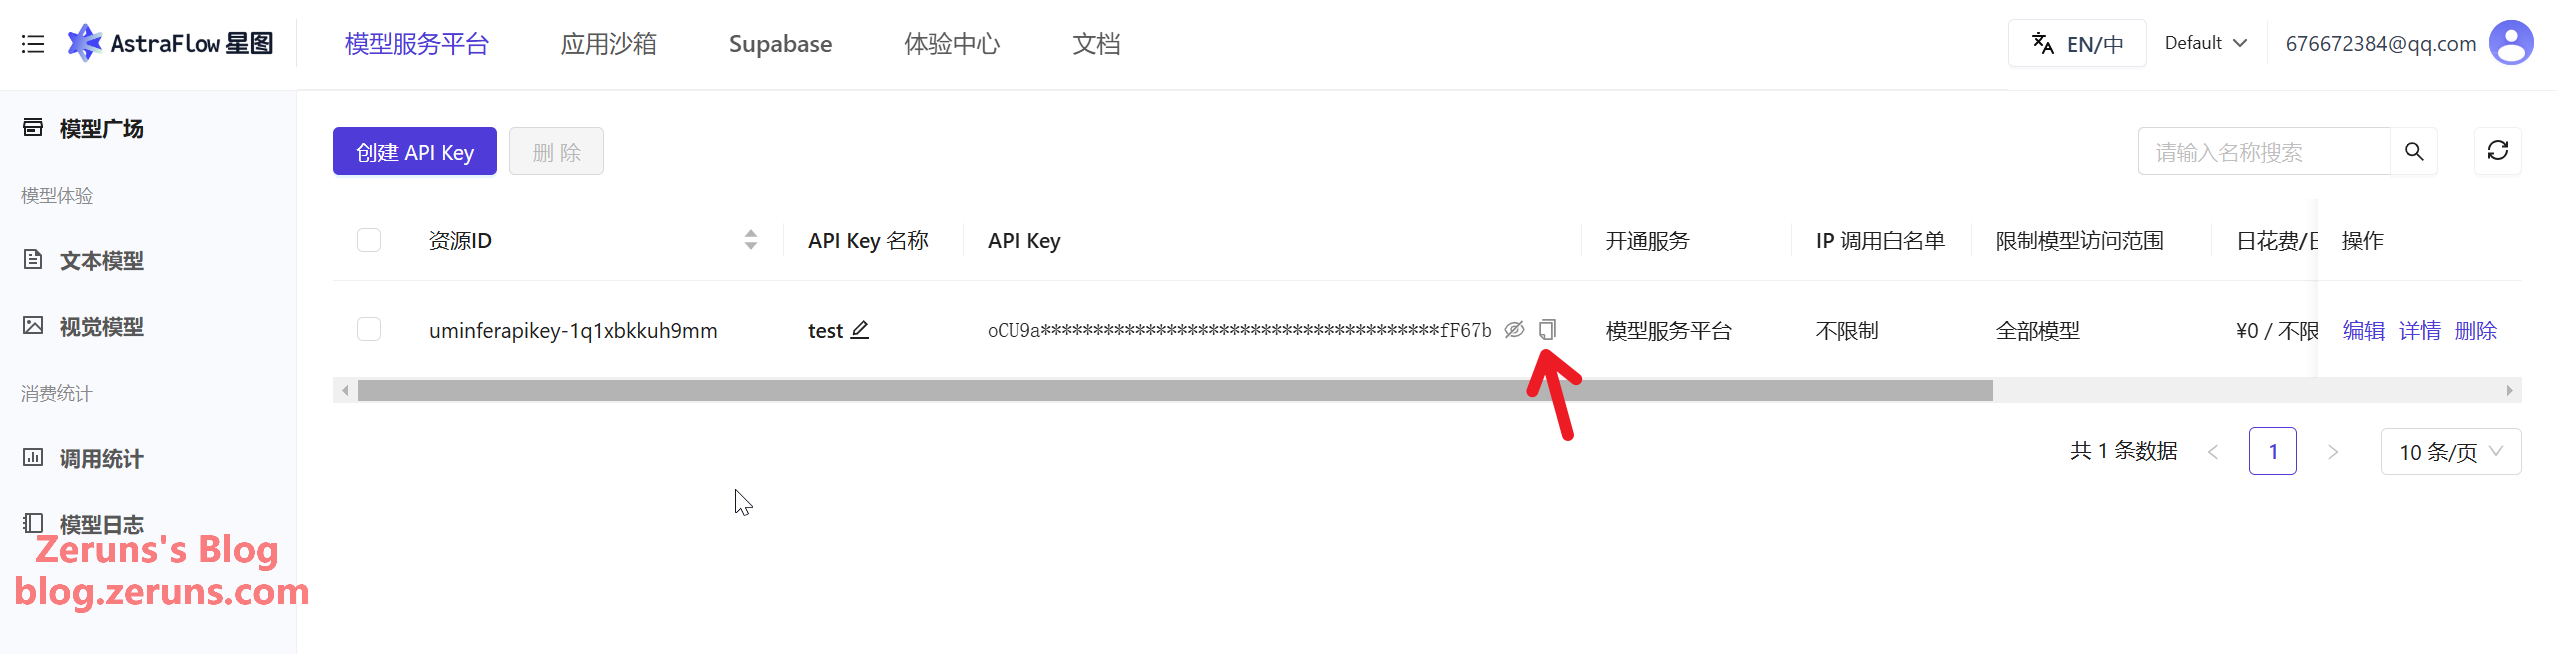
我这里用Ucloud的AstraFlow星图平台来演示,通过下面链接注册后进入到Ucloud星图平台,点击左下角的密钥管理,点击创建 API Key。
- Ucloud优惠注册链接:https://url.vpszj.cn/uc
- 通过优惠链接注册送50万token
API Key 名称 自己设置一个,还可以设置预算上限,其他默认就行,最后点击确定。
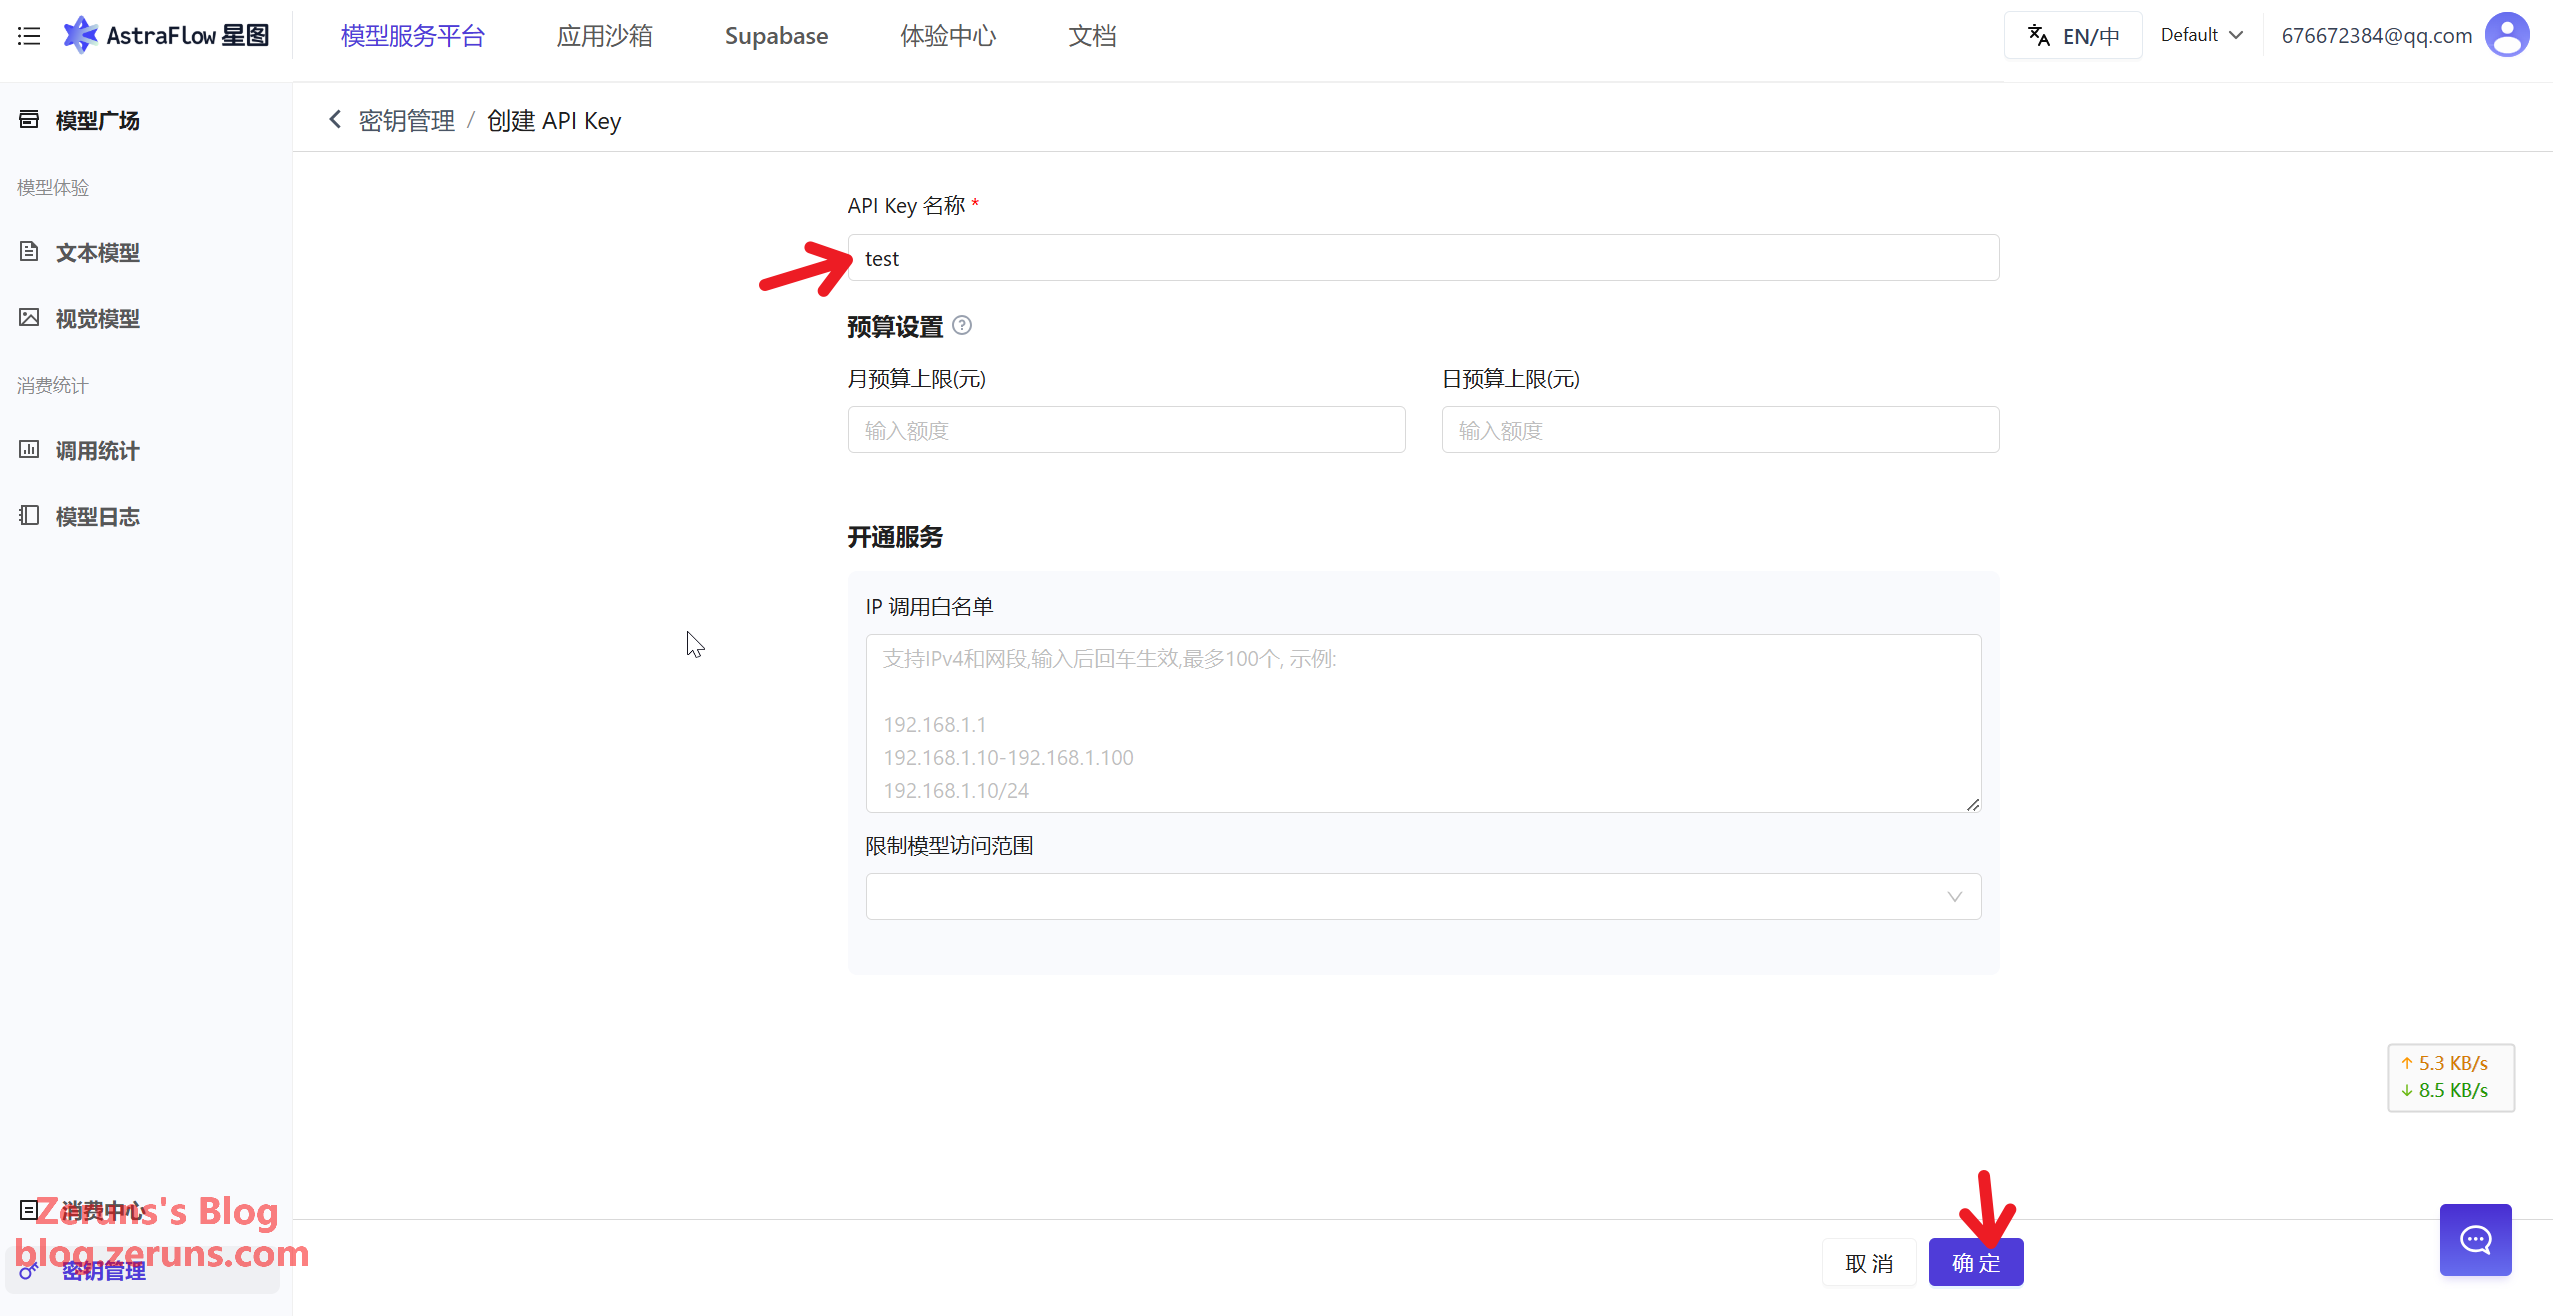
接着可以复制保存一下这个API Key,等下安装Hermes时需要用到,其他平台也是差不多的流程。
连接服务器
下载安装并打开ssh客户端软件,ssh客户端软件推荐putty或mobaxterm。
SSH客户端软件下载地址:https://www.123pan.com/ps/2Y9Djv-UAtvH.html
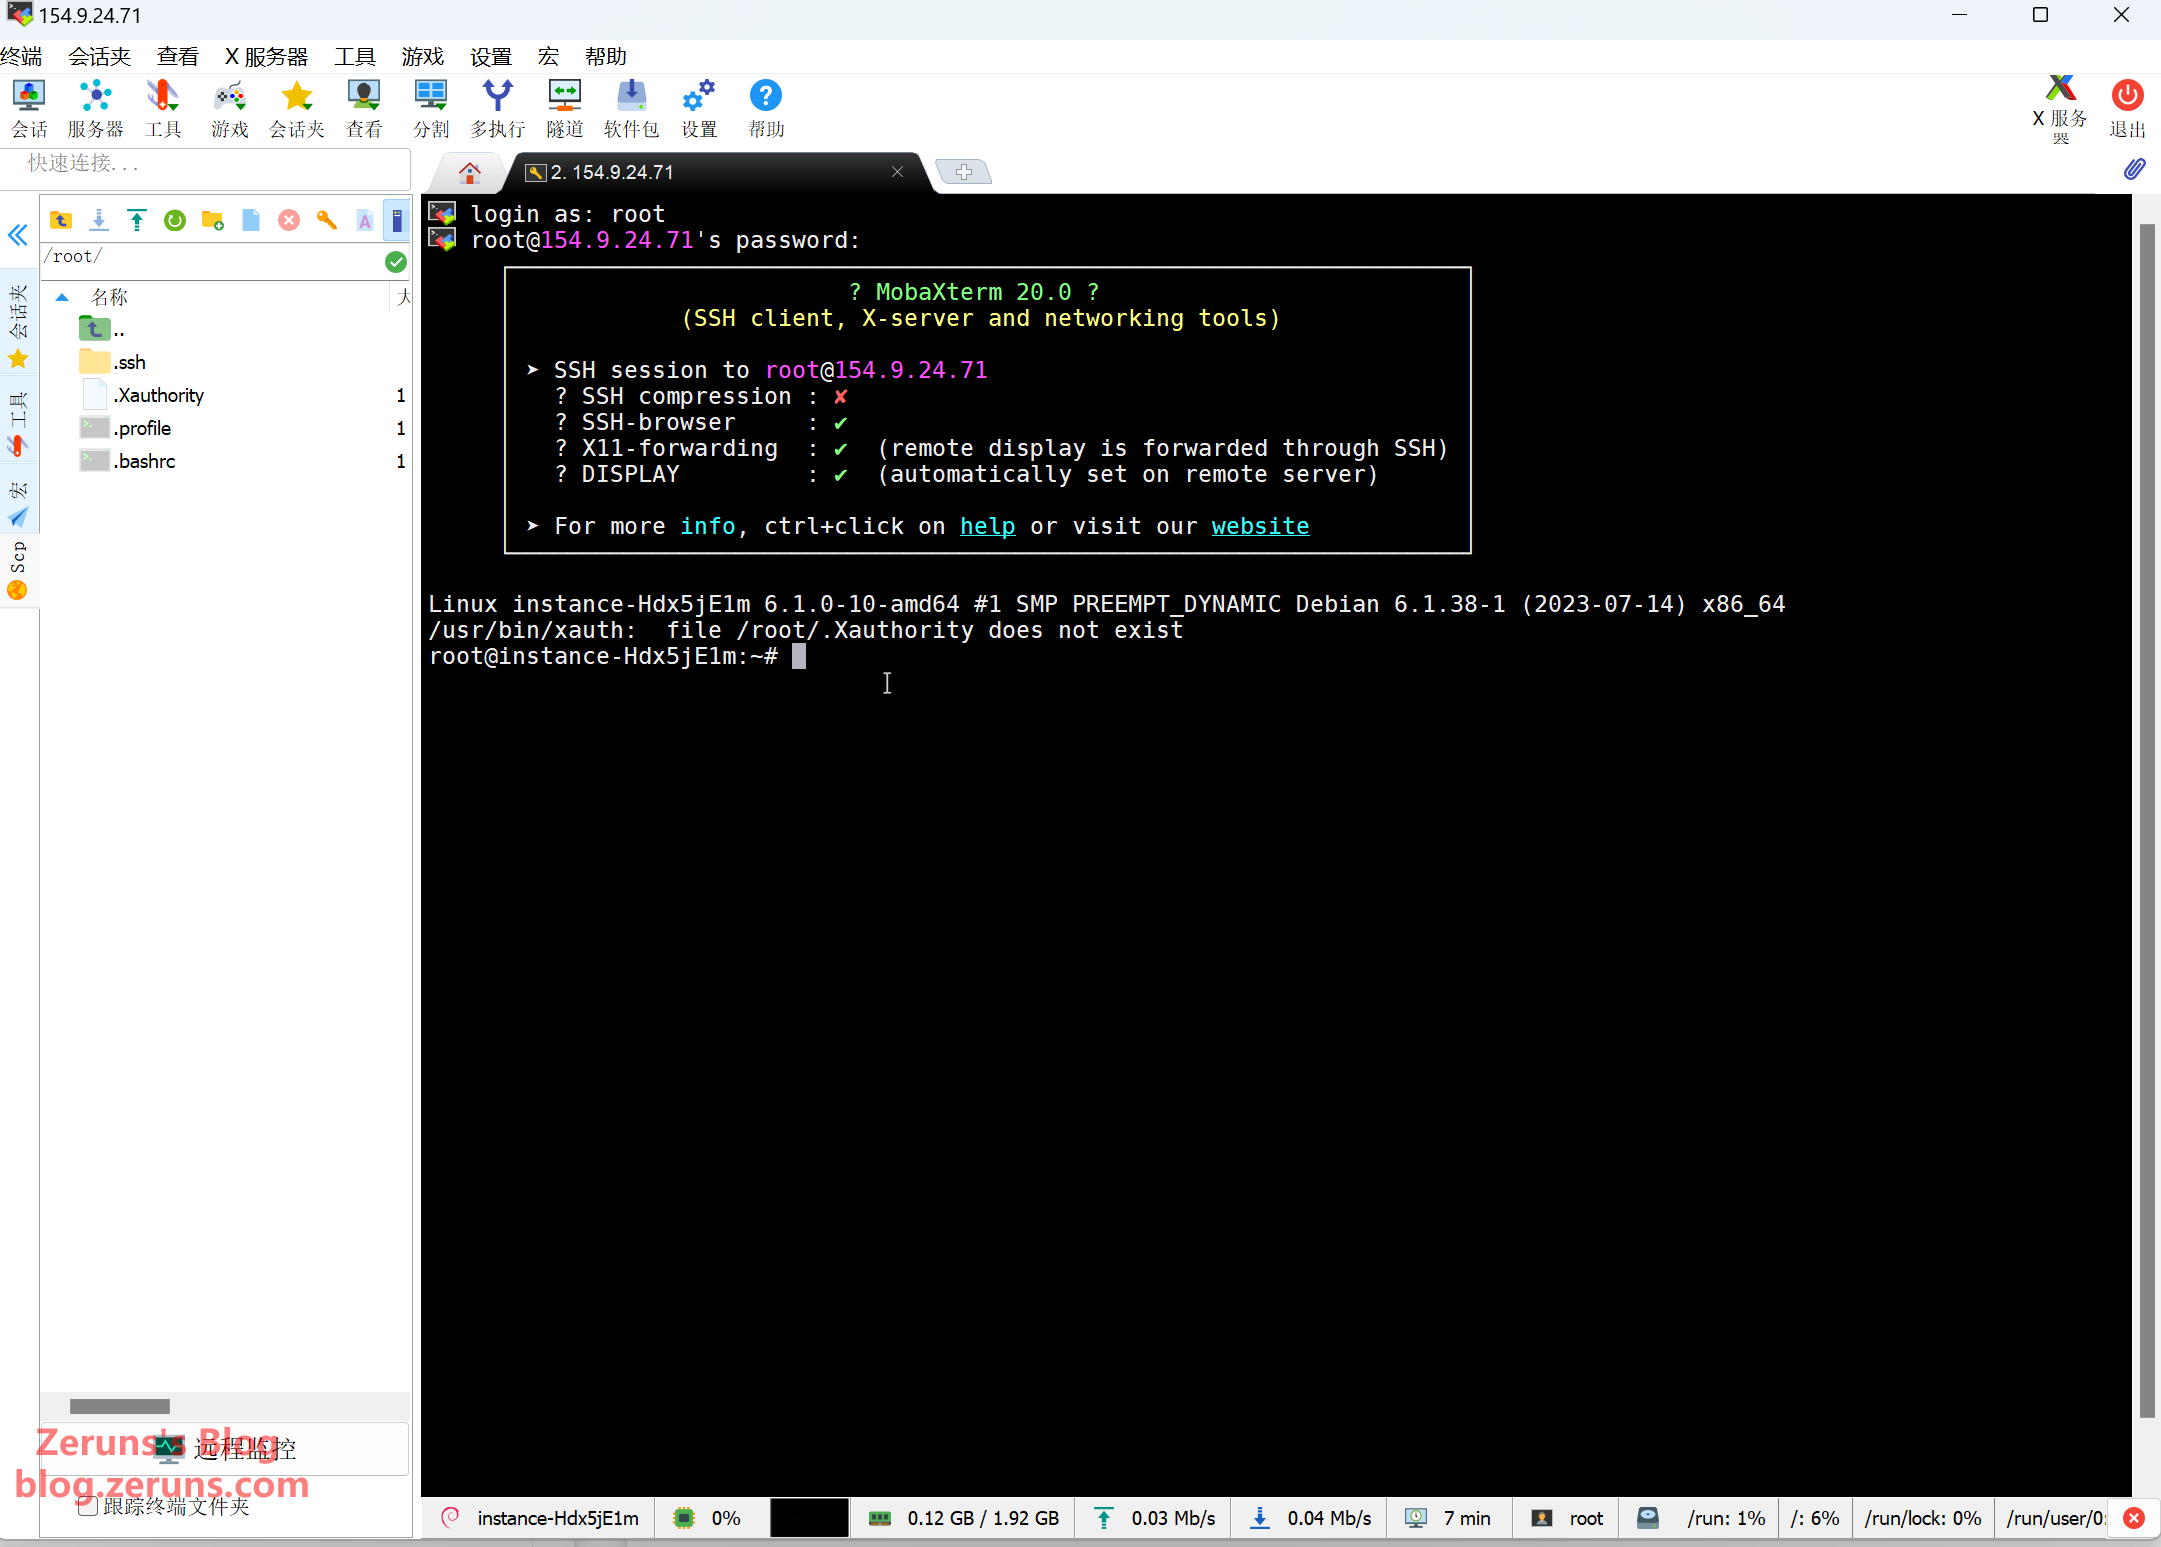
我这里用mobaxterm,在SSH客户端中输入你的服务器的IP地址(控制台获取),还有SSH端口(默认是22),然后点击好的或者打开。
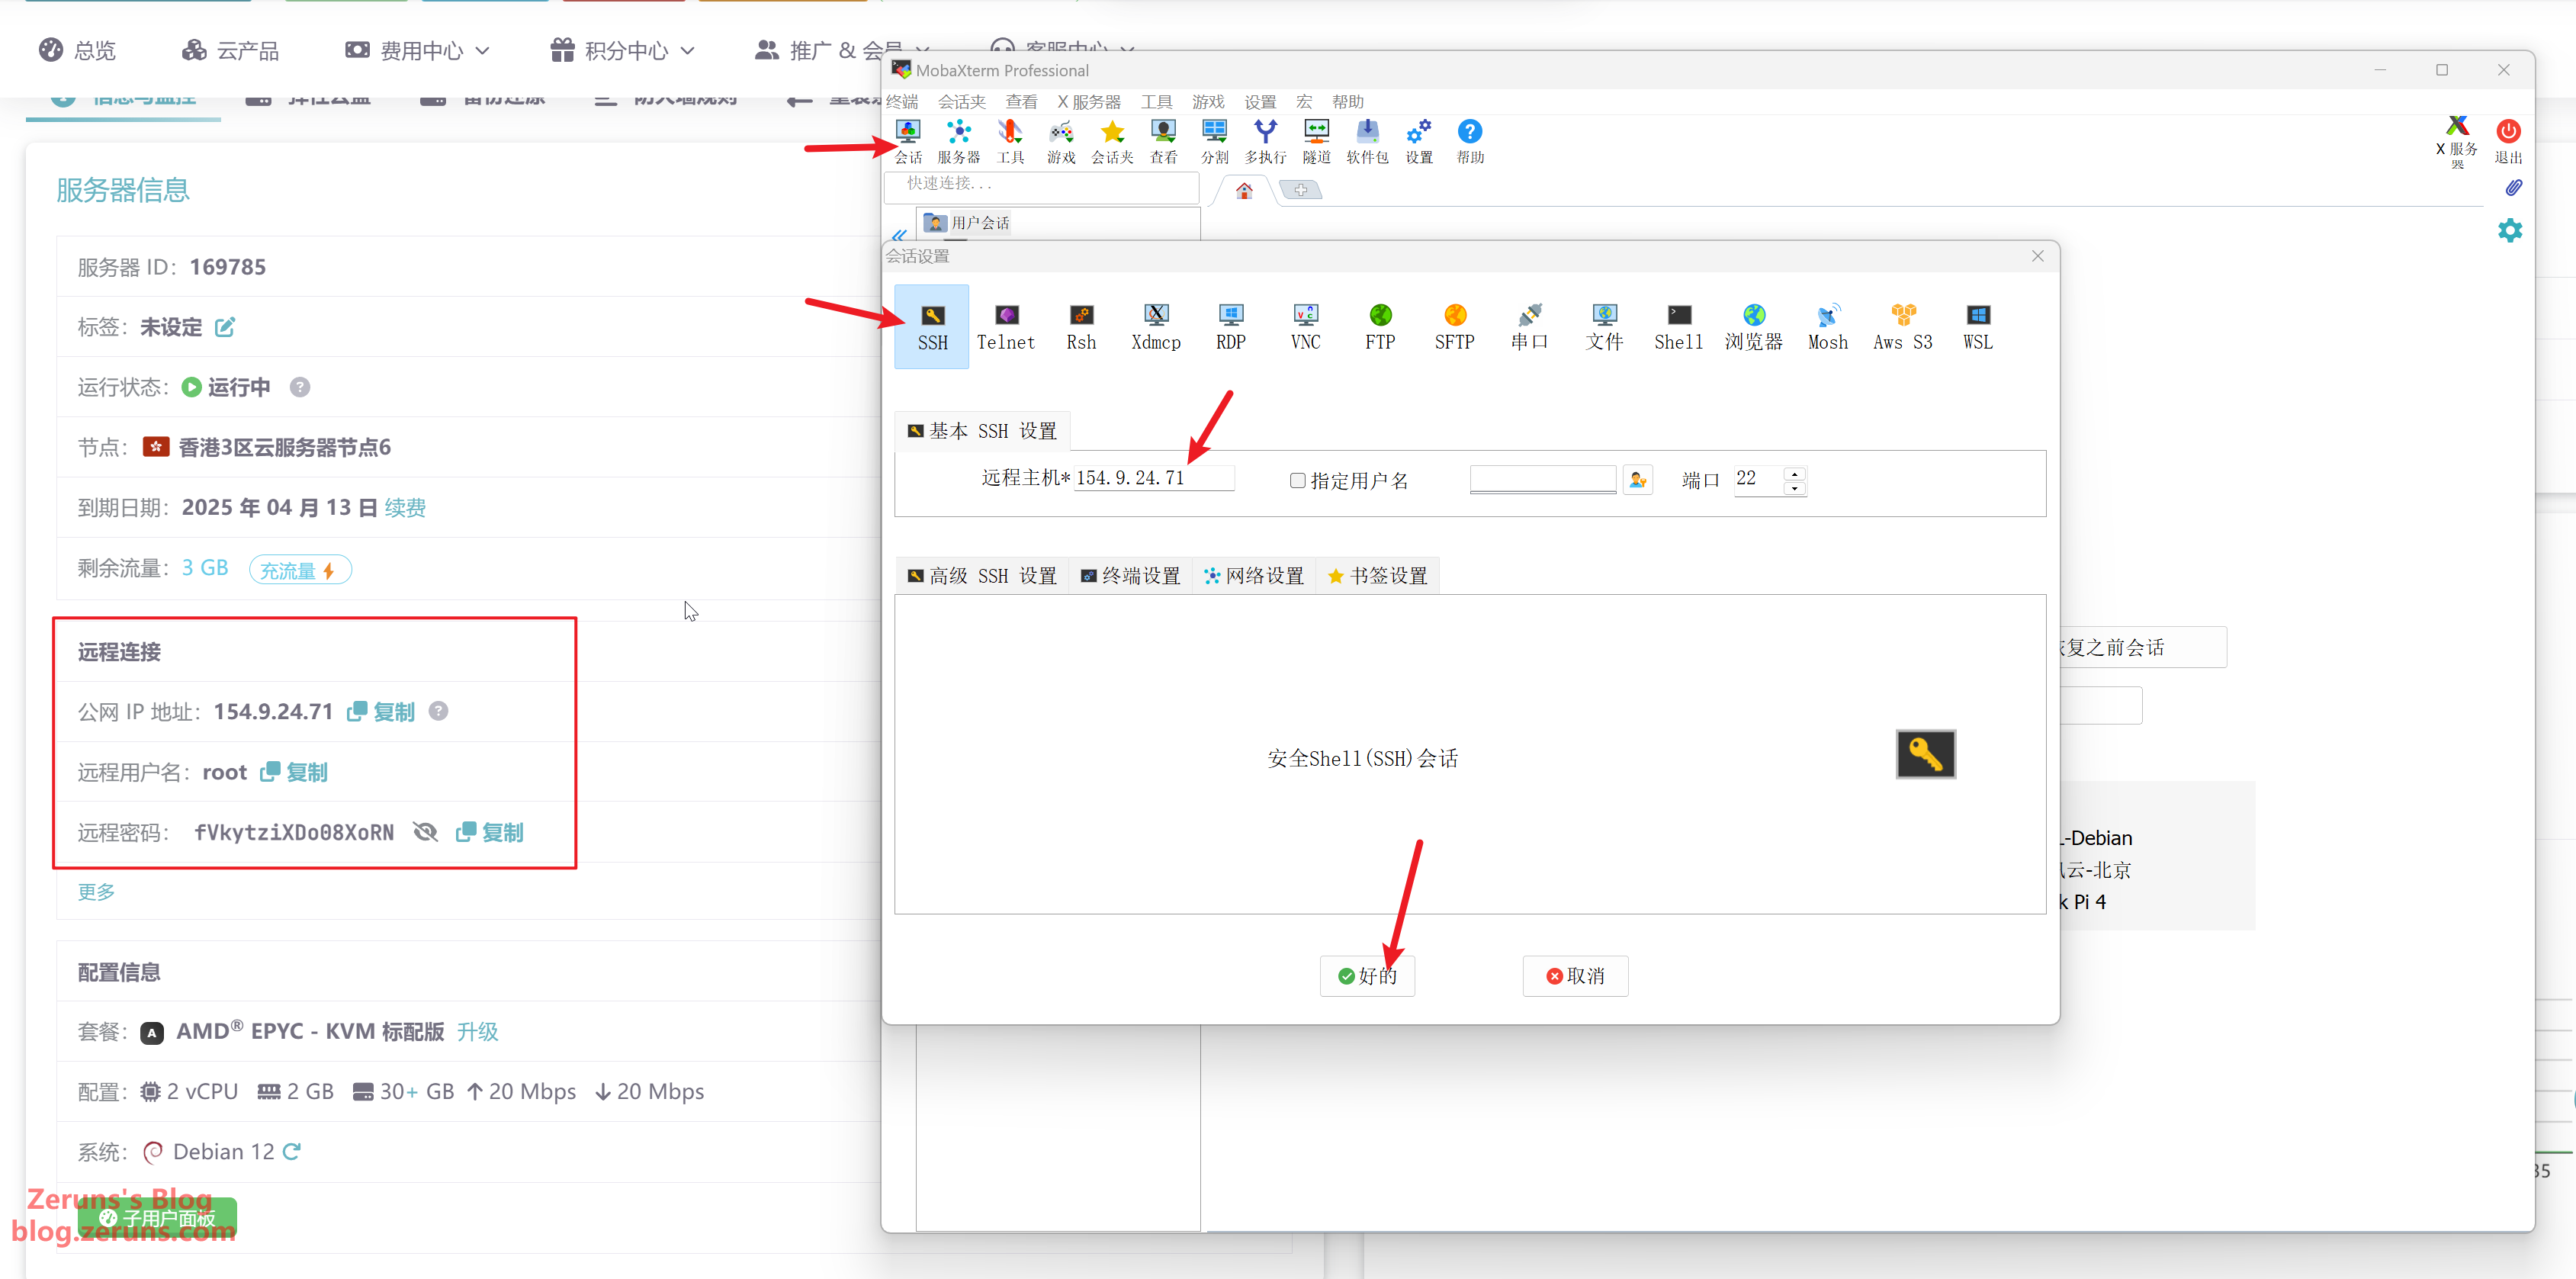
然后输入账号并按回车,账号一般默认为root,接着输入密码(密码在控制台获取)并按回车确定,输入密码时不会显示出来。
温馨提示:在SSH终端中按住鼠标左键选择文字,然后松开鼠标,再在空白处单击一下,这样就把选中的文字复制了;在SSH终端单击右键即为粘贴。
APT换源(境外服务器无需进行这步)
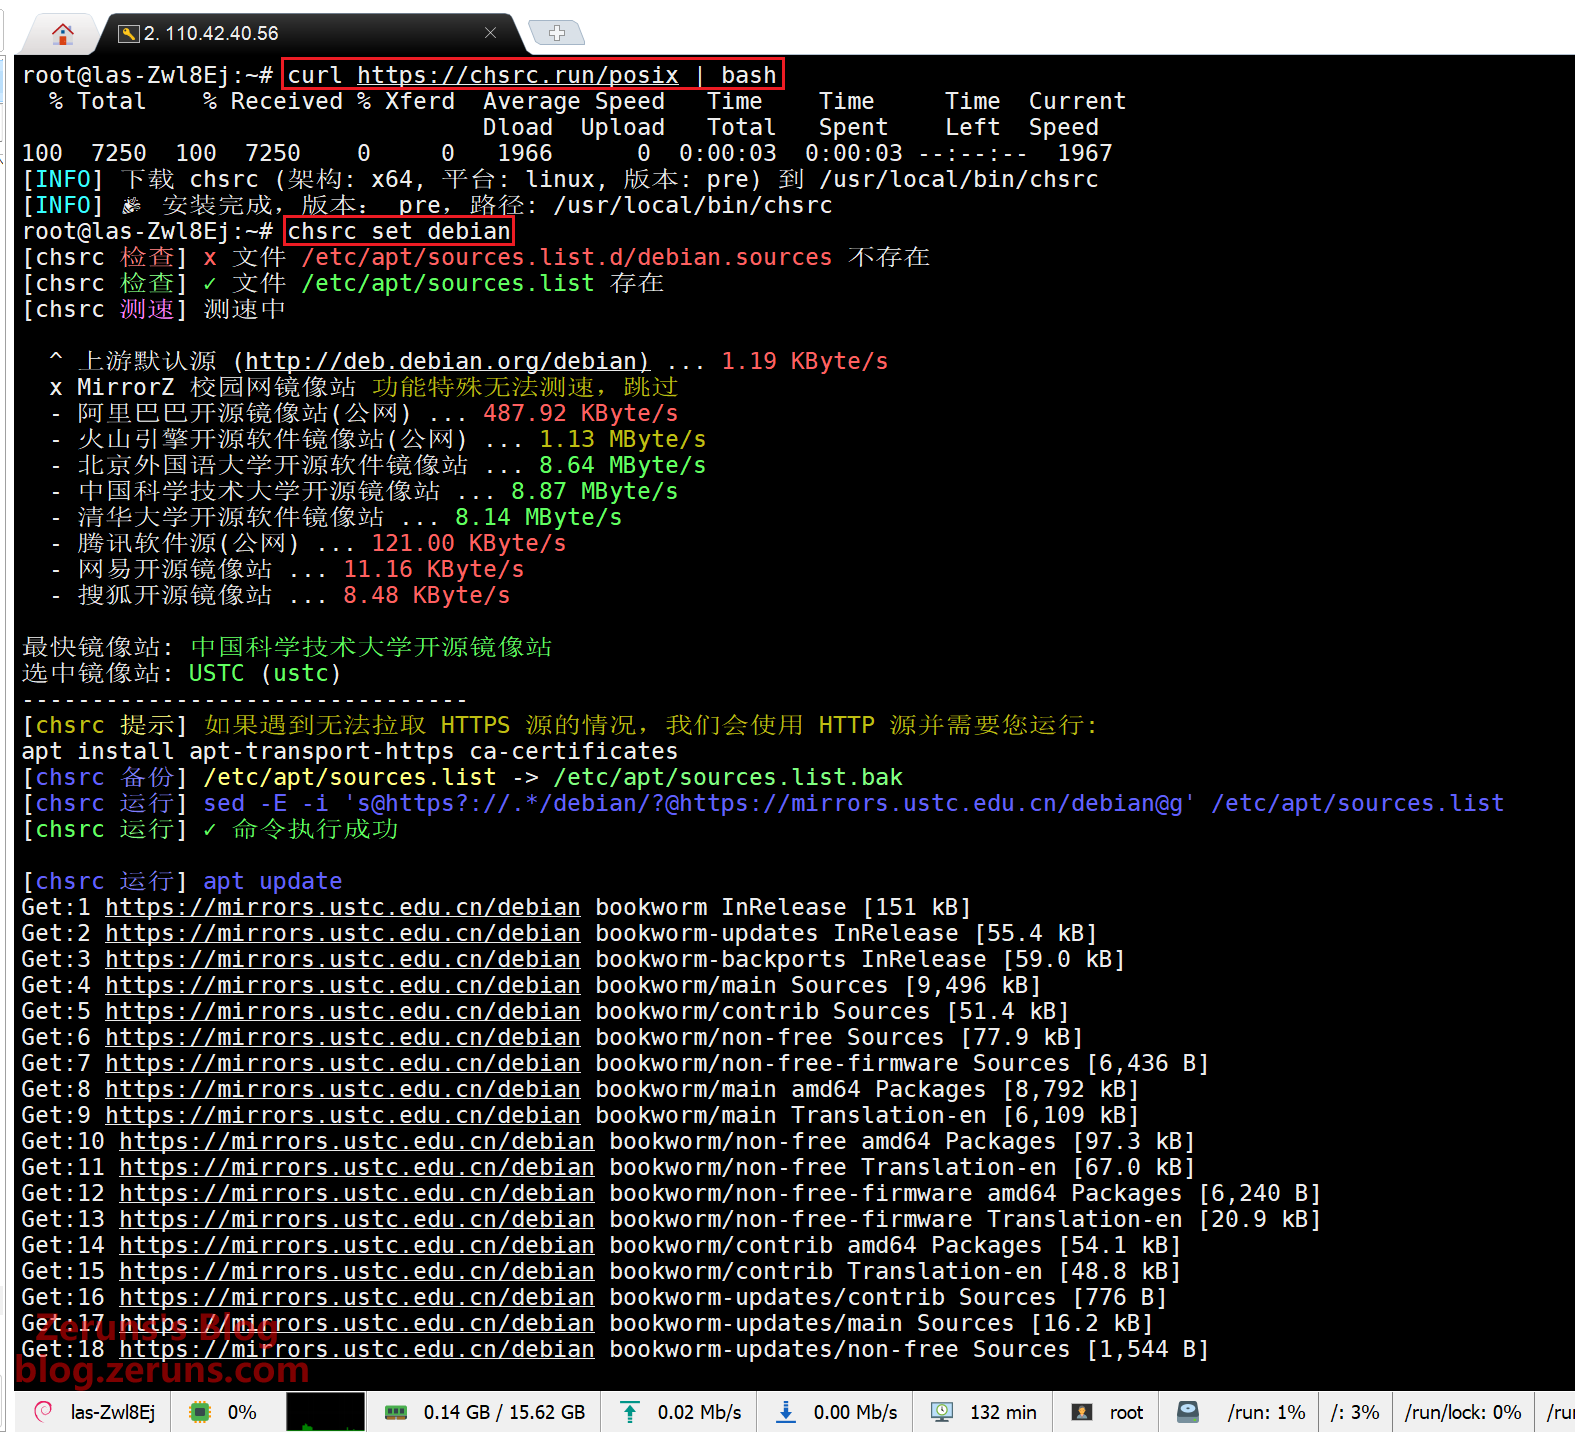
系统默认apt软件下载源是国外服务器,所以需要换国内镜像源,使用chsrc来换源。
在SSH终端,输入下面的指令并按回车执行(#开头的是注释,不用输入)。
# 下载安装chsrc
curl https://chsrc.run/posix | bash

# 自动测速,寻找最快者,换源
chsrc set debian
安装与配置 Hermes Agent
在SSH终端输入下面的命令并按回车执行:
curl -fsSL https://res1.hermesagent.org.cn/install.sh | bash
等待安装完成。
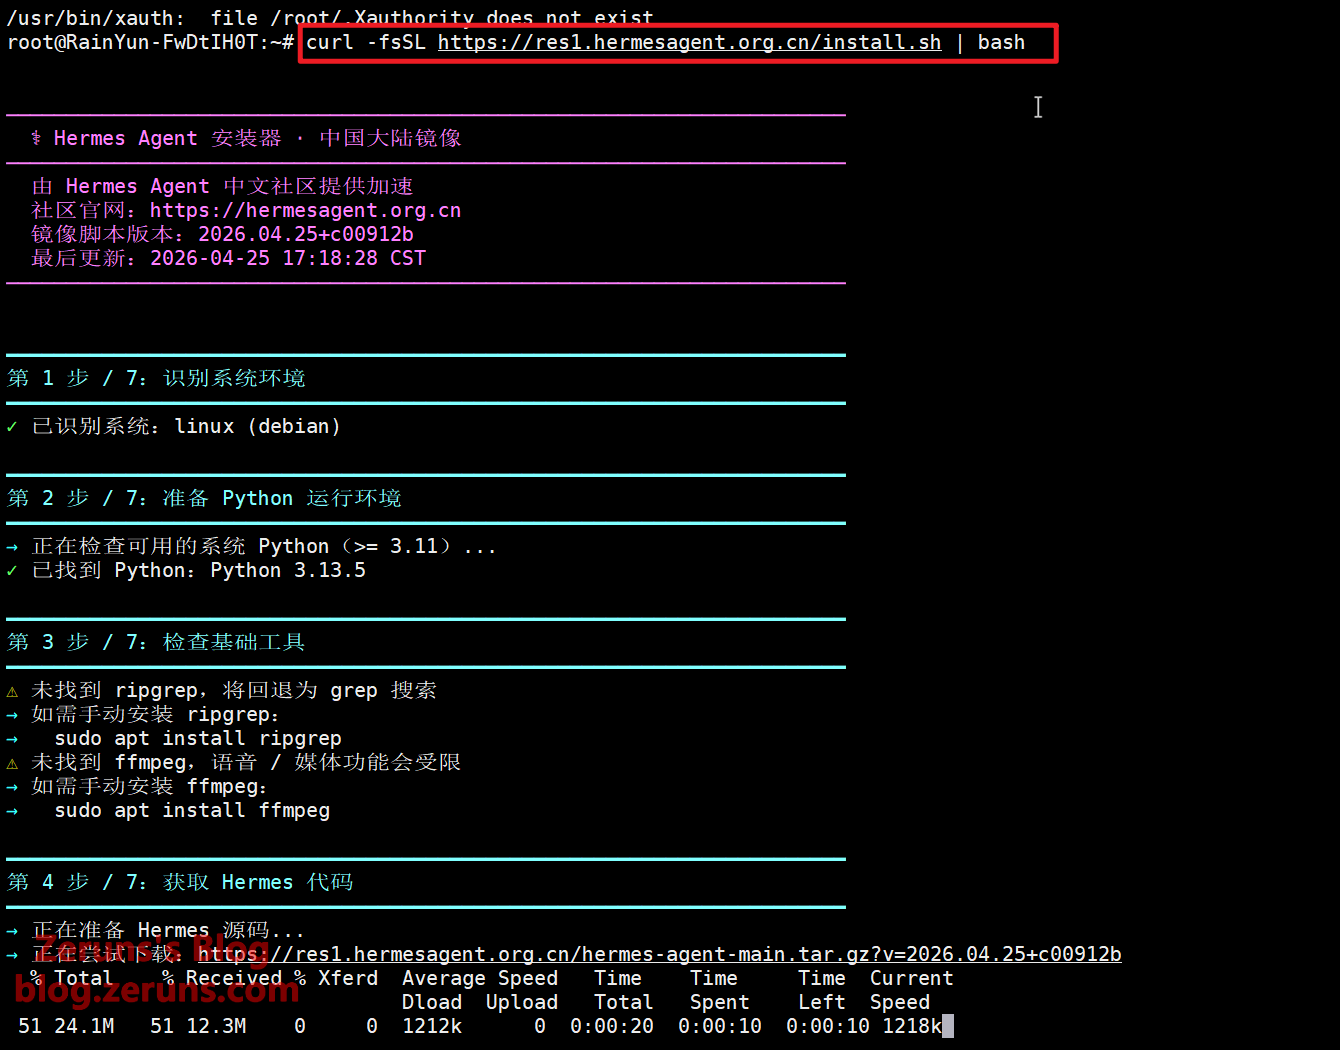
出现下面提示信息就是安装完成进入配置步骤了,这里我们按键盘上的 Ctrl+C 退出脚本的配置引导程序,然后在终端执行 hermes setup 再次进入配置引导程序。
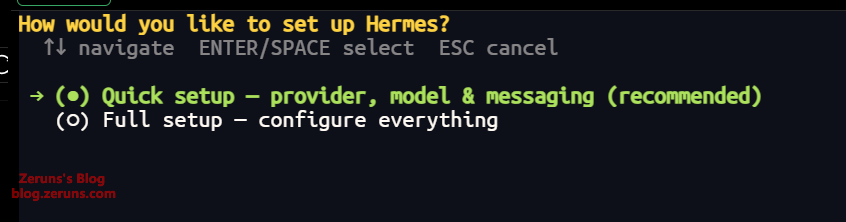
这里问是要快速设置还是完整设置,这里我们选默认的快速设置就行,直接按回车键。
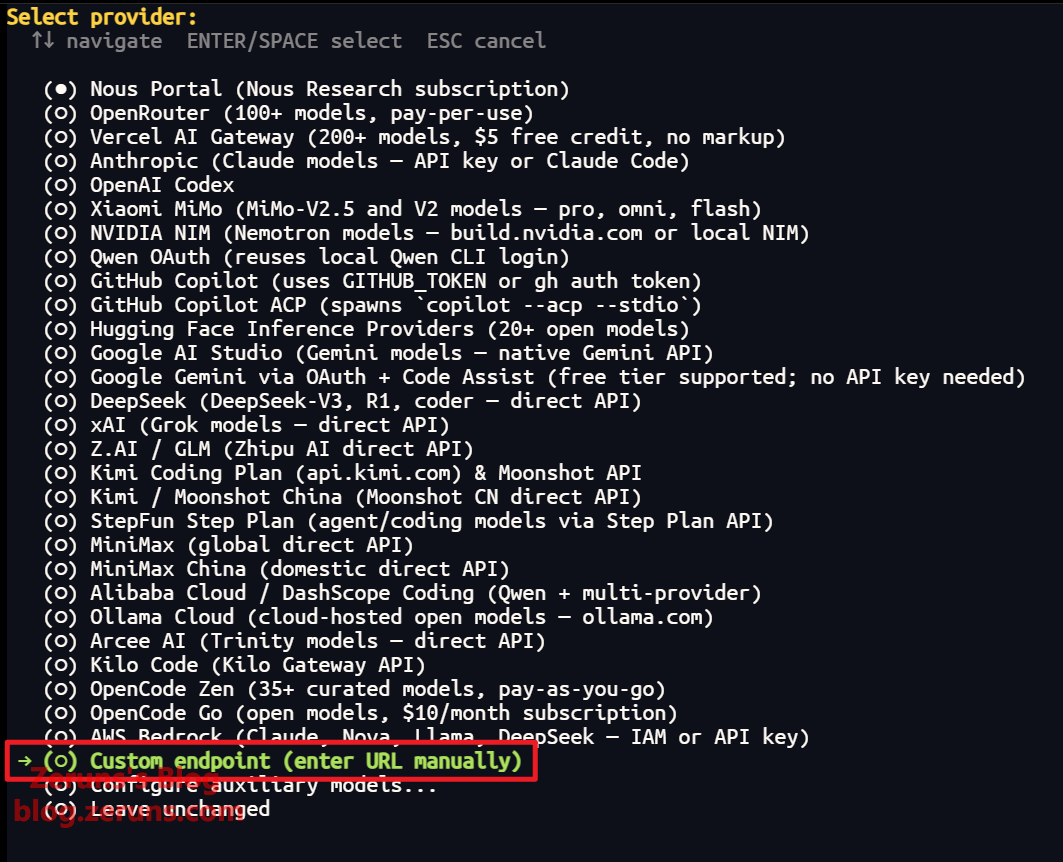
接着是设置大模型API提供商,通过键盘上的上下(↑↓)方向键来选择 Custom endpoint (enter URL manually) 自定义,选中后直接回车确定。
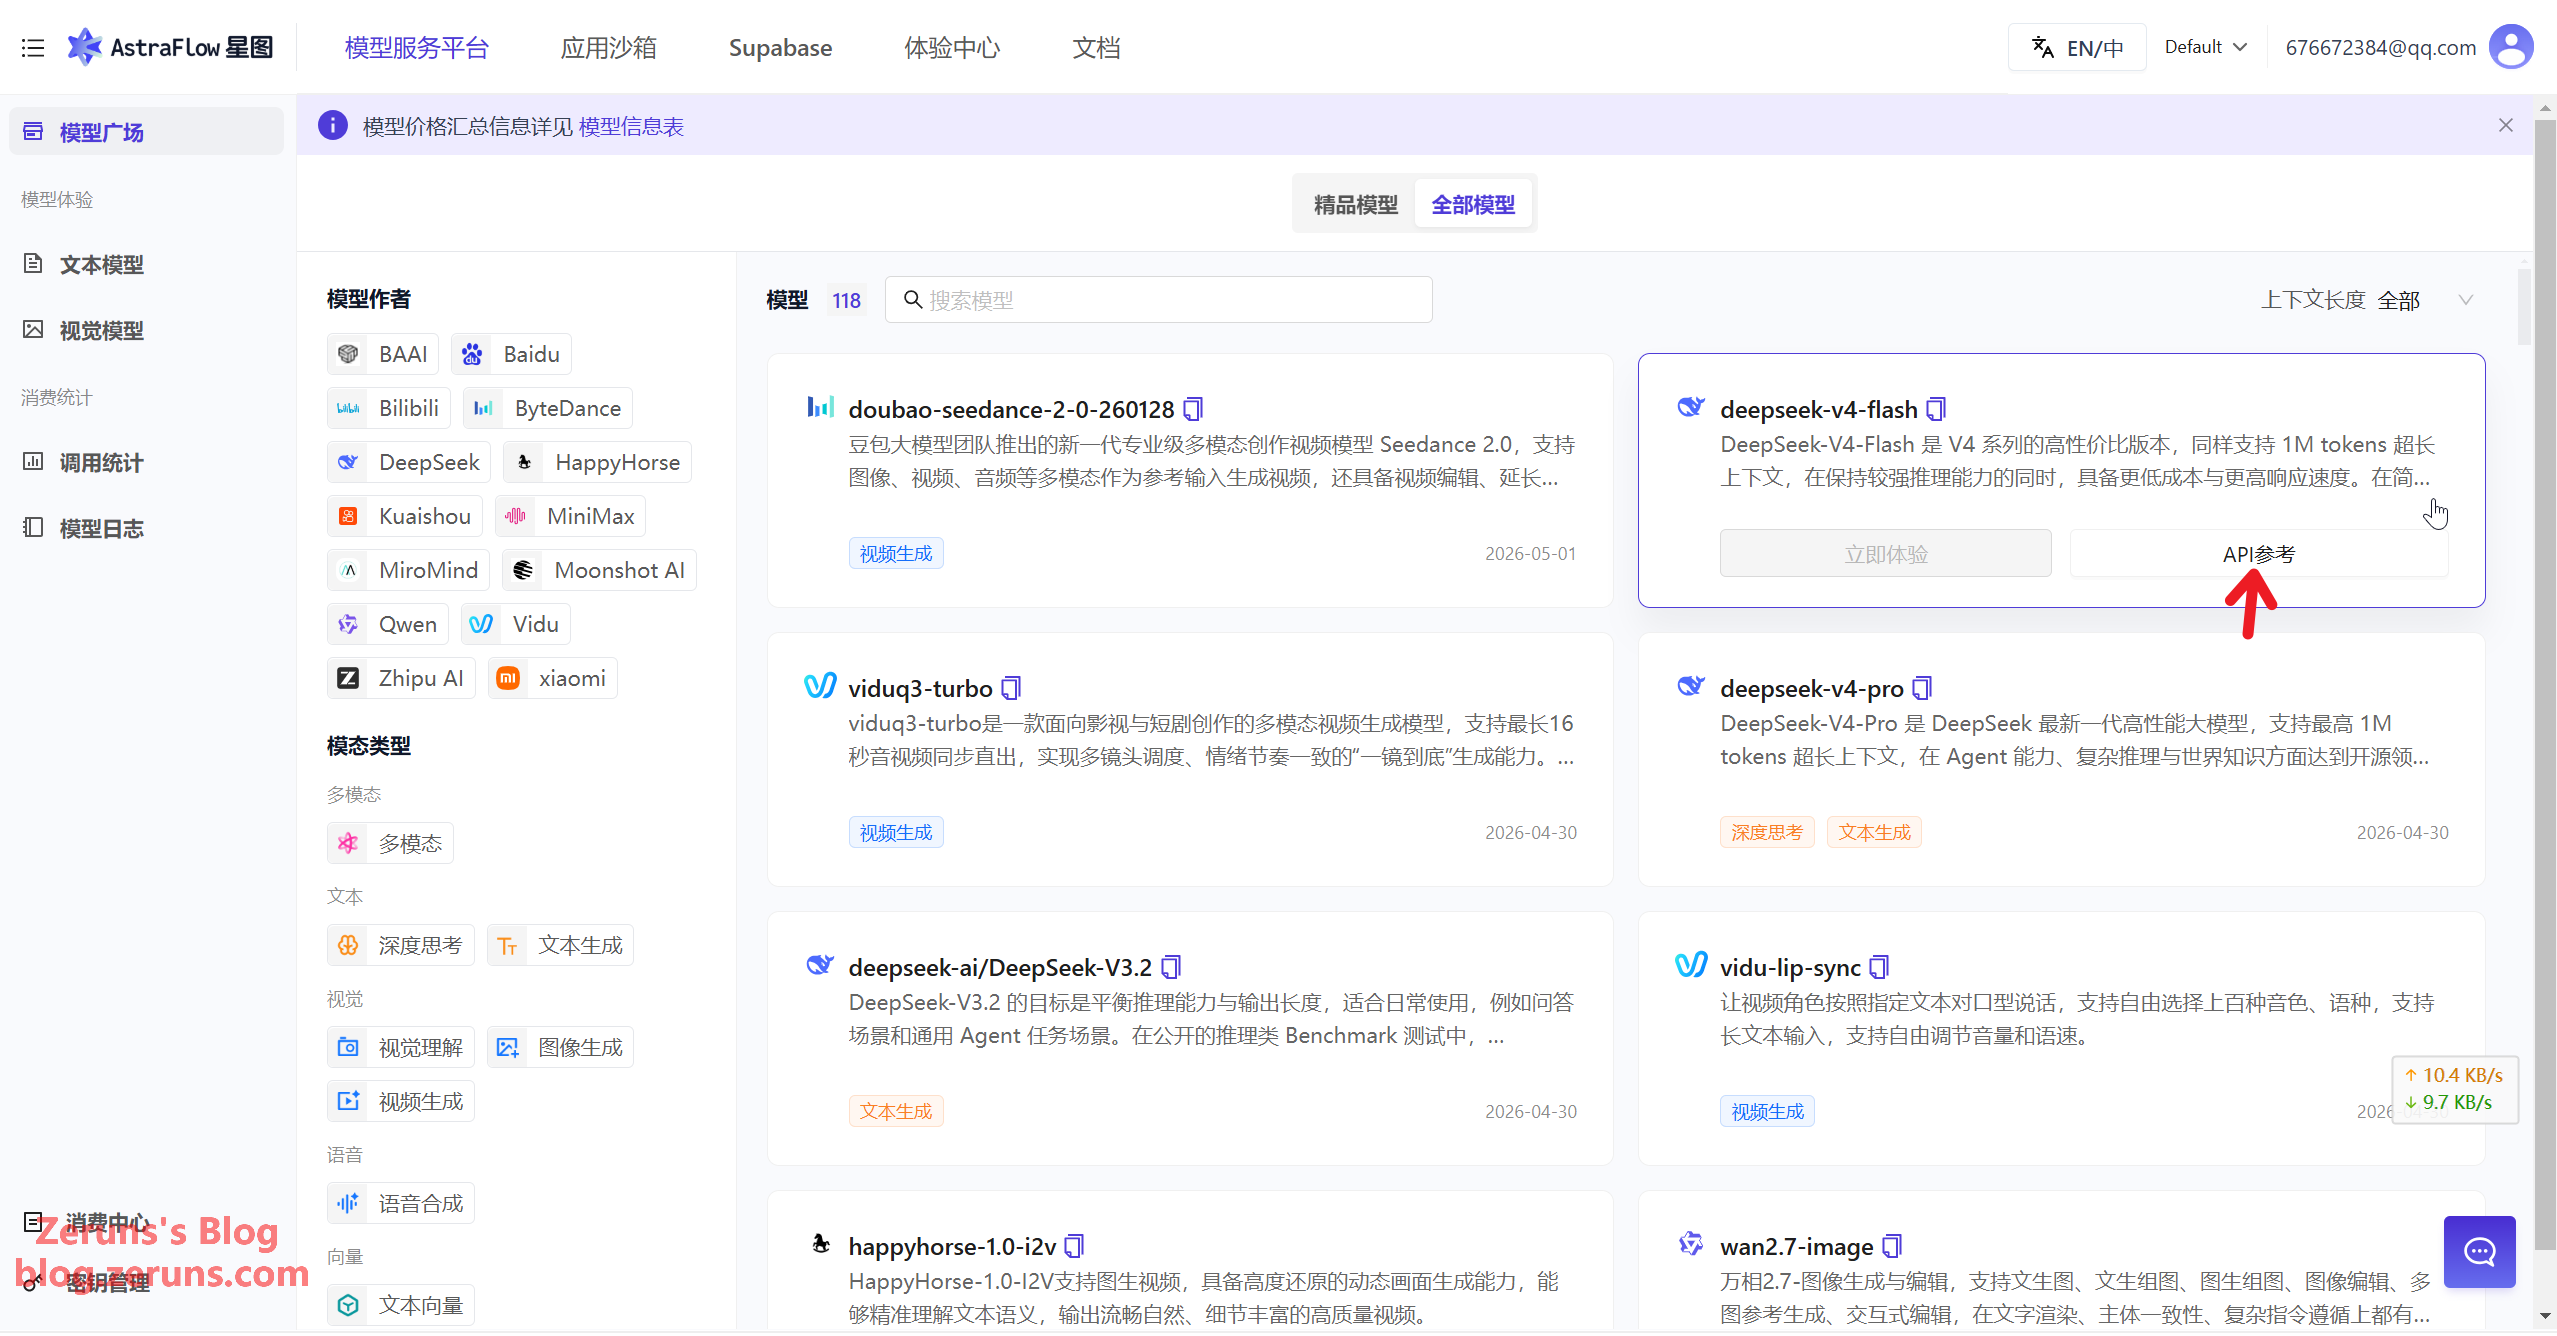
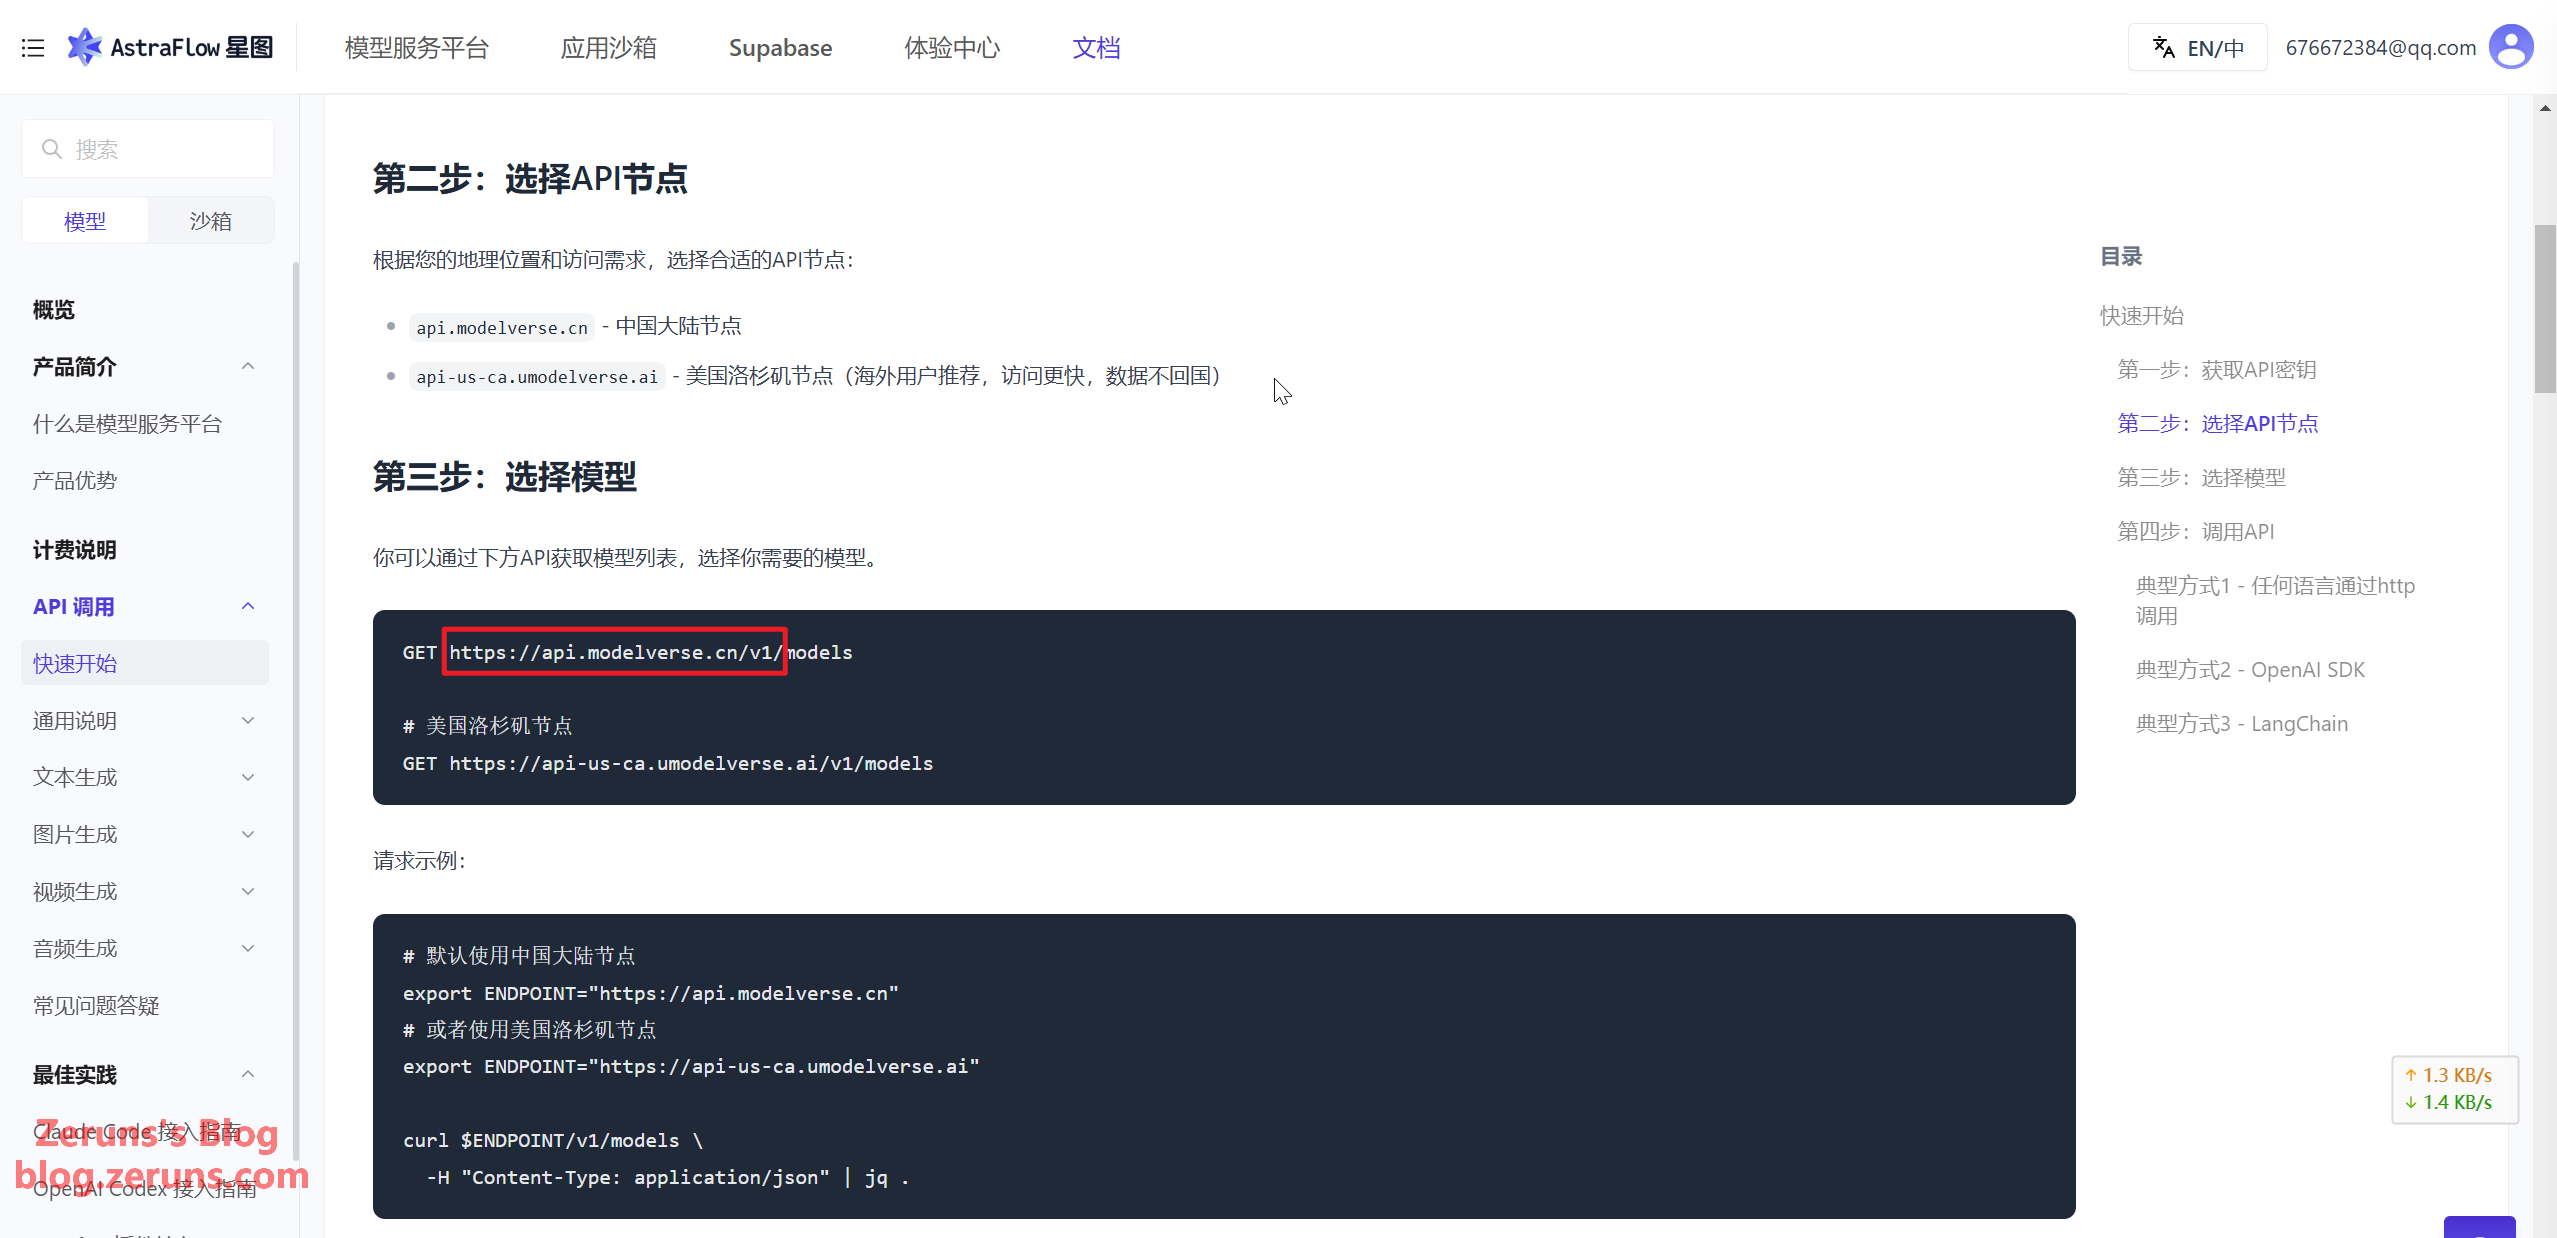
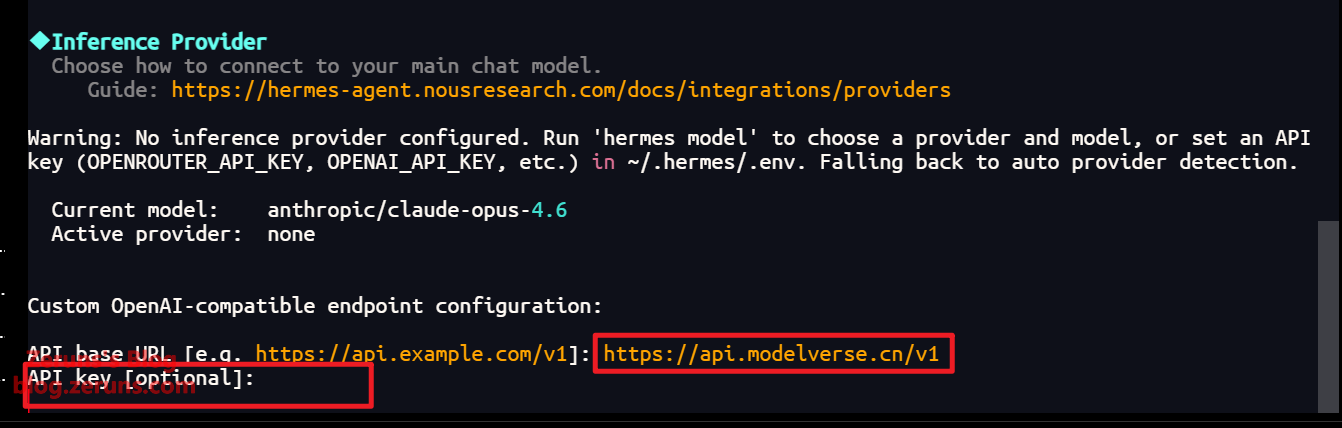
接着要输入Ucloud的API地址,在星图平台的模型广场处随便选一个模型点击API参考即可跳转到API调用相关文档可以获取API地址,Ucloud的中国大陆API地址一般是 https://api.modelverse.cn/v1 ,输入后按回车确定。
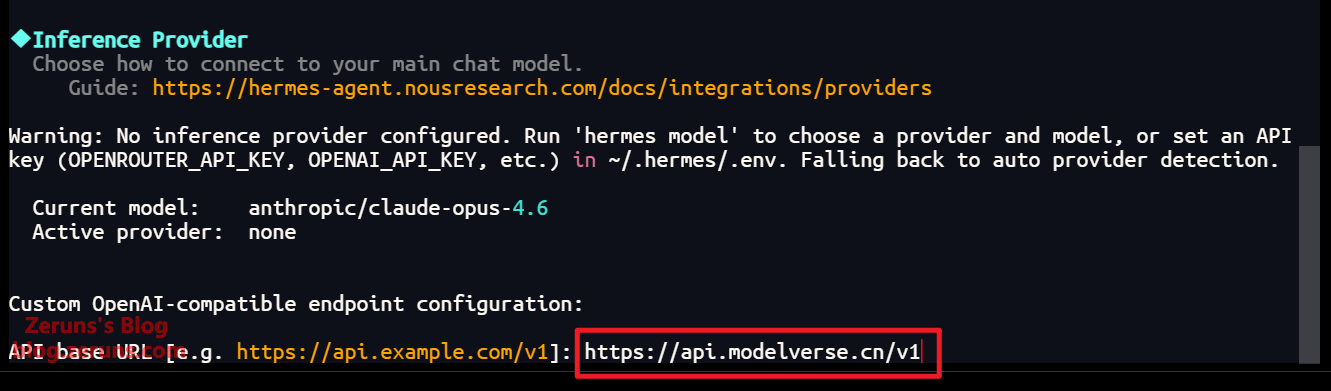
接着输入 API Key (上面创建的 API Key),输入时是不会显示出来的,输入完成后按回车确定。
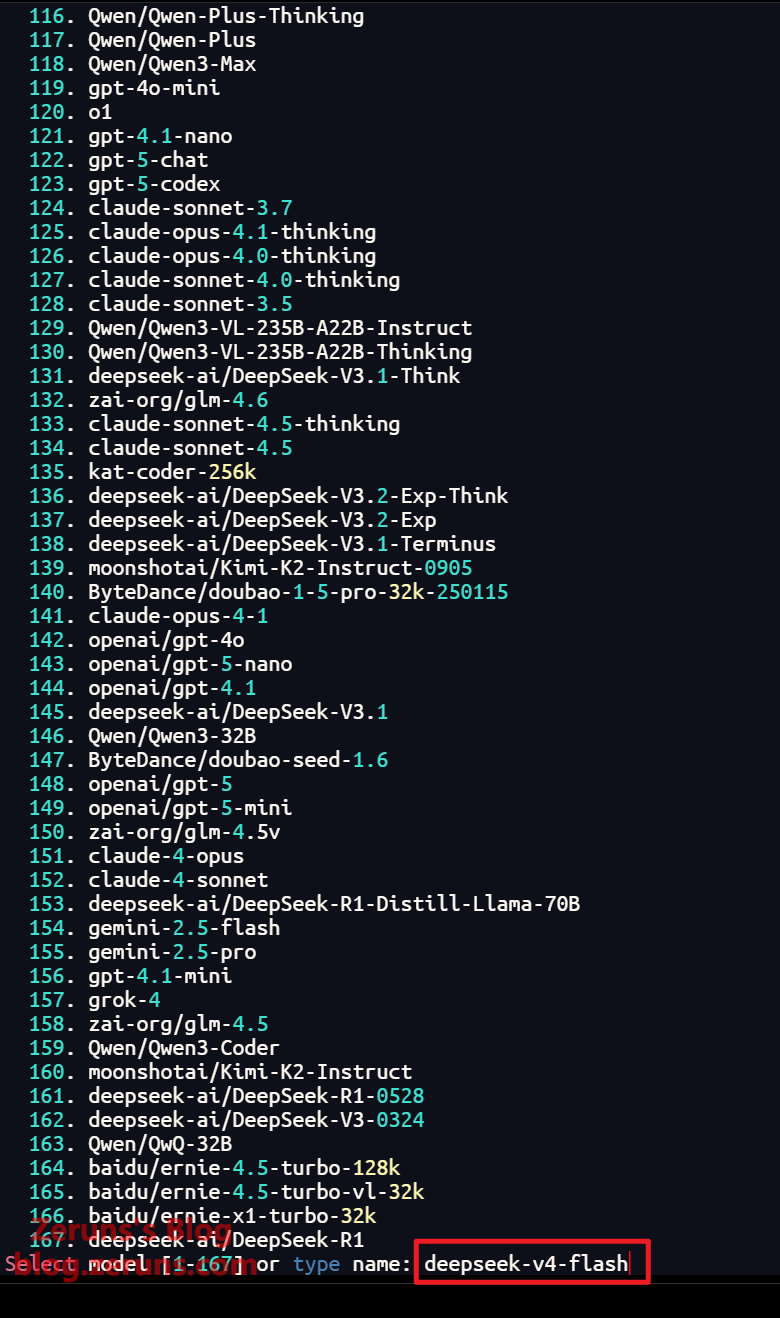
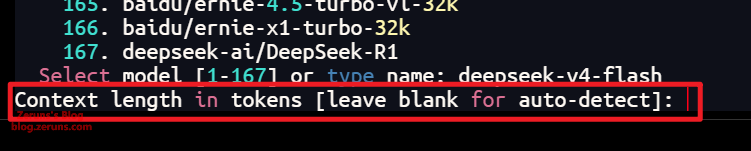
接着选择AI模型,一般会通过API获取模型列表,直接输入模型序号或ID就行,也可以自己到API平台的模型广场处选择模型复制模型ID进去,比如 deepseek-v4-flash ,我这里就直接用这个了,这个模型用来做 AI Agent 时缓存命中率极高,且价格非常便宜,性价比很高。
接着是设置上下文长度,这里直接回车自动检测就行。
接着设置显示名称,直接回车默认即可。

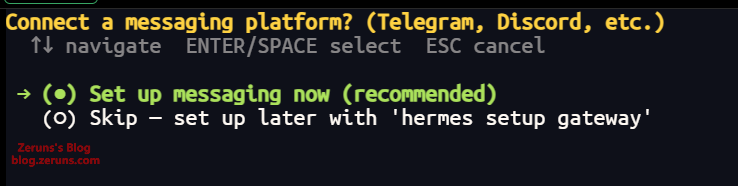
接着进入到消息平台设置,直接回车确定现在设置。
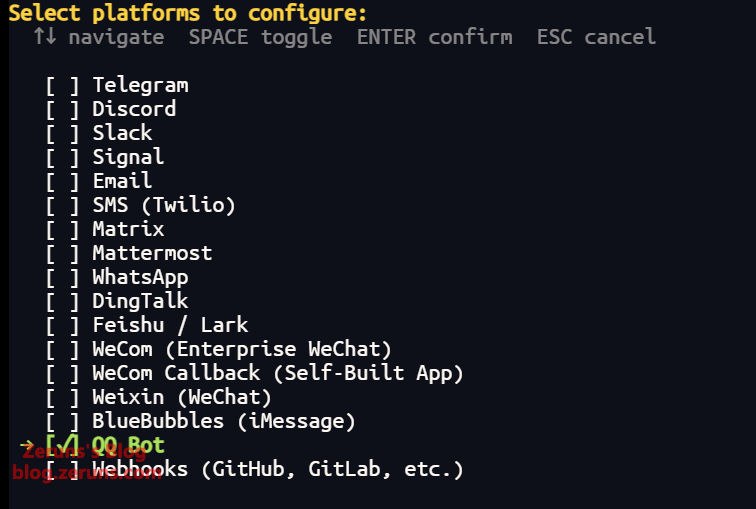
选择要设置的消息平台,按空格选中,我这里选 QQ Bot ,最后按回车确定。
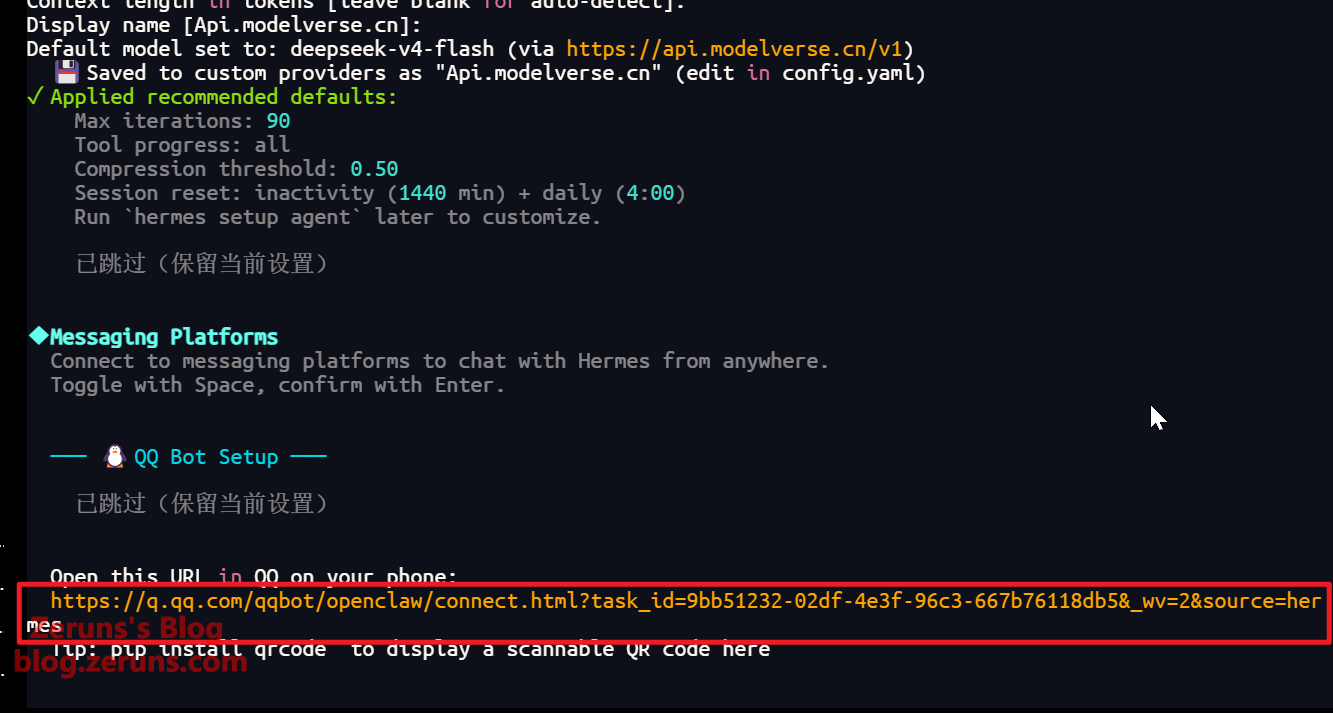
选择第一项扫描二维码自动设置,按回车确定。

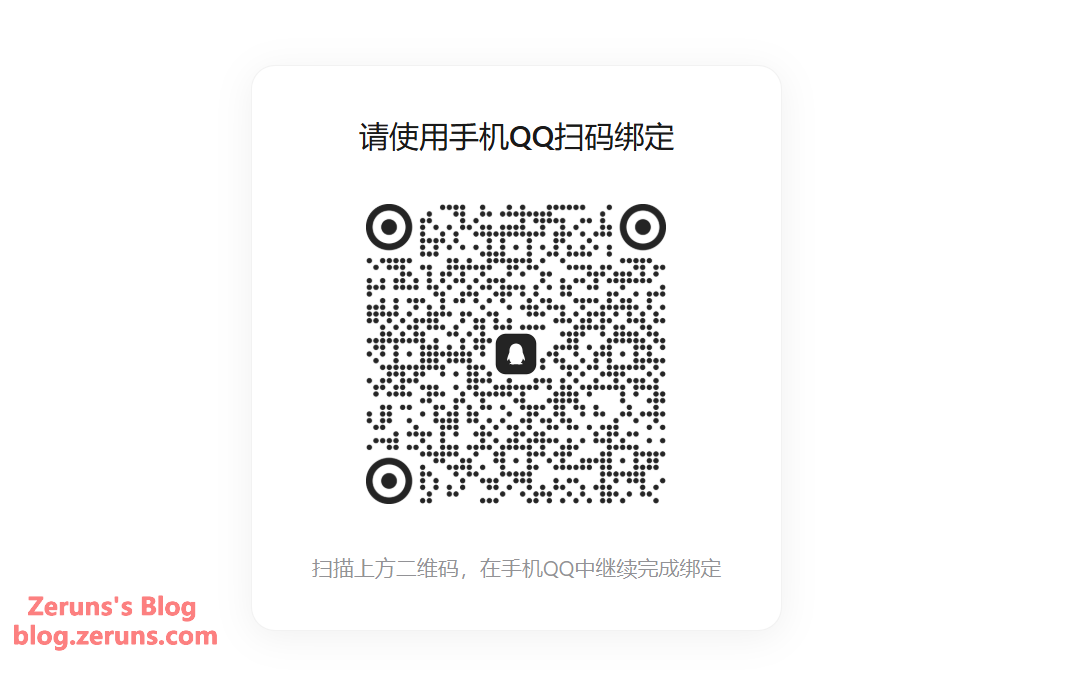
接着复制给出的链接到浏览器打开,会显示一个二维码,使用手机QQ扫码并按照引导创建一个QQ机器人,后面会通过这个QQ机器人与我们部署的Hermes对话。
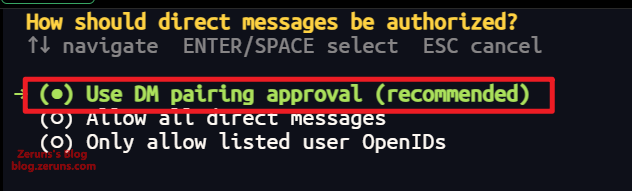
接着设置消息授权,接着一路回车默认就行。
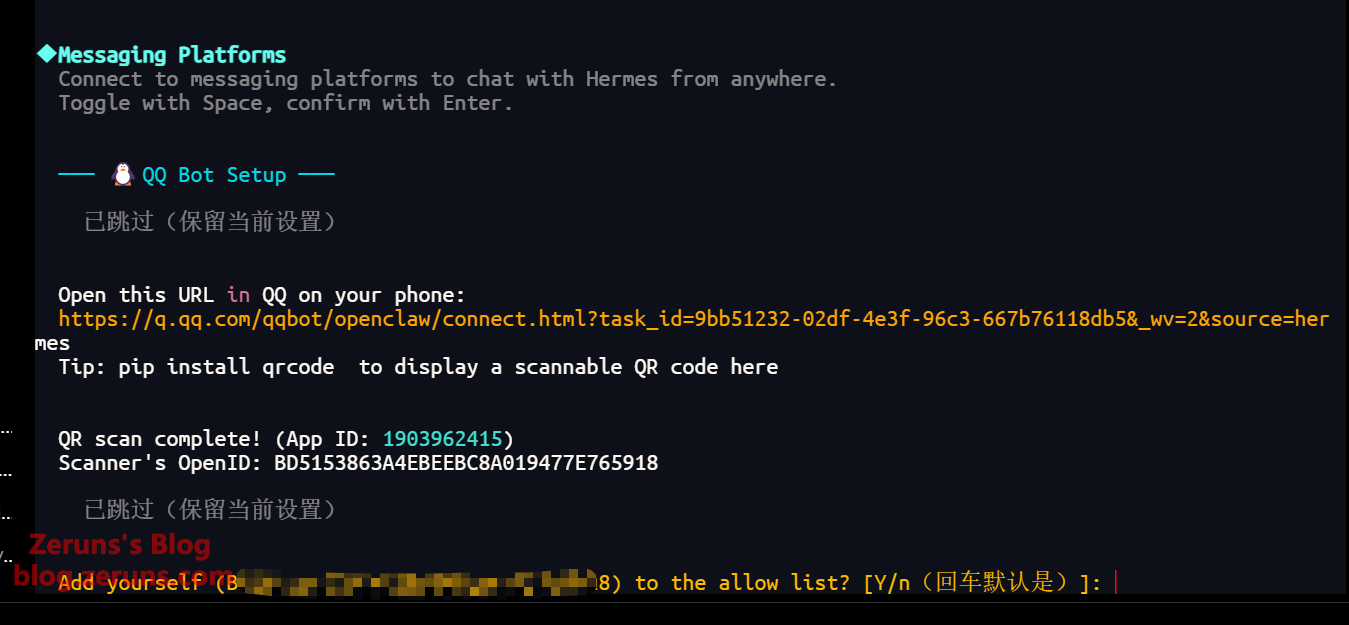
接着设置消息网关运行后台,选第二个作为系统服务,然后回车确定。

接着设置以哪个用户运行网关,输入 root 然后回车确定就行。
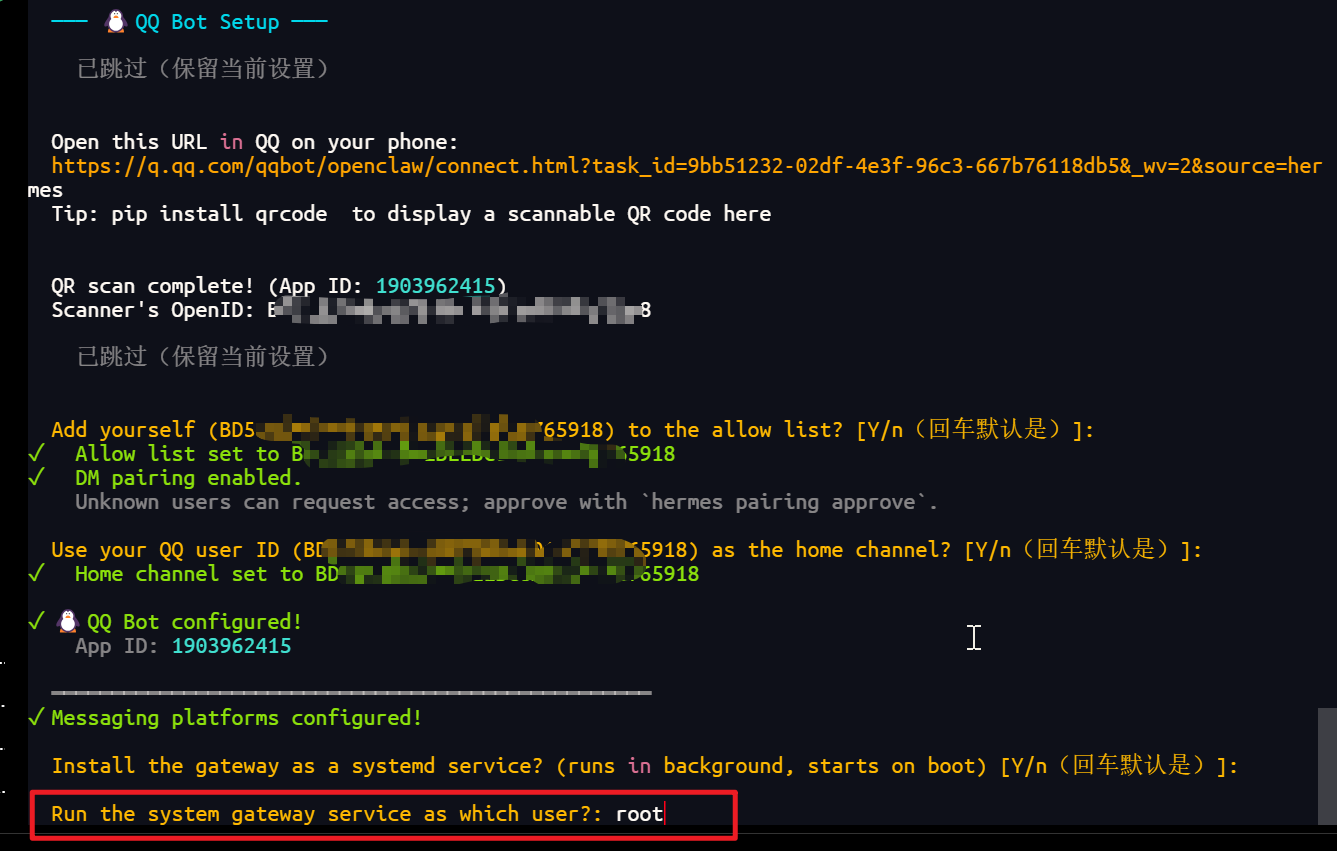
接着按回车确定启动服务。
再次回车即可进入到终端对话,也可以通过QQ机器人来跟Hermes对话。
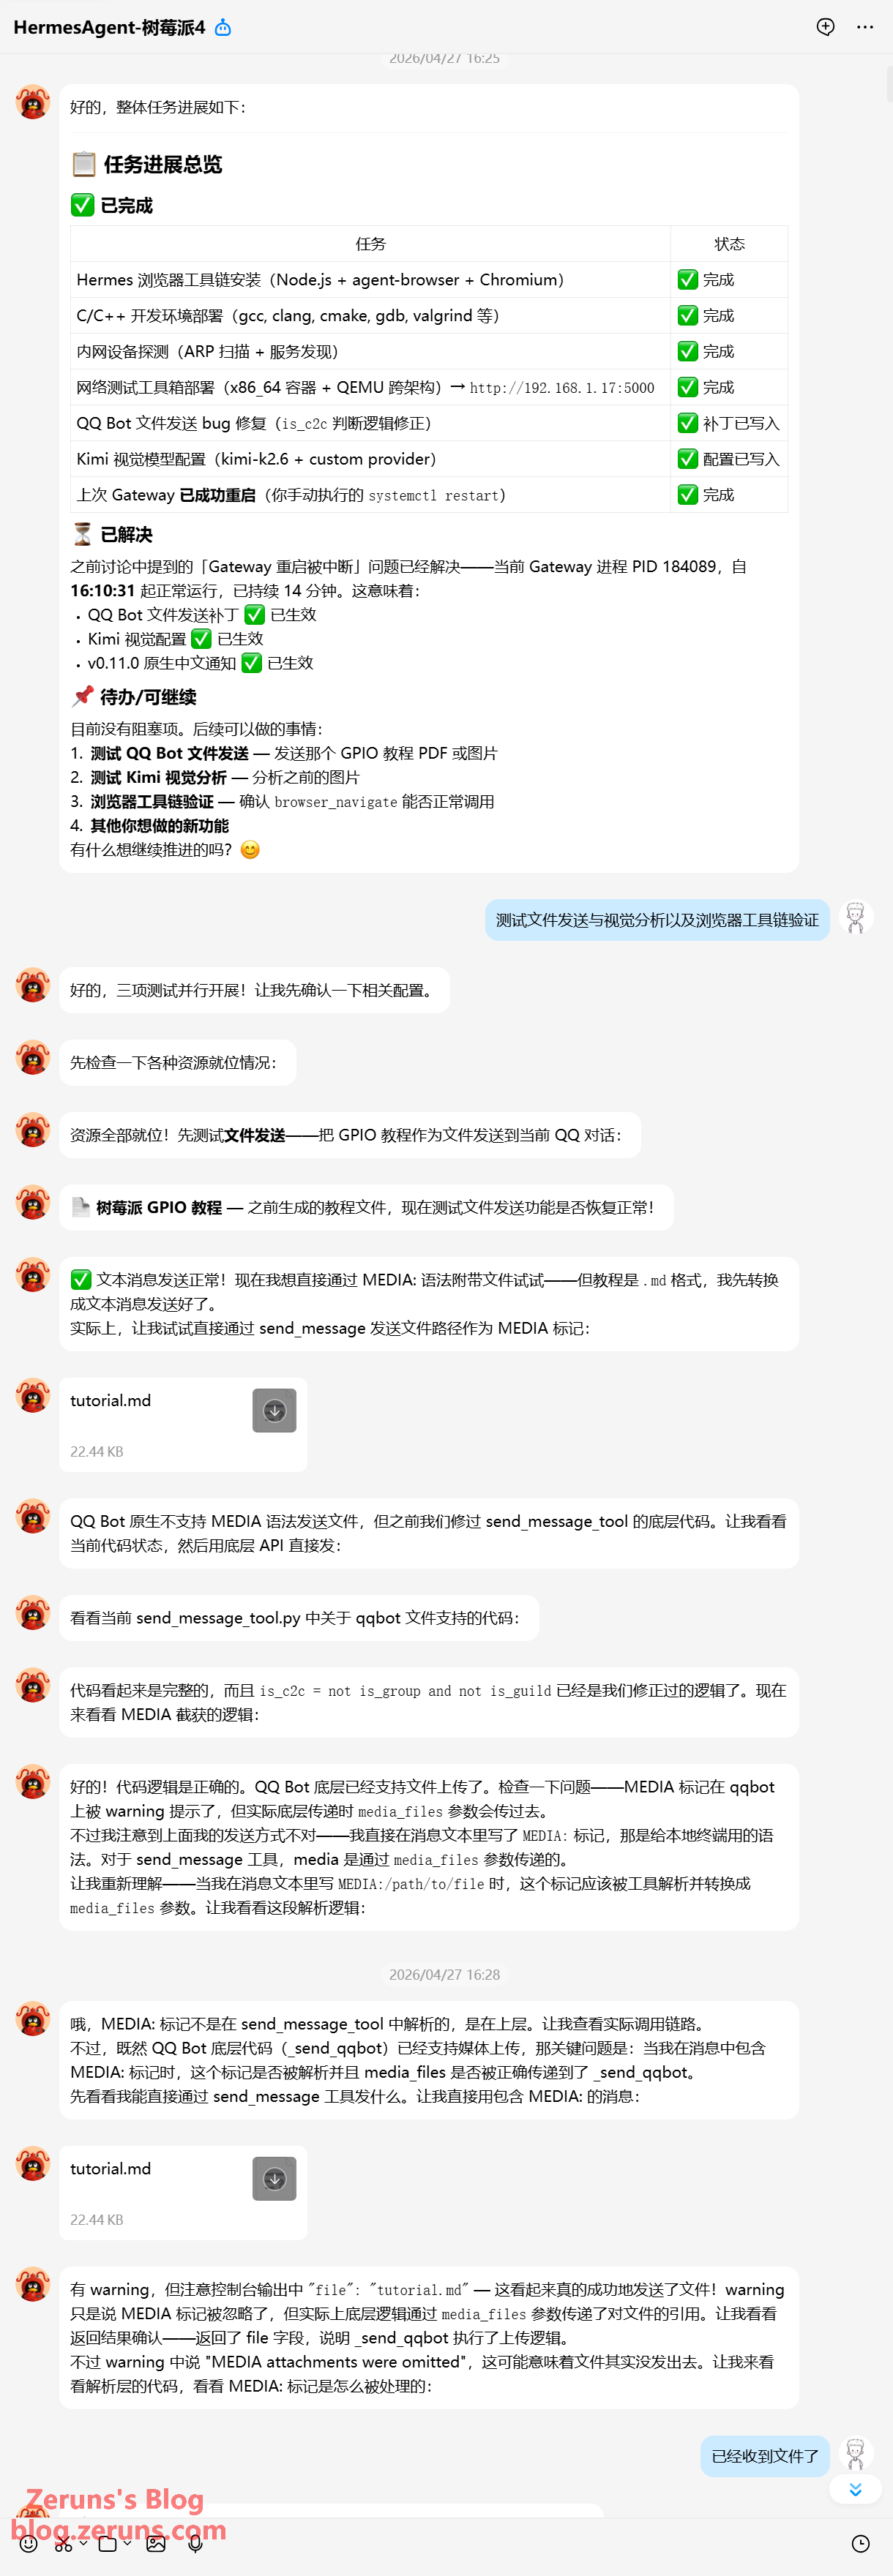
Hermes Agent 到此就已经部署和配置完成了,你可以直接使用了,你还可以把其他多模态的模型API通过QQ发给它让它自己配置来实现图片识别功能等。
Hermes Agent 的使用
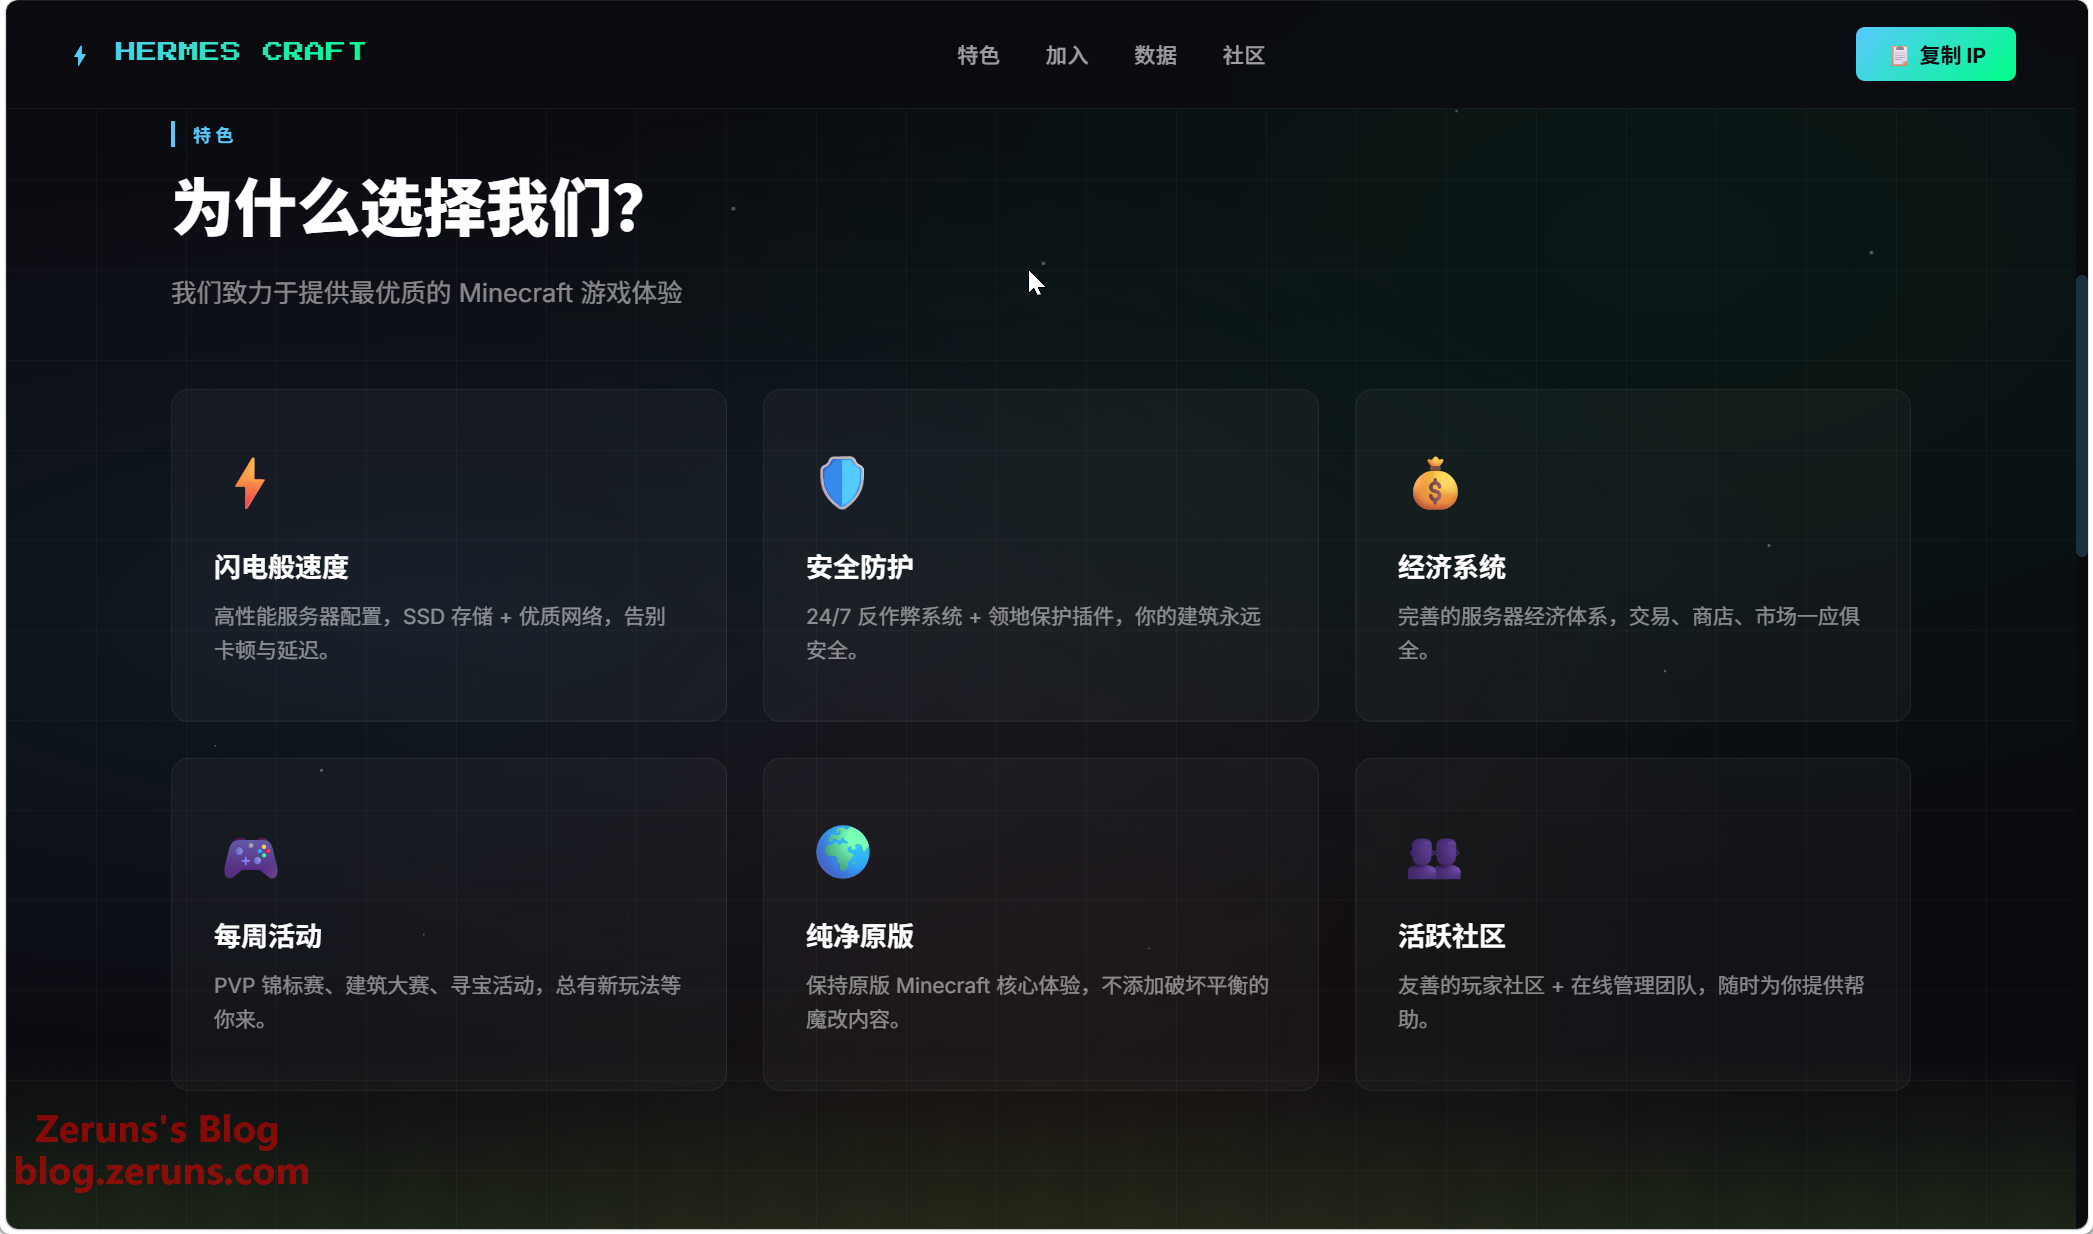
下面我通过QQ机器人给服务器上的Hermes发指令让它设计并部署一个Minecraft服务器官网。
这是它做的网站的效果,效果很不错!还可以继续发指令给它让它继续完善网站。
像一些缺失的功能,比如通过QQ机器人发送和接收文件的功能可以让它自己修改代码加上去,然后你就可以直接通过QQ发文件给它了,或者是它发文件给你。还有可以让它把DeepSeek-V4-Pro的模型加上,用于任务规划等。
有一些系统提示信息是英文的,还可以让它自己把自己的程序汉化,可玩性很高。
教程到此结束了,更多玩法请自行探索!
推荐阅读
- 高性价比和便宜的VPS/云服务器推荐: https://blog.zeruns.com/archives/383.html
- 我的世界开服教程:https://blog.zeruns.com/tag/mc/
- Discourse论坛搭建教程,零基础部署Discourse开源社区论坛网站:https://blog.zeruns.com/archives/919.html
- 5G CPE 鲲鹏C2000MAX 简单开箱测评:https://blog.zeruns.com/archives/937.html
- CommentAI-Typecho博客AI智能评论审核&回复插件:https://blog.zeruns.com/archives/931.html
- 运算放大器(Op-Amp)入门指南,从原理到实战:https://blog.zeruns.com/archives/938.html
English Version of the Article: https://blog.zeruns.top/archives/90.html