Get Hermes Agent Up and Running in 10 Minutes: A Foolproof Installation and Usage Guide. Build Your Exclusive AI Assistant from Scratch — An AI Agent That Gets Smarter the More You Use It.
Video Tutorial: https://www.bilibili.com/video/BV1yQR8BhEhm/
Introduction
Have you ever experienced this? Every time you open an AI chat window, you have to re-explain your identity, preferences, and work background. The Agent tackles each task like it’s “its first day on the job,” with all previous experience reset to zero, forcing you to manually fix the same bugs over and over.
What if there was an AI assistant that takes only minutes to deploy, can remember every conversation you have, accumulate execution experience into reusable Skills, and stand by 24/7 on WeChat, Feishu, or Telegram to respond at any time—it’s not just completing “a task,” it’s continuously learning your way of working.
This is Hermes Agent.
As an open-source, self-hosted AI Agent system, Hermes not only supports mainstream models like Kimi, GLM, Claude, and Gemini, but also features “long-term memory + skill evolution” as its core design: it remembers lessons, accumulates skills, and compresses context, making the same tasks run faster and consume fewer Tokens. Compared to similar products, its tool calling is more transparent, and migration costs are lower (a single command to migrate from OpenClaw), making it a truly personal Agent system built for long-term tasks.
In this guide, I will walk you through environment preparation, model configuration, TUI chat, and messaging gateway integration to complete your first Hermes Agent deployment step by step.

Webmaster Communication Group: 767557452
Hermes Agent Overview
Hermes Agent is a lightweight, open-source, self-hostable AI Agent with long-term memory and skill accumulation capabilities, optimized for the usage environments and needs of Chinese users. Its core advantages are as follows:
 Highly Flexible Deployment: Supports local PCs, VPS, Docker, WSL2, and other environments, covering all Linux/macOS/Windows systems, with domestic mirror acceleration for installation;
 Long-term Evolution: Remembers your projects, preferences, and work habits across sessions, accumulating solved problems into reusable Skills—the more you use it, the better it understands you;
 Comprehensive Toolset: Supports 40+ tools including MCP, terminal, files, browser, images, and TTS, enabling automation like daily reports, backups, and inspections via cron;
 Cross-Platform Online: Can be connected to messaging gateways like QQ, WeChat, Feishu, DingTalk, Telegram, and Discord, responding anytime, anywhere;
 Full Model Compatibility: Supports Qwen, GLM, Kimi, MiniMax, Claude, Gemini, OpenAI-compatible APIs, and local models, adapted for domestic networks.
Hermes Agent Official Website: https://url.zeruns.com/HermesAgent
Preparation
I’ll be using a Linux cloud server for this demonstration, but you can also deploy it on a Raspberry Pi, Mac, mini PC, or other devices. However, using a cloud server might be more convenient—for instance, if you want to create a website, you can give it instructions to write and deploy the website directly so it can be accessed right away.
Recommended Cloud Servers:
- Yunyun Hong Kong Zone 5 Large Bandwidth VPS Review, 2 Cores 2G 500Mbps for only 19.6 CNY/month: https://blog.zeruns.com/archives/932.html
- Kuya Data Hong Kong VPS Performance Review, direct connection to three networks, 2 Cores 2G 5Mbps for only 6.9 CNY/month: https://blog.zeruns.com/archives/2646.html
- Beishaoyun Hong Kong Zone A VPS, 2 Cores 2G 10Mbps for only 18 CNY/month, direct connection to three networks: https://blog.zeruns.com/archives/933.html
- Other cost-effective server recommendations: https://blog.vpszj.cn/archives/41.html
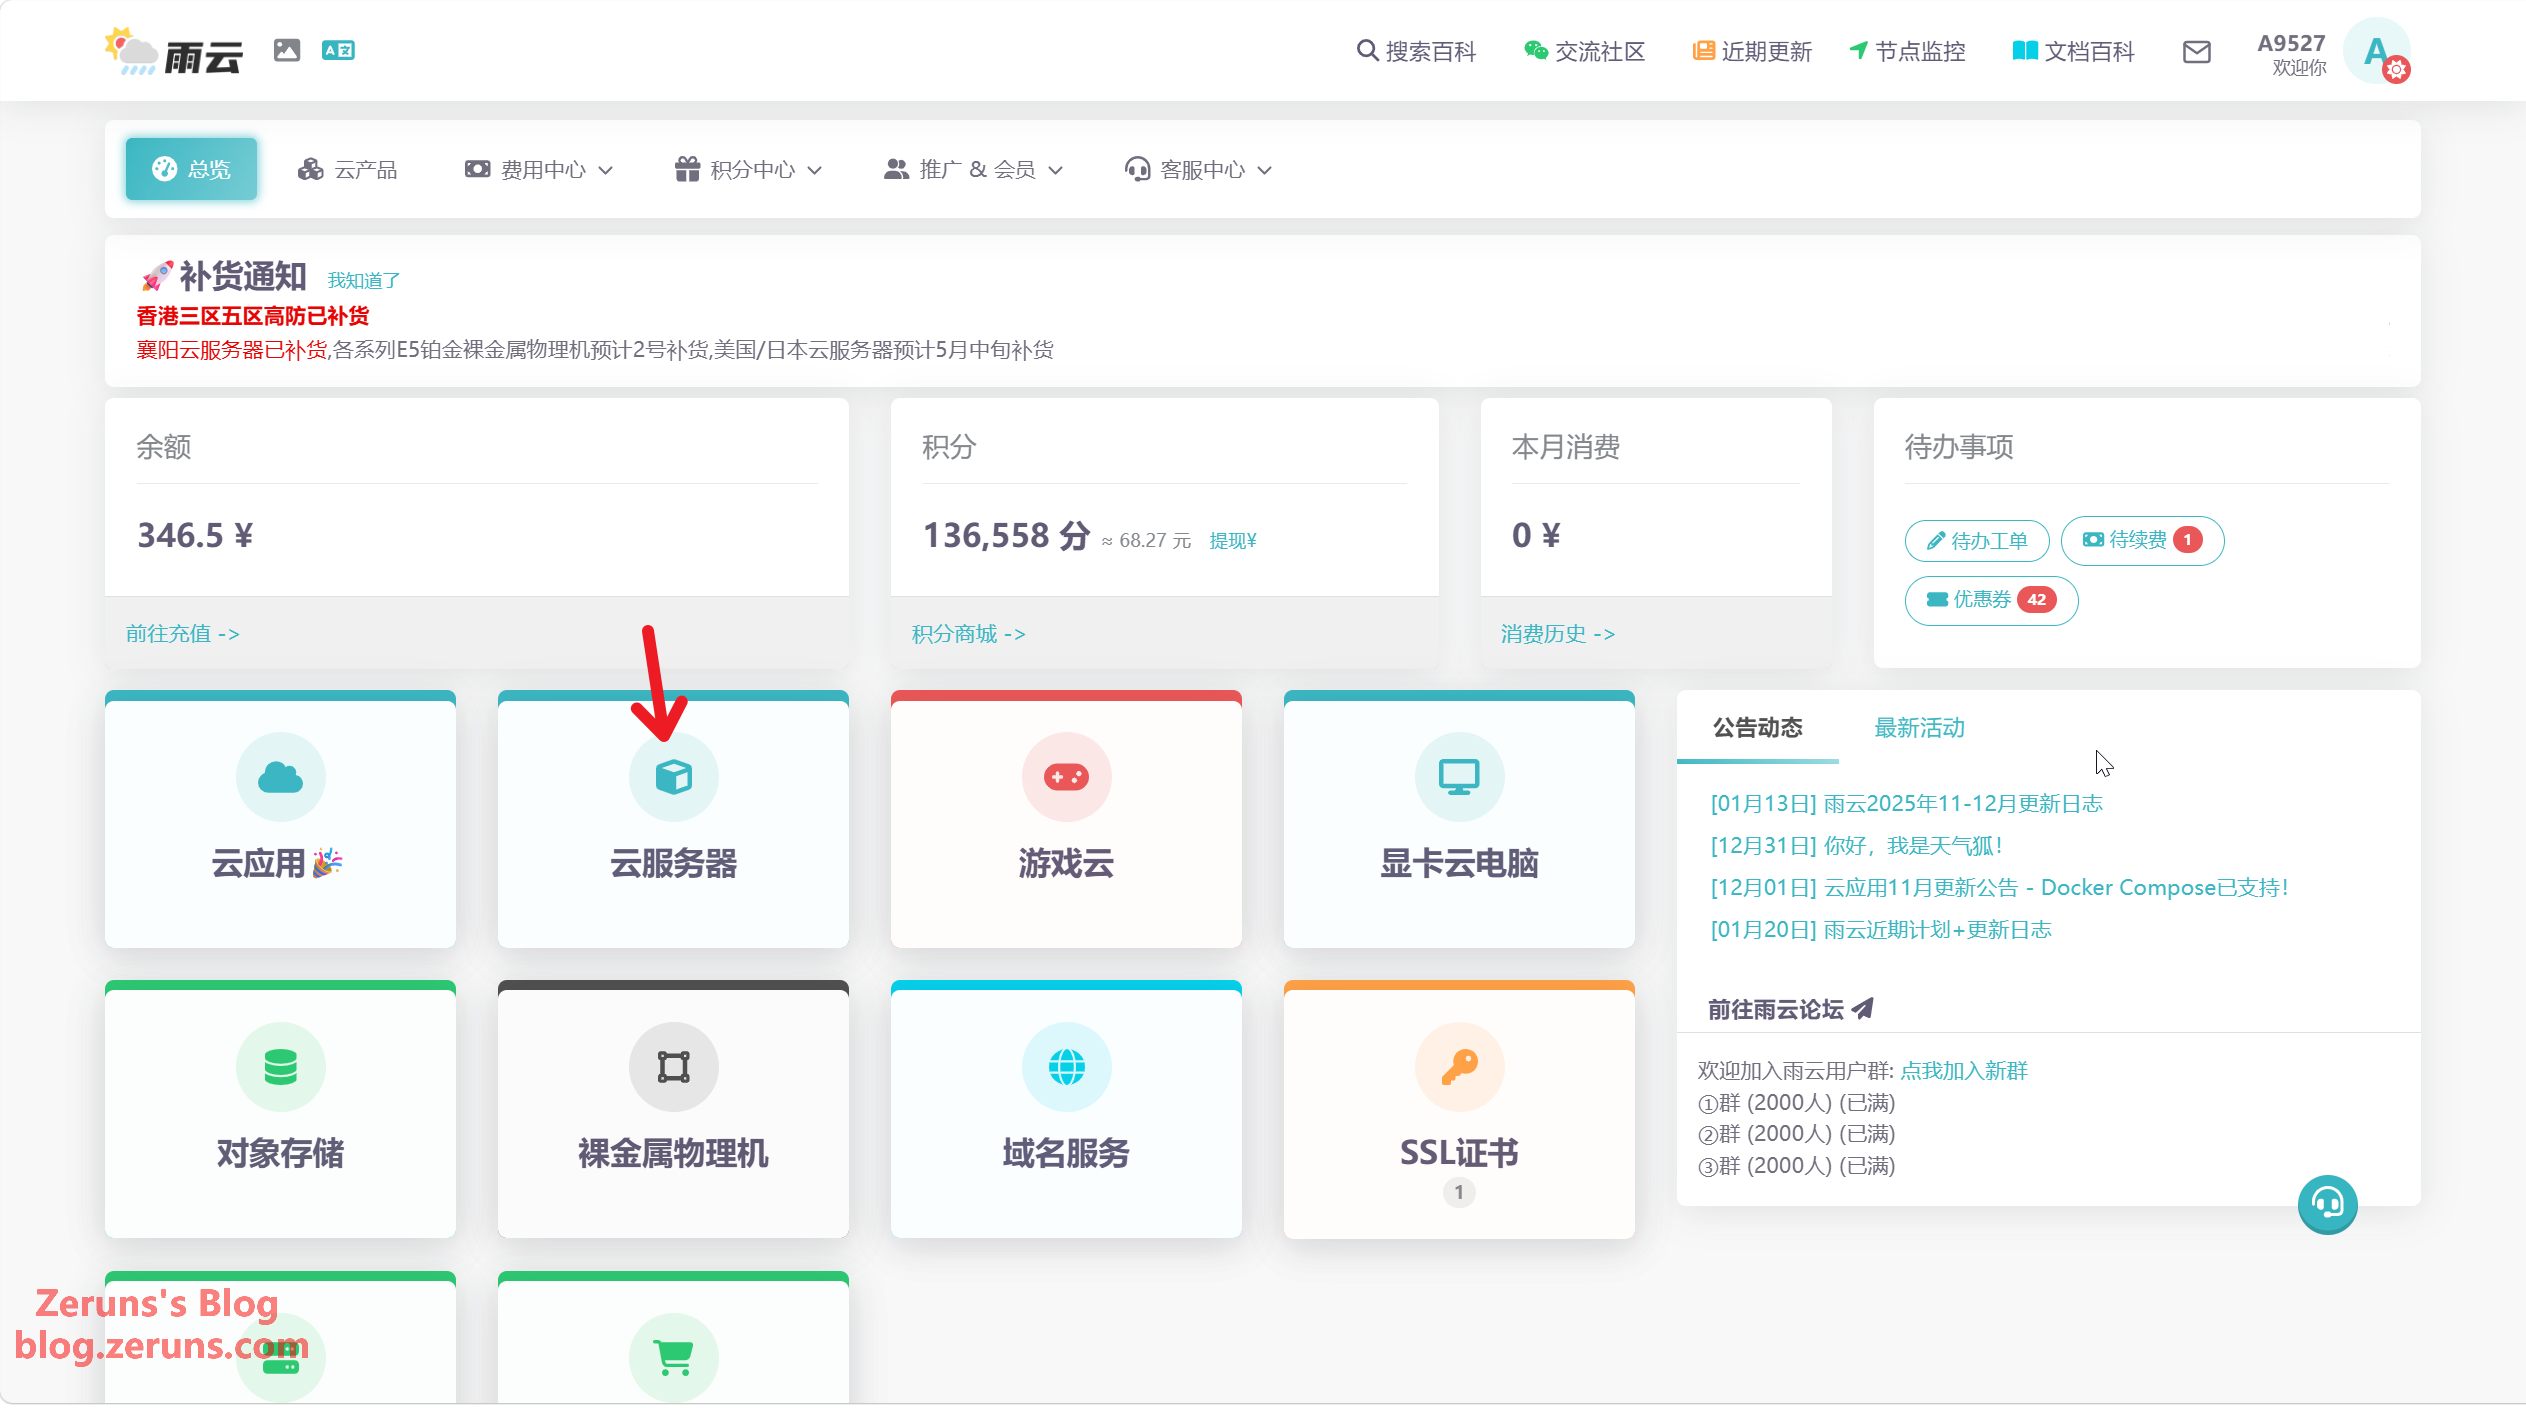
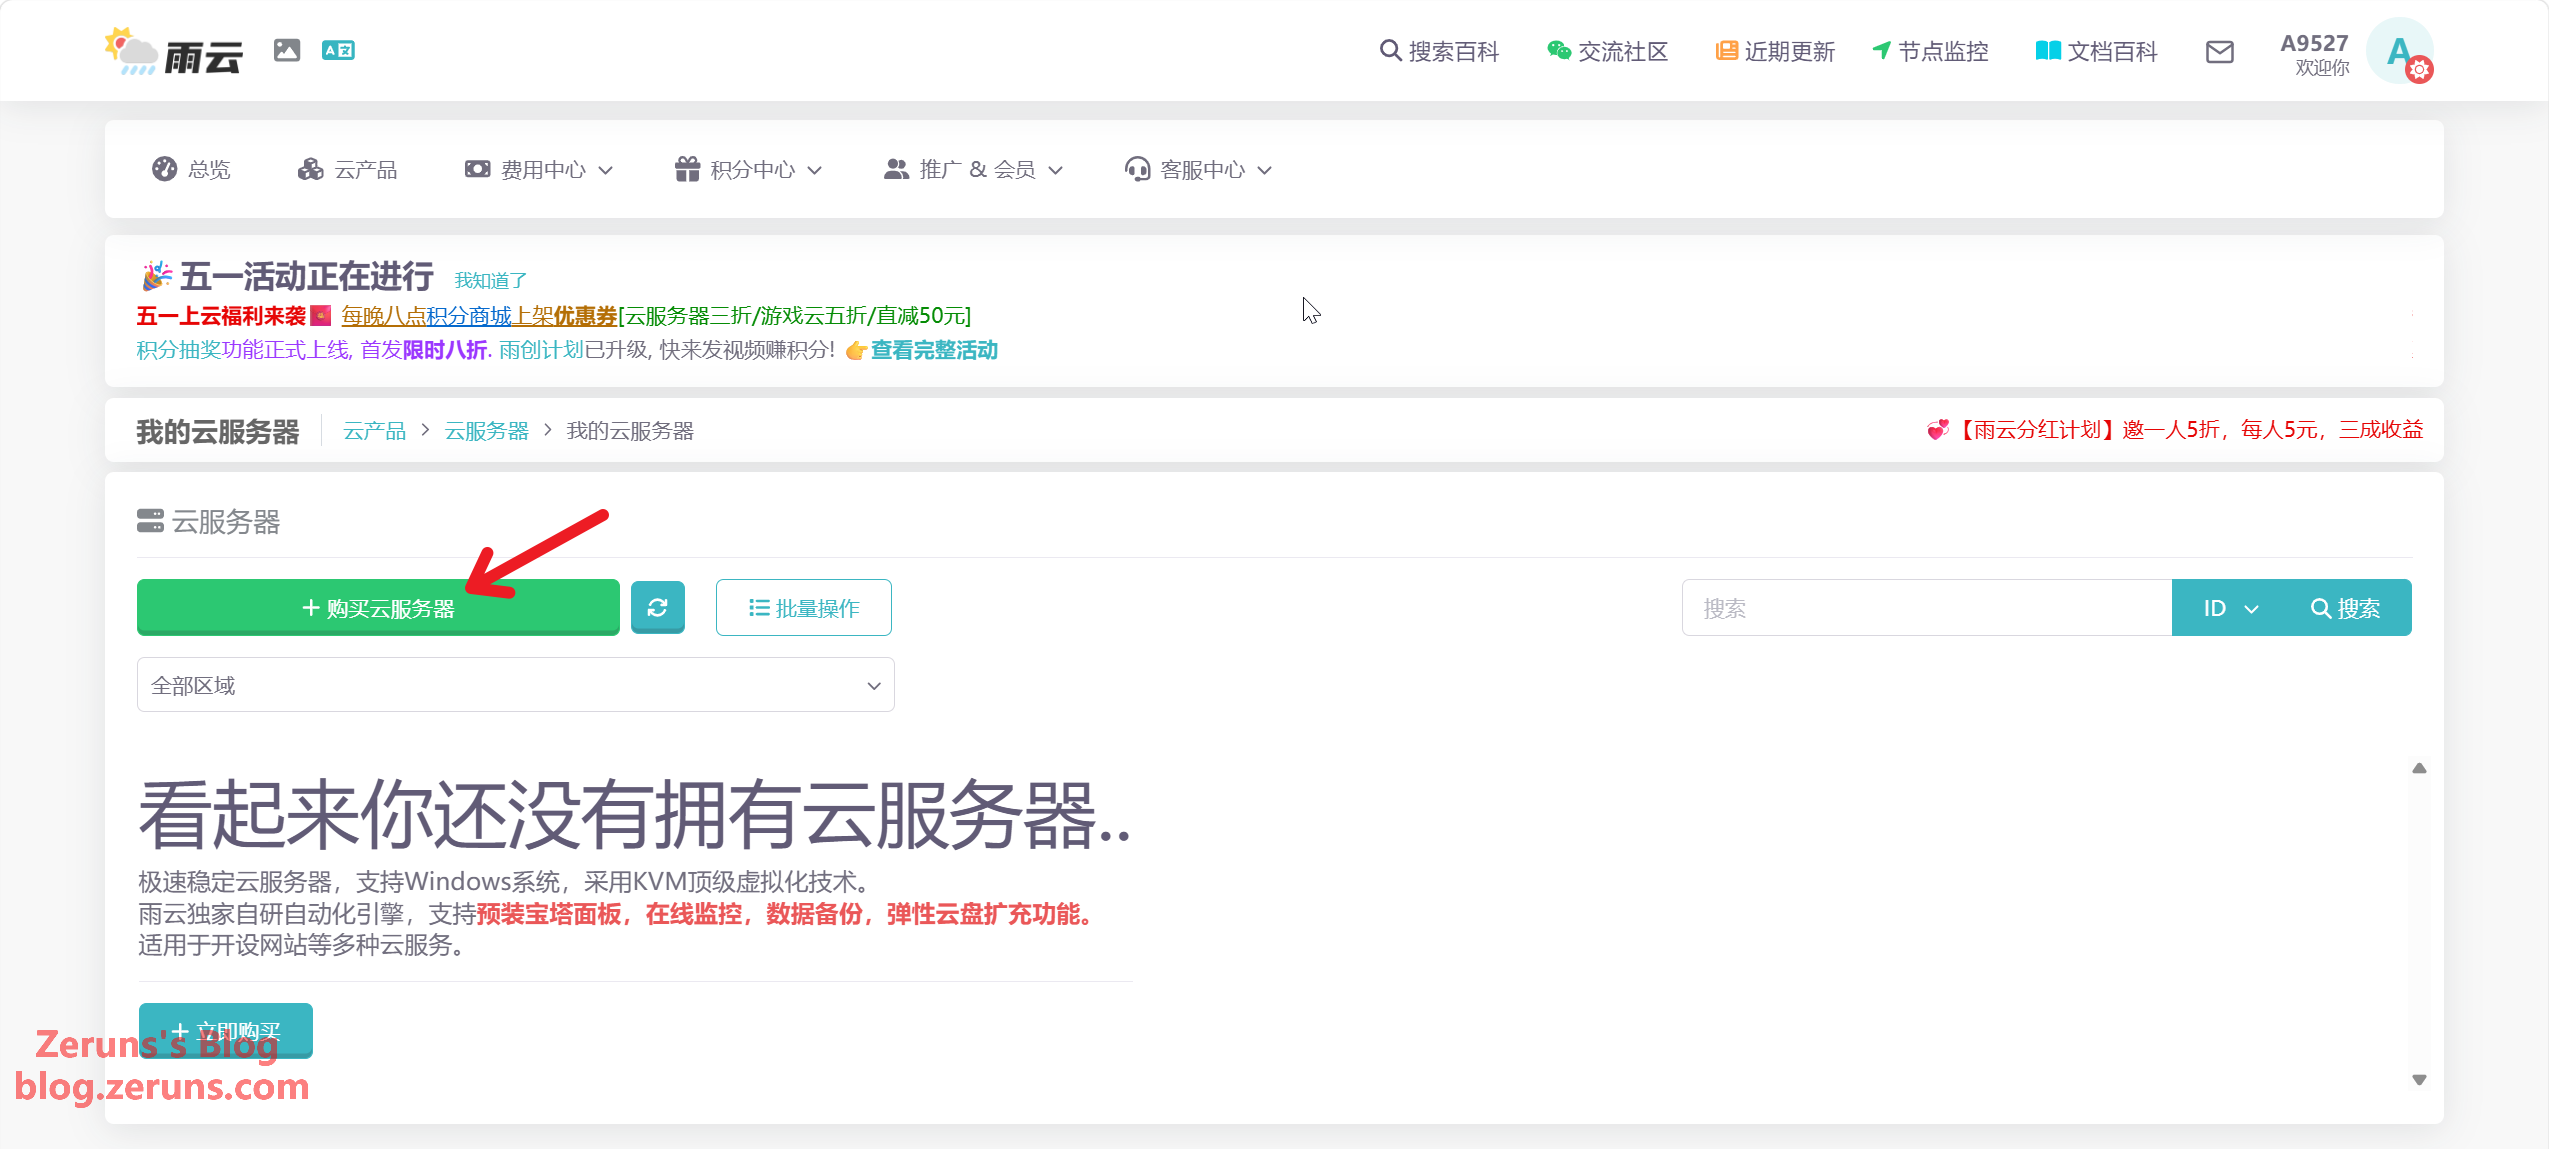
I’m using a Yunyun cloud server for this tutorial. First, use the affiliate link or promo code (zeruns) below to register a Yunyun account. Once registered, log into the Console and click Cloud Server → Purchase Cloud Server.
- Yunyun Promo Registration Link: https://rain.zeruns.com/?s=eeclub
- Yunyun Promo Code: zeruns
- Registering with the promo code gets you a 50% off coupon for the first month, and you can also claim an exclusive 20% off new purchase coupon in the points store. The 20% off coupon can be stacked with the official 30% off annual payment discount, effectively making it 5.6折 (44% off).
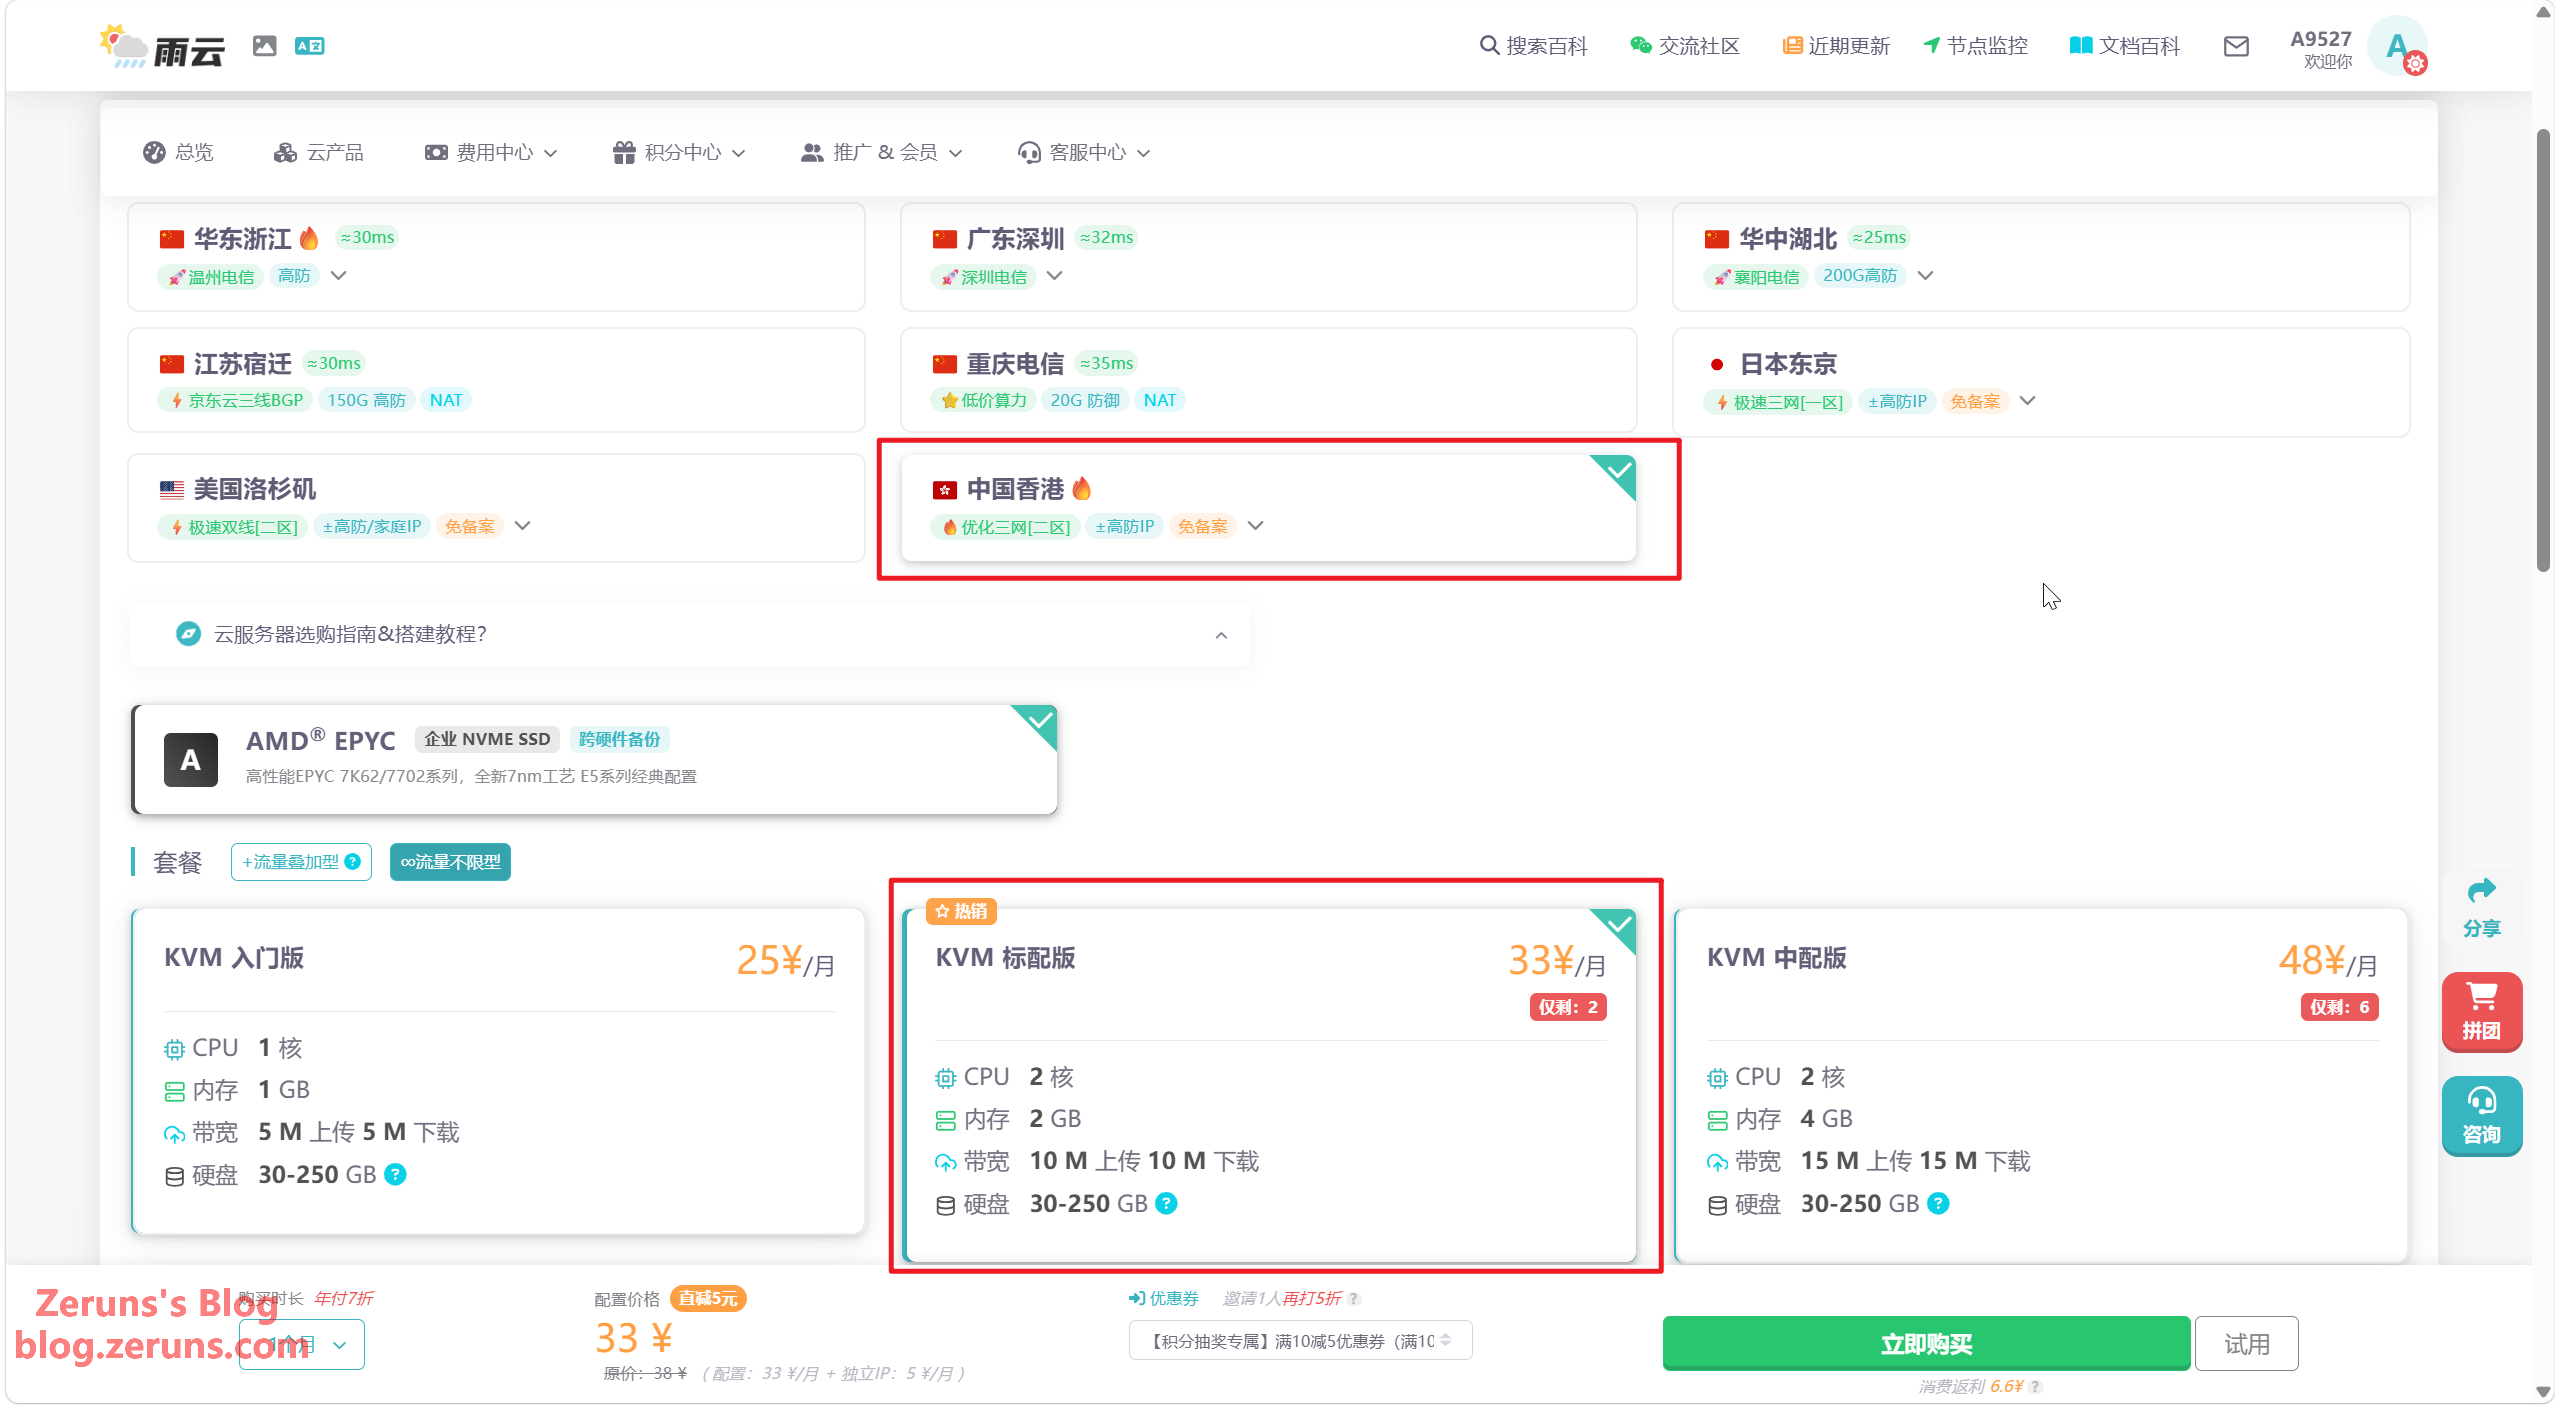
Next, select the server region and configuration based on your needs. I chose Hong Kong Zone 2 with 2 cores and 2GB RAM. If you need to host a website, I recommend choosing Hong Kong, Japan, or the US, as no ICP filing is required.
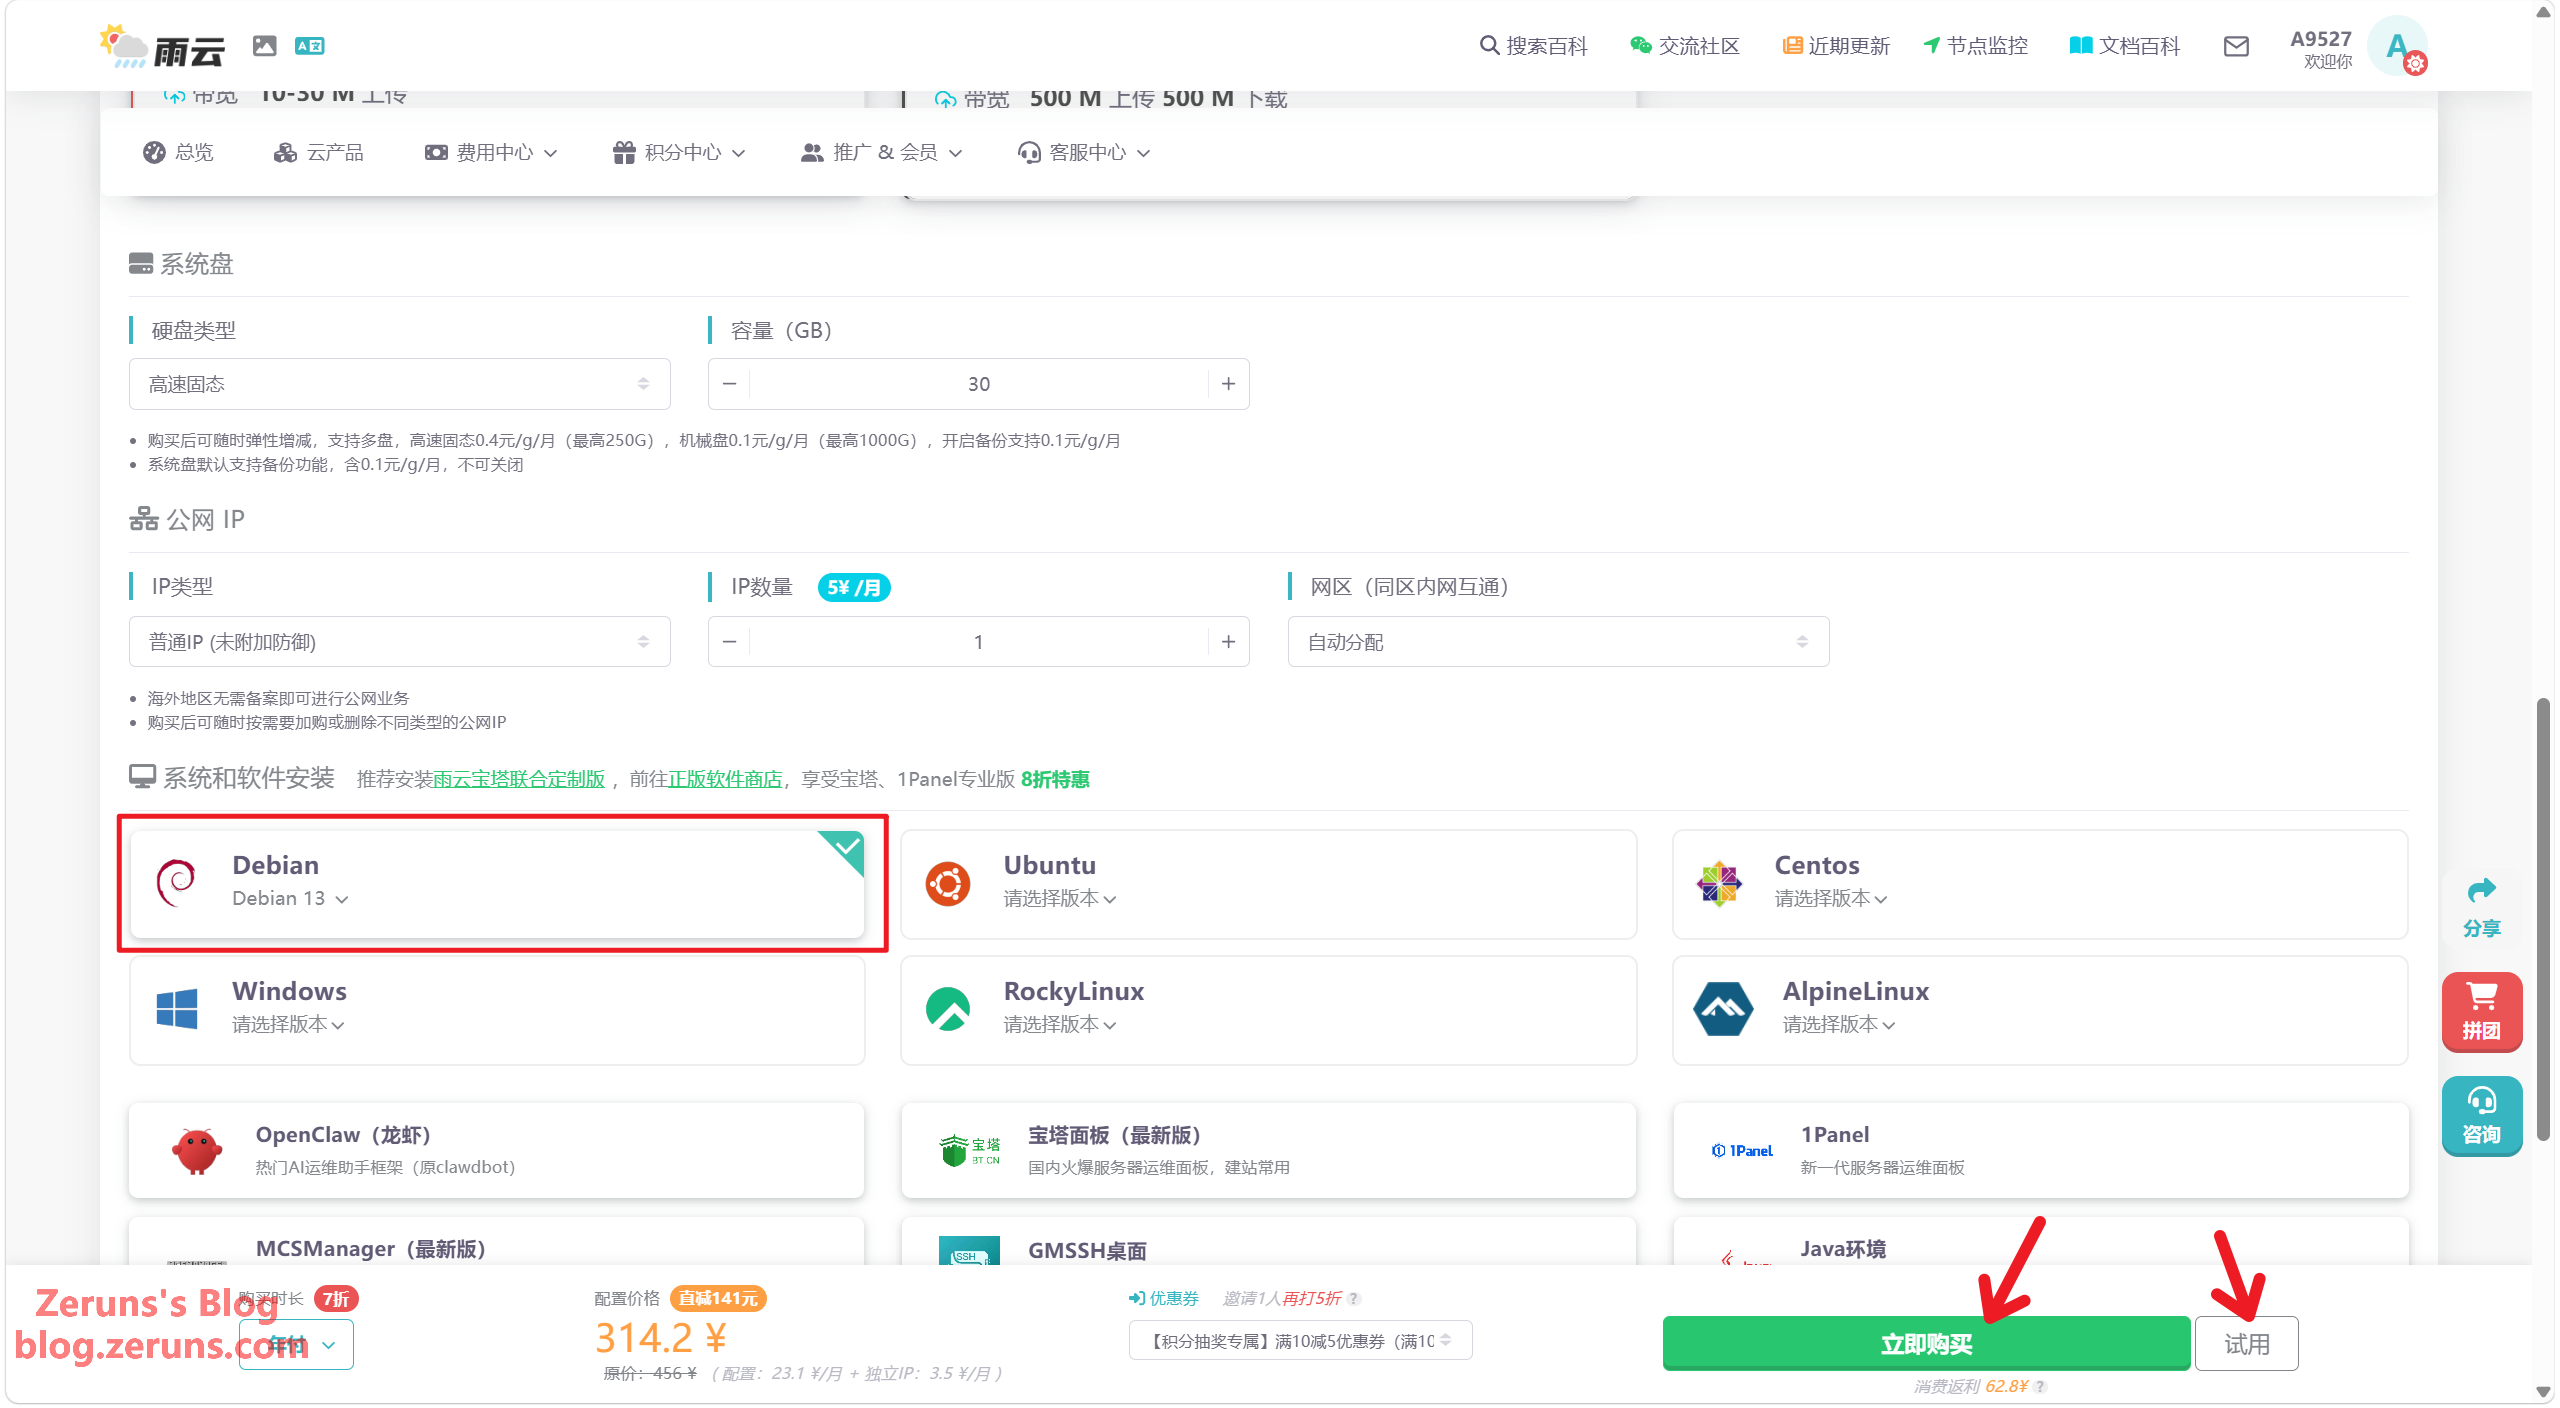
For the OS, select Debian 13. Once selected, click Buy Now or Trial—you can try it for 1 day for just 1 CNY.
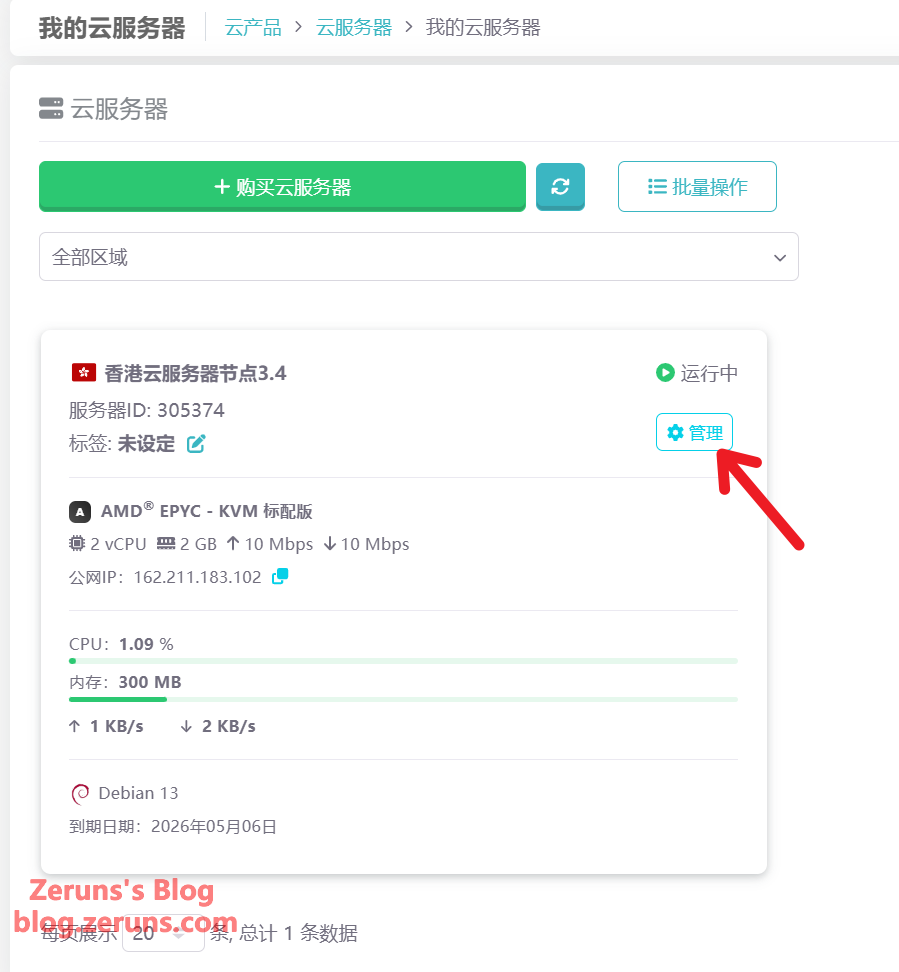
After purchasing, you’ll see your new cloud server under My Cloud Servers. Click Manage.
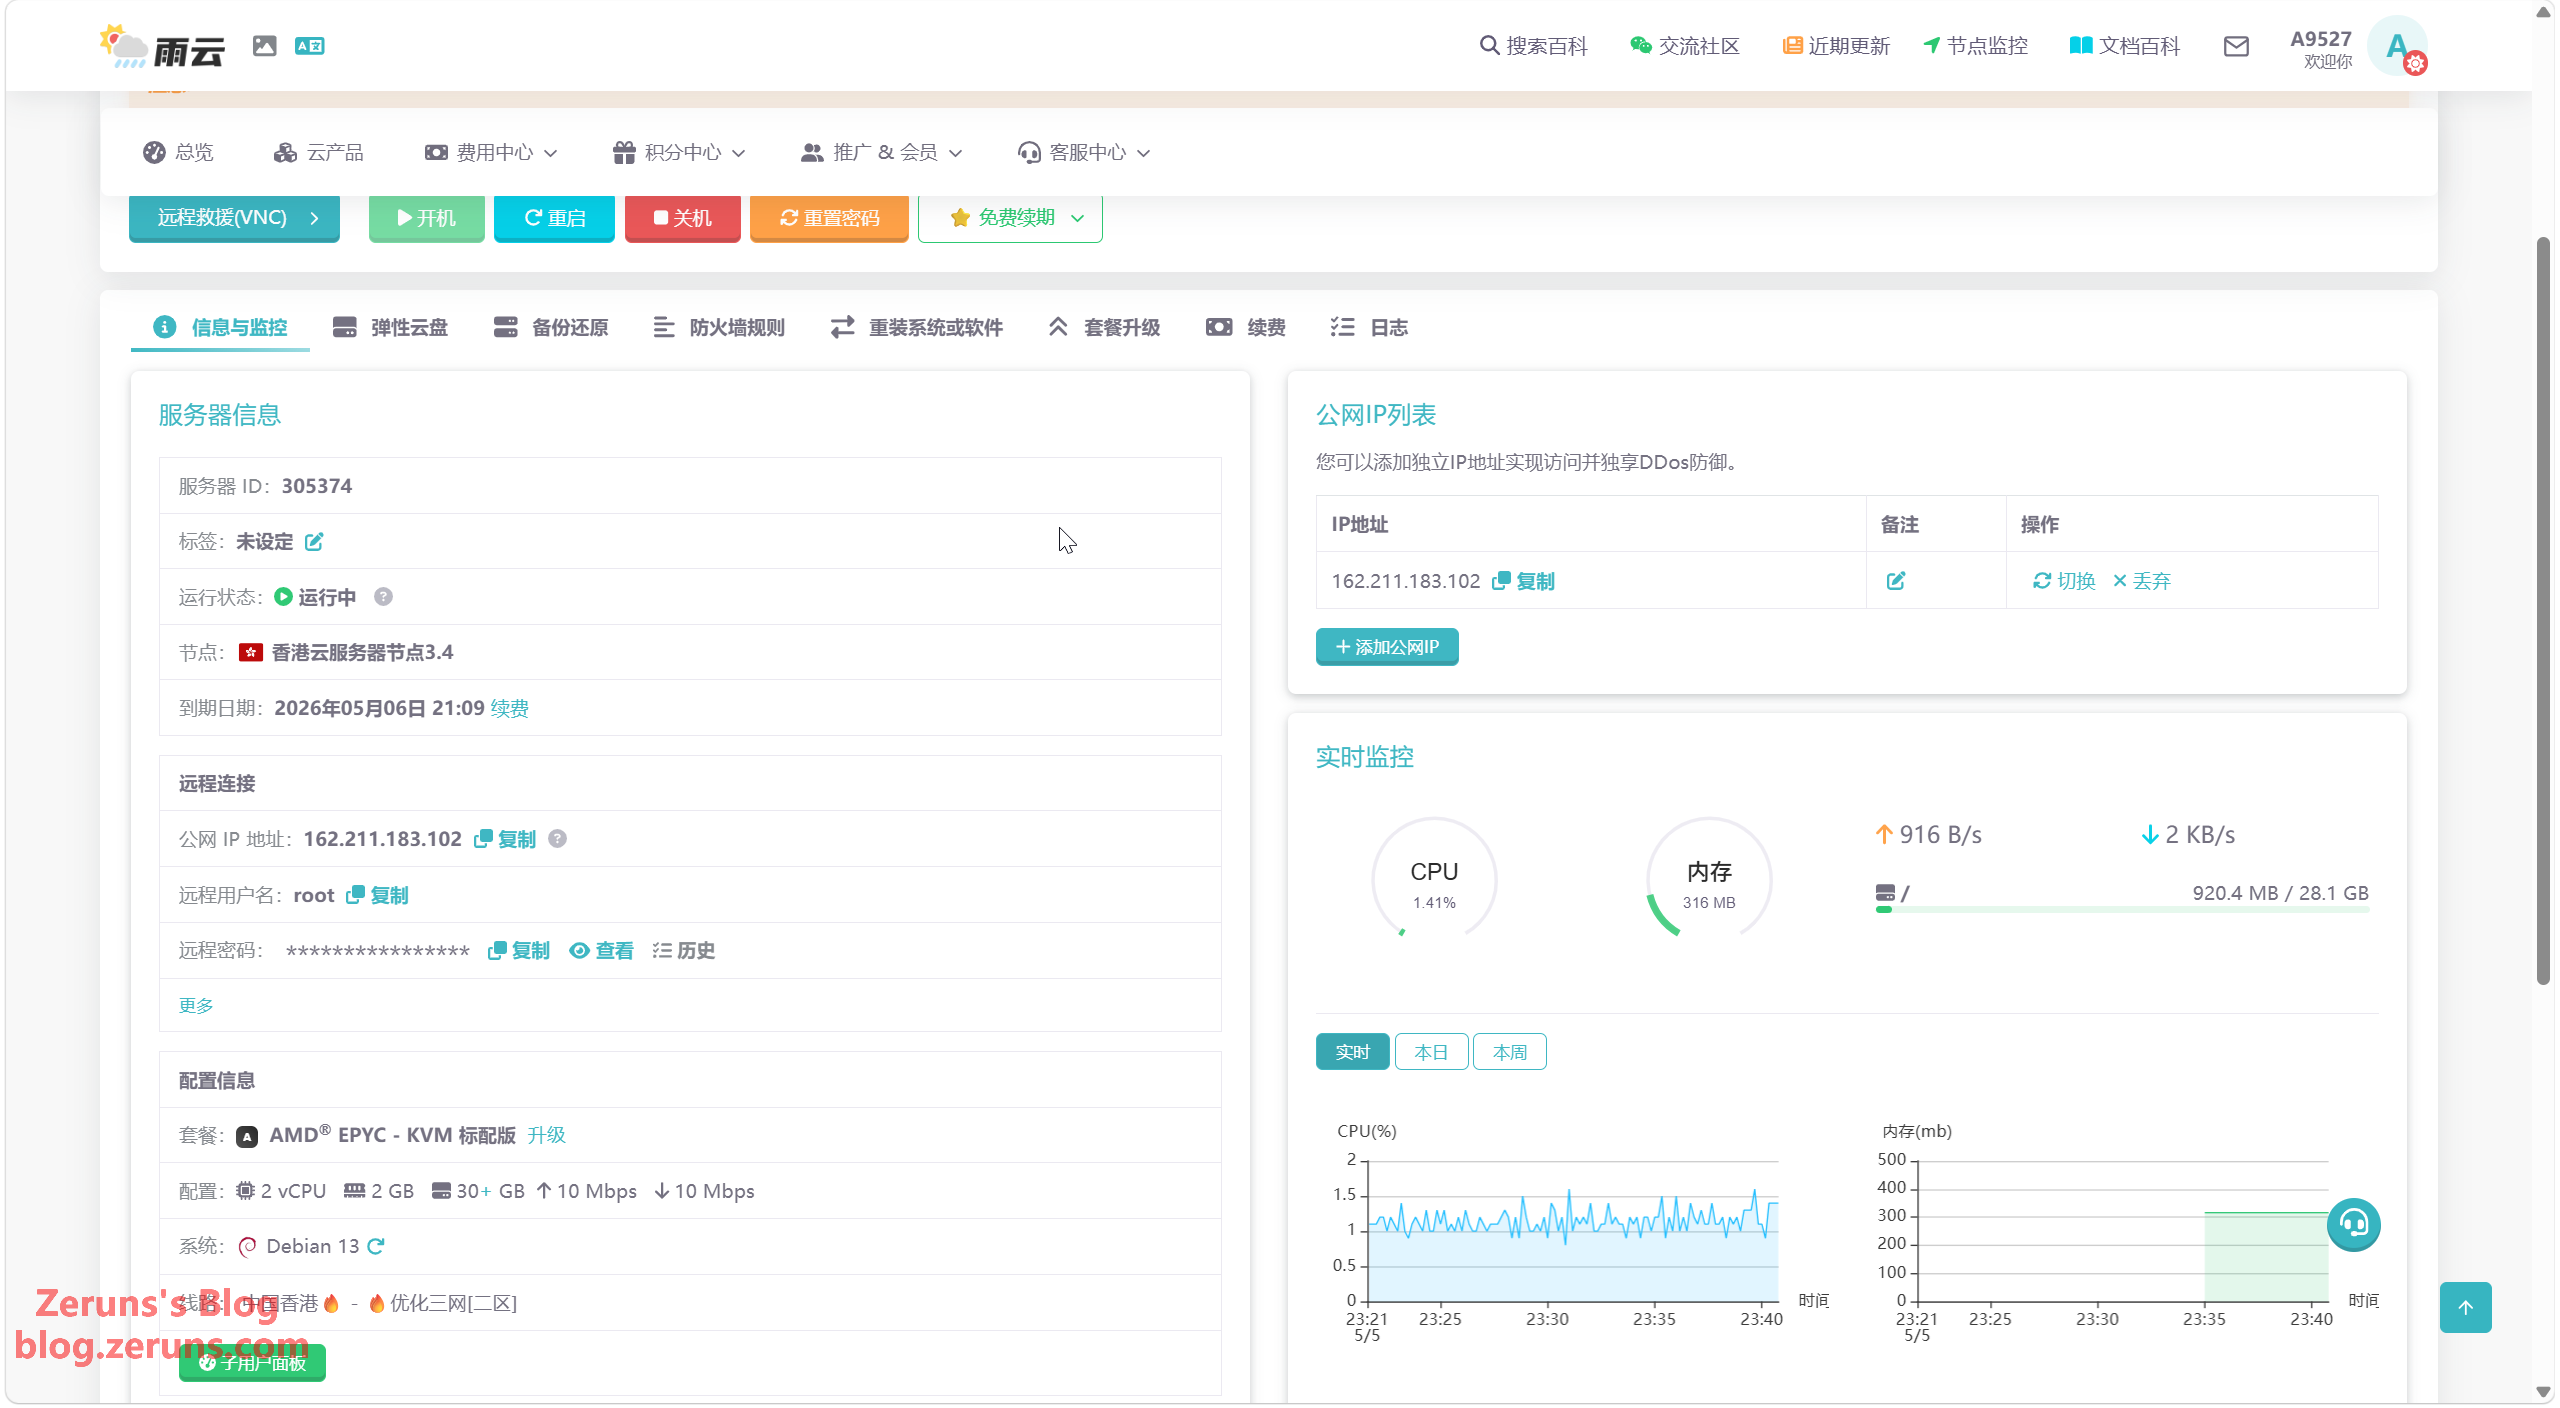
You’ll then see your cloud server’s information, where you can reinstall/switch the OS or upgrade the configuration. Wait for the server setup to complete before moving on to the next step.
While waiting for the server to be created, we can prepare the Large Language Model (LLM) platform API first. Here are a few platforms I recommend:
- Ucloud AstraFlow: https://url.vpszj.cn/uc_astraflow
- Alibaba Cloud (Get a 10% off coupon via this link): https://url.vpszj.cn/alicloud
- SiliconFlow (Get a 16 CNY voucher when you register via this link): https://url.vpszj.cn/siliconflow
- Recommendations and introductions for various AI LLM API platforms: https://bbs.eeclub.top/t/ai-api-2026-6-9/388
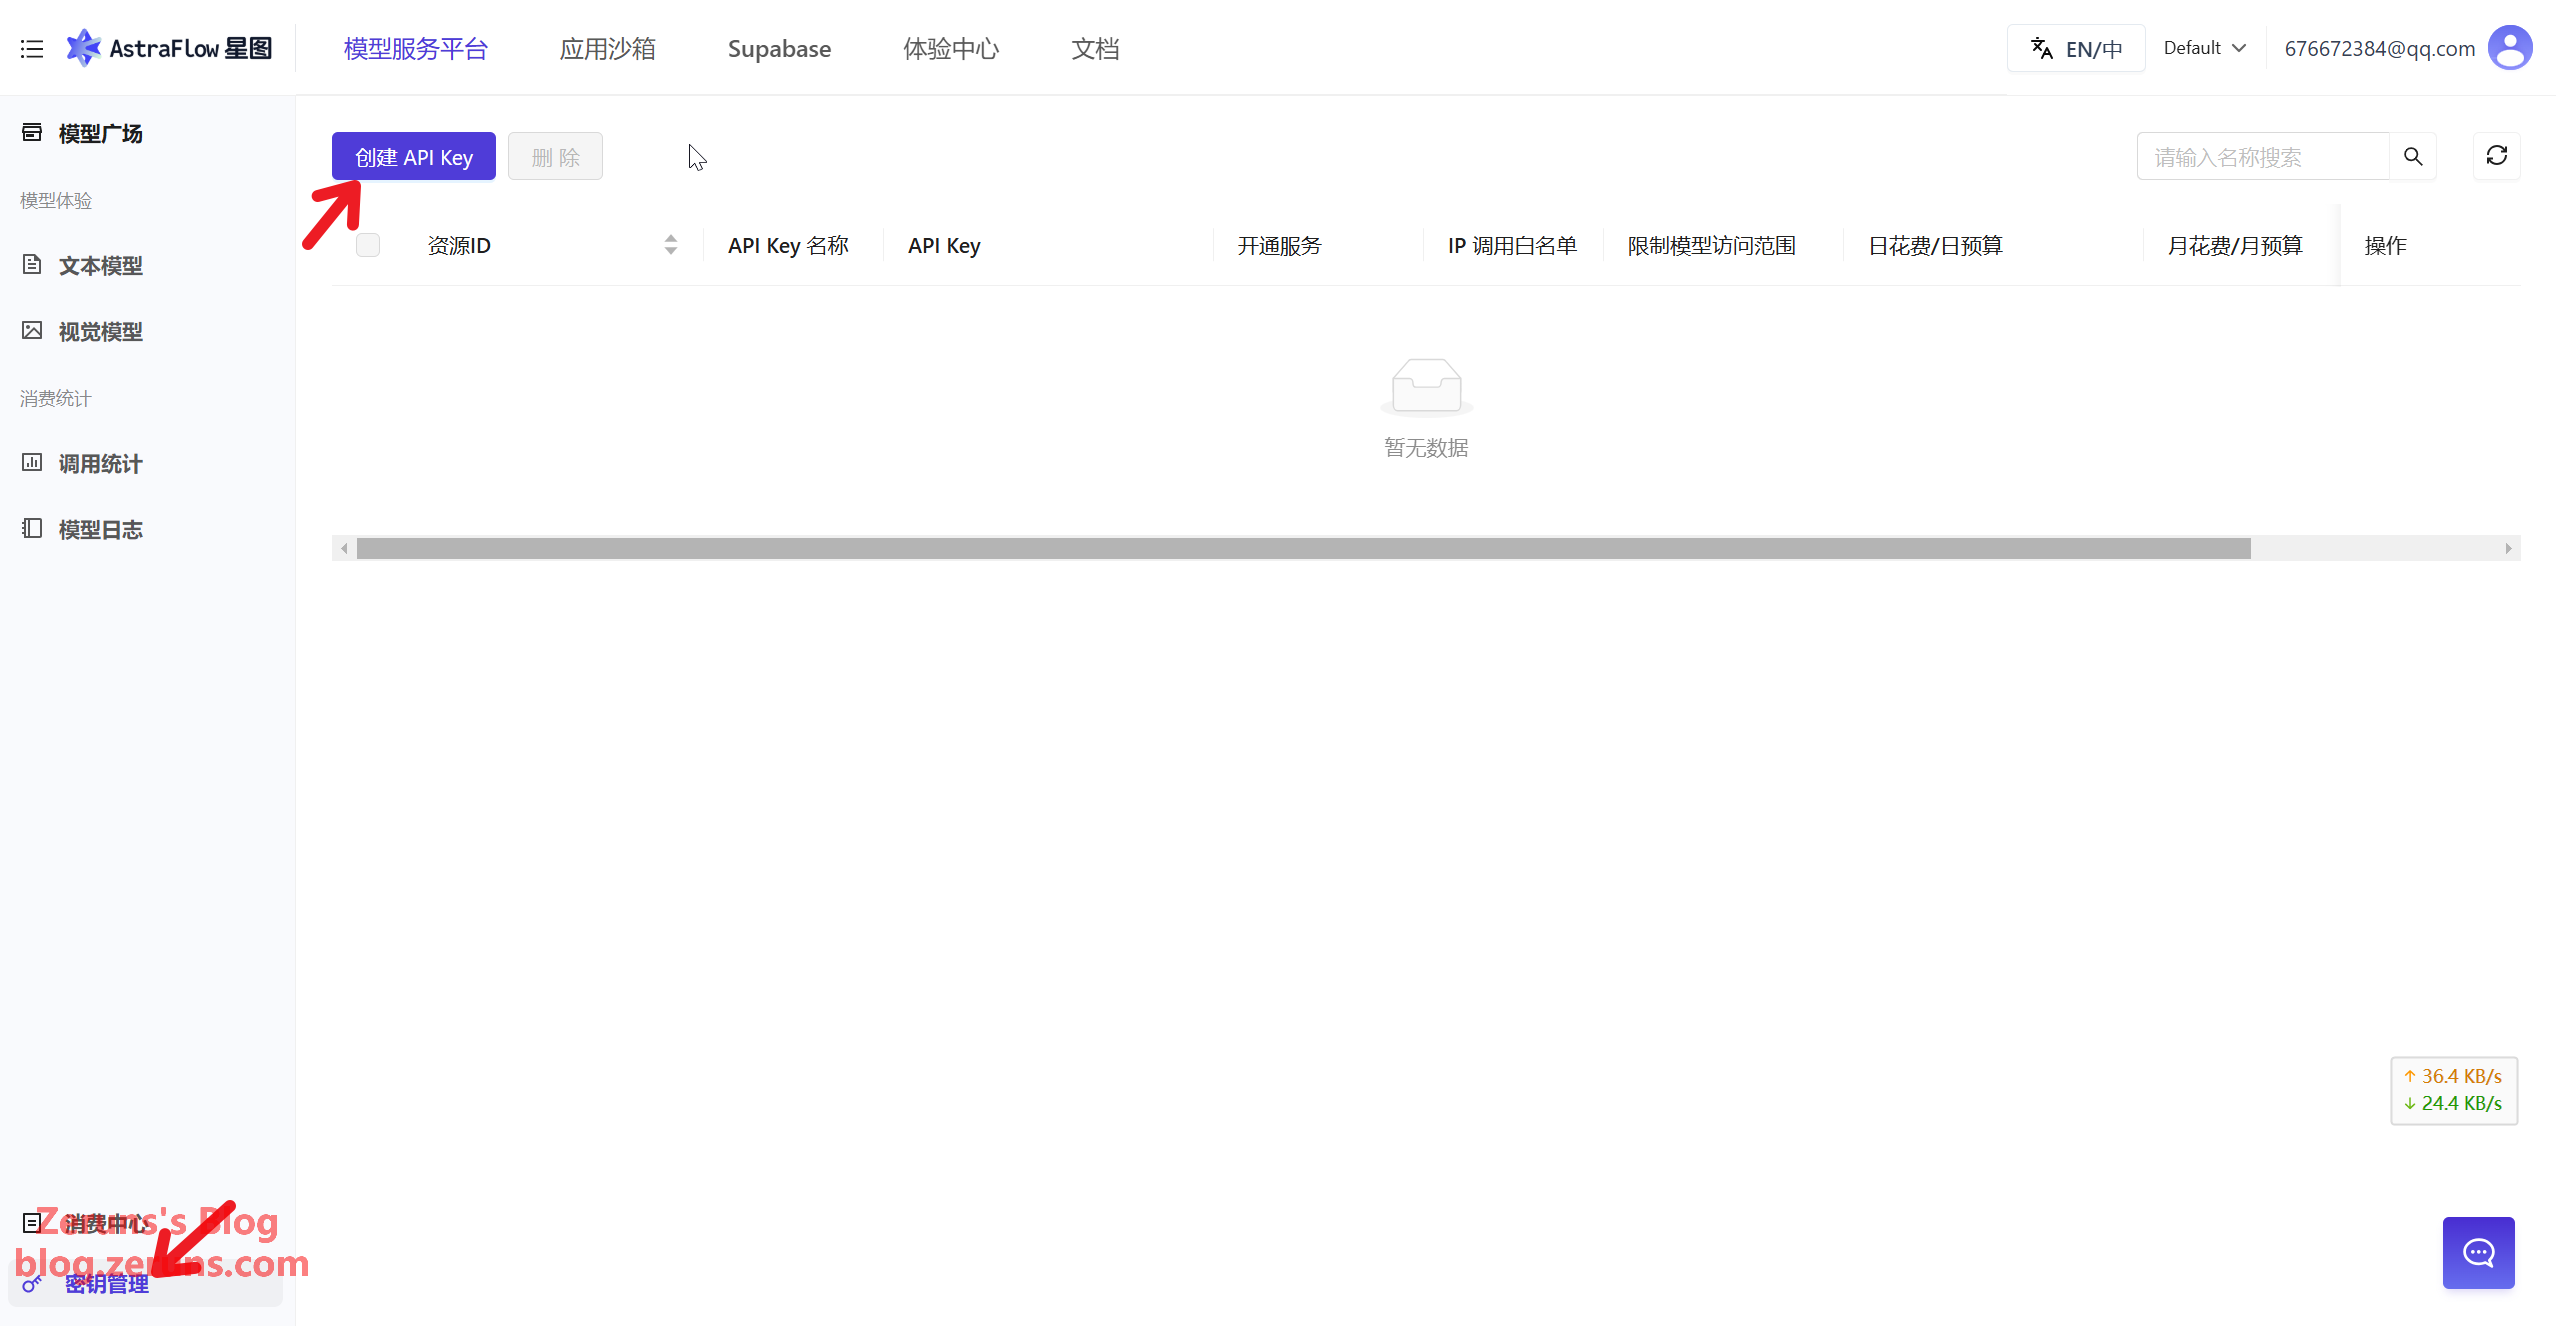
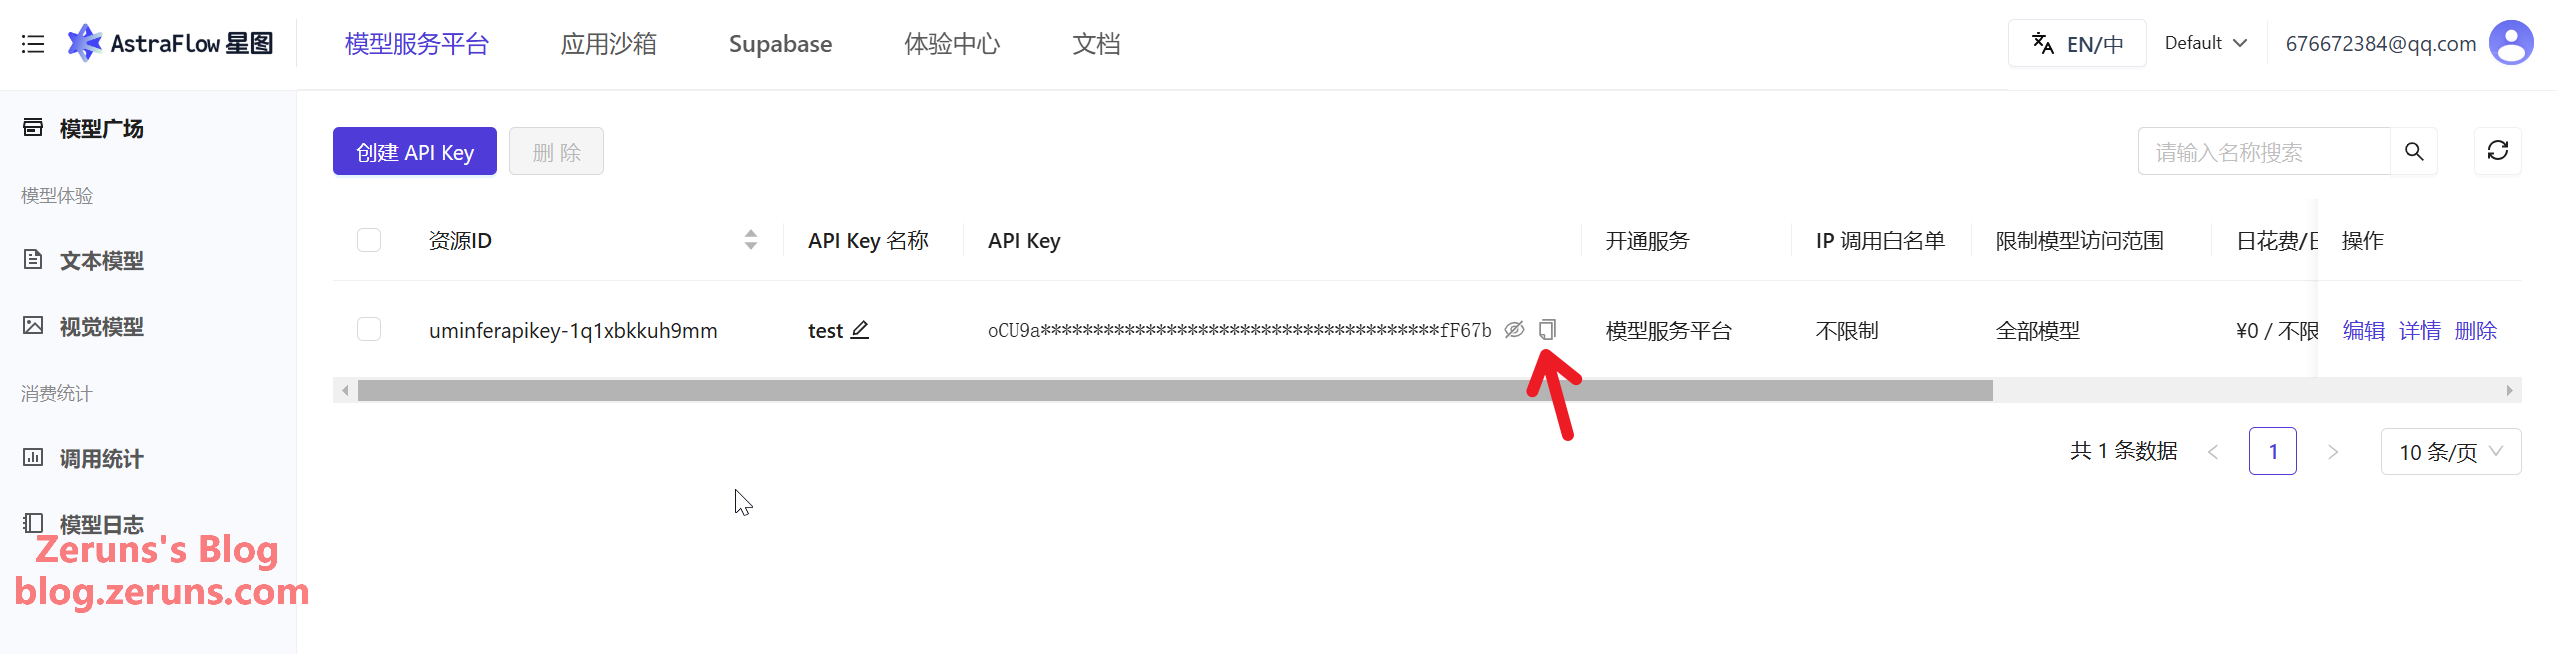
I’ll be using Ucloud’s AstraFlow platform for this demo. Register and enter the Ucloud AstraFlow platform via the link below, click Key Management in the bottom left corner, and then click Create API Key.
- Ucloud Promo Registration Link: https://url.vpszj.cn/uc
- Register via the promo link to get 500,000 free tokens.
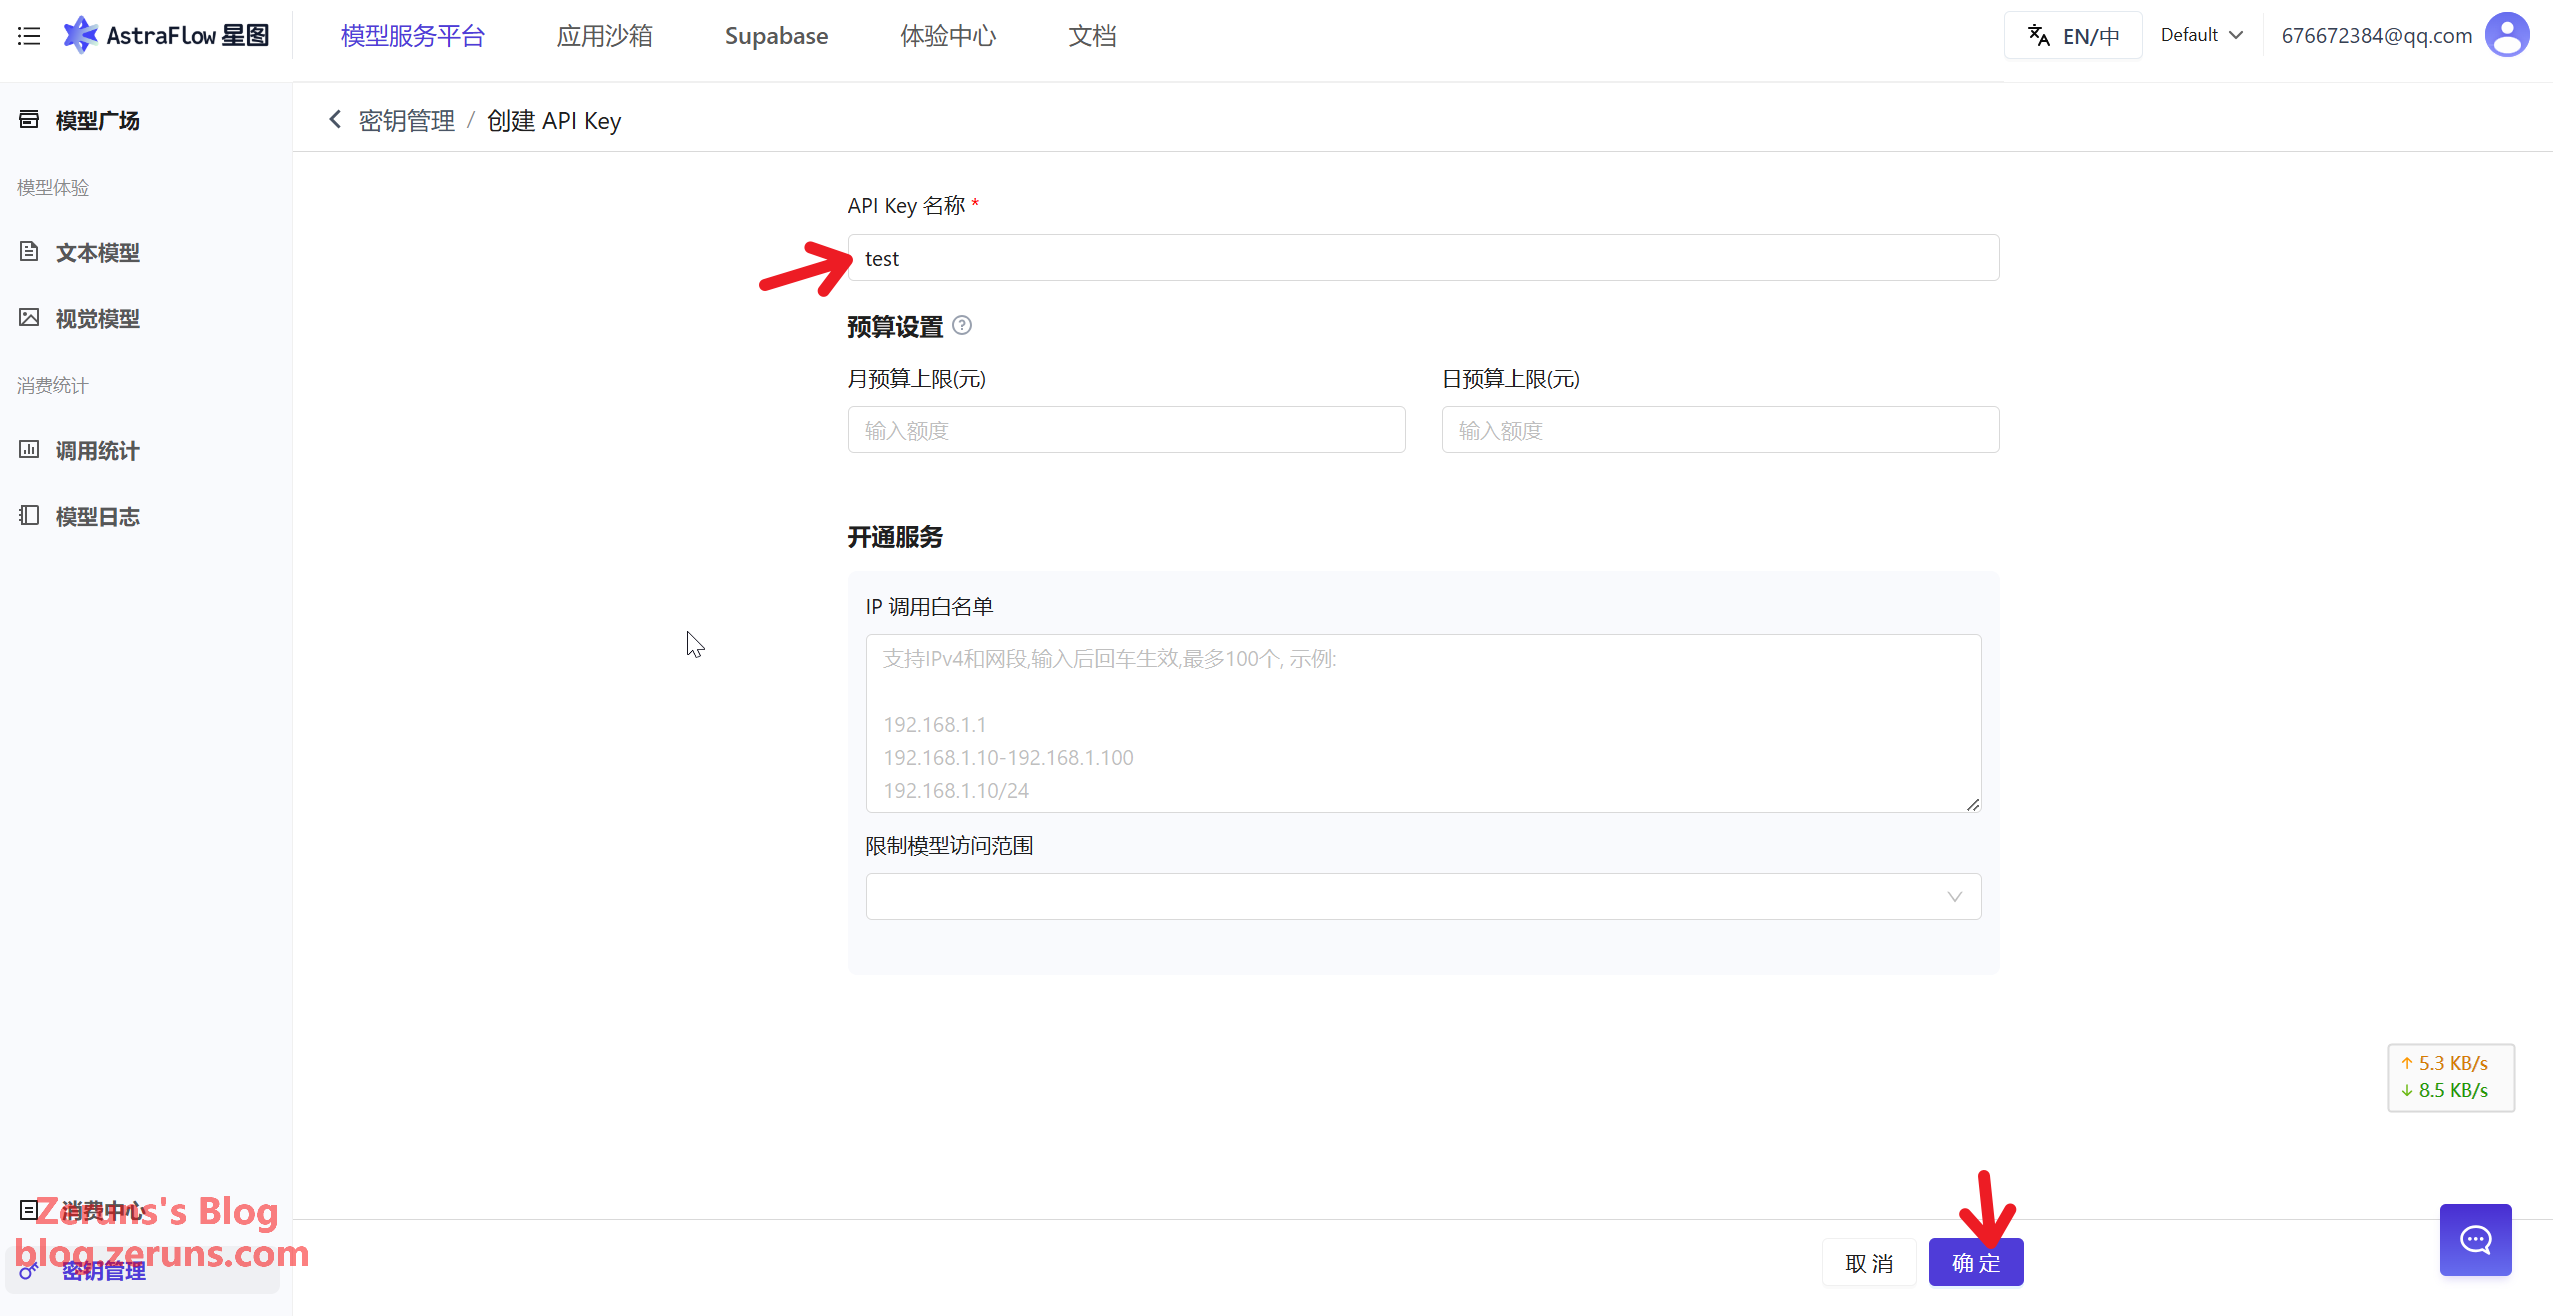
Set an API Key name of your choice. You can also set a budget limit; leave the rest as default and click Confirm.
Next, copy and save this API Key. You’ll need it when installing Hermes later. The process is similar for other platforms.
Connecting to the Server
Download, install, and open an SSH client. I recommend PuTTY or MobaXterm.
SSH Client Download Link: https://www.123pan.com/ps/2Y9Djv-UAtvH.html
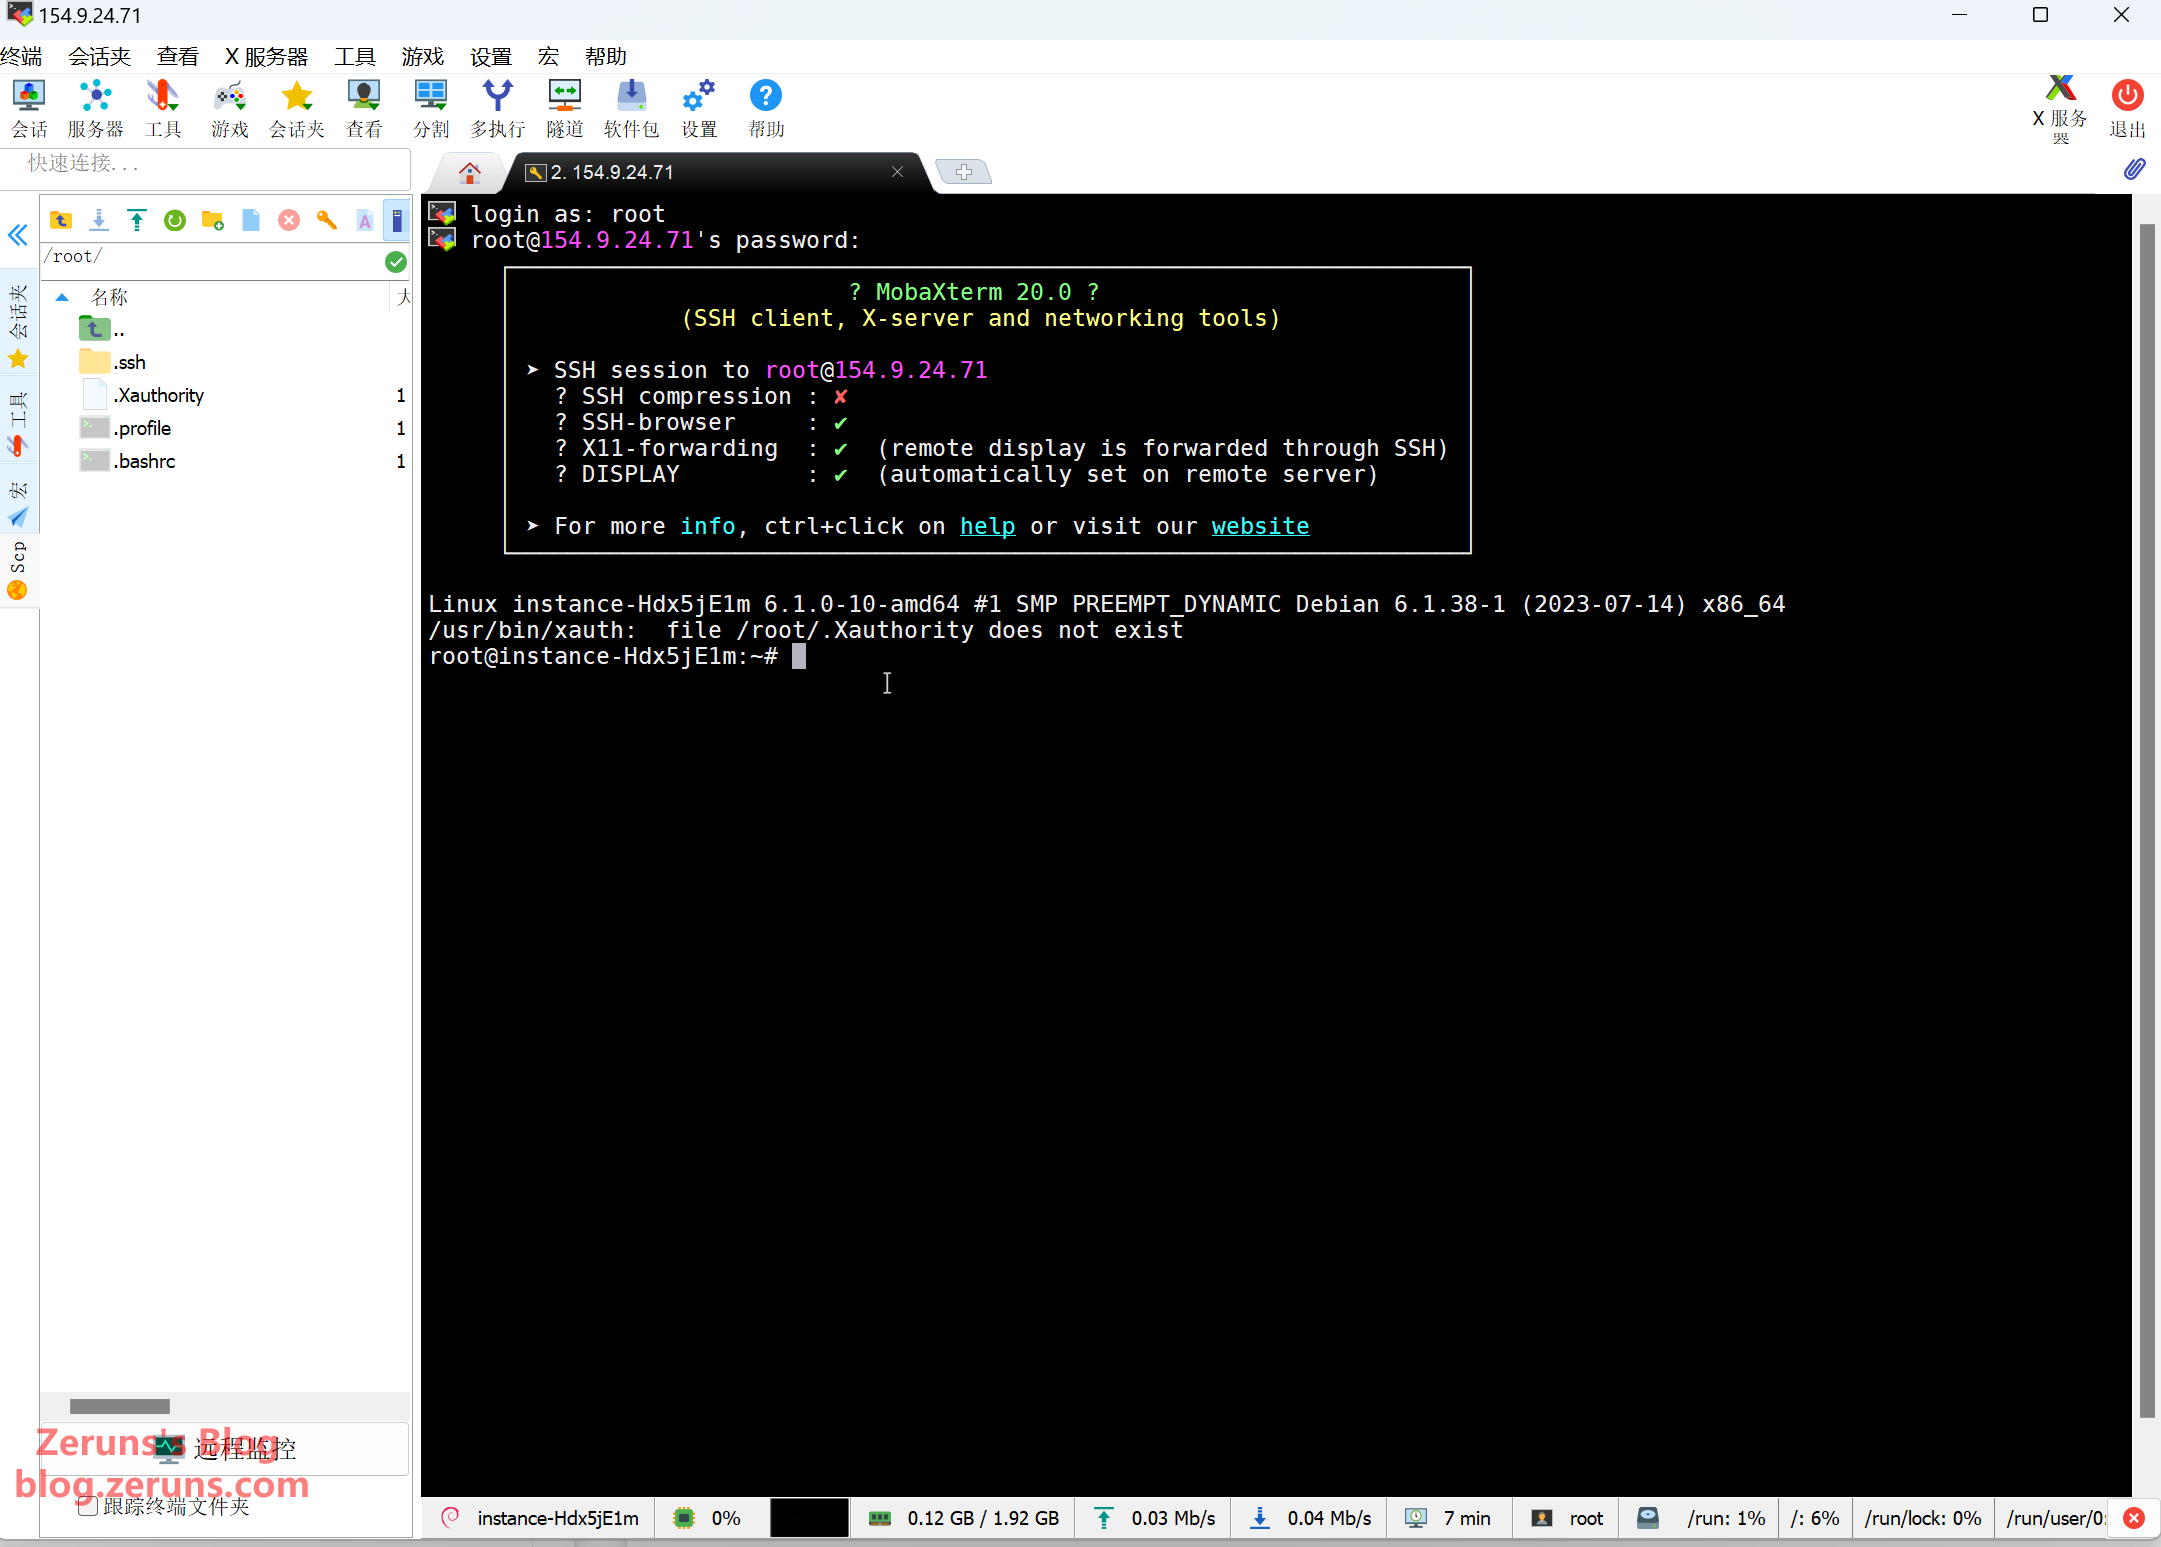
I’m using MobaXterm here. Enter your server’s IP address (obtained from the console) and the SSH port (default is 22) into the SSH client, then click OK or Open.
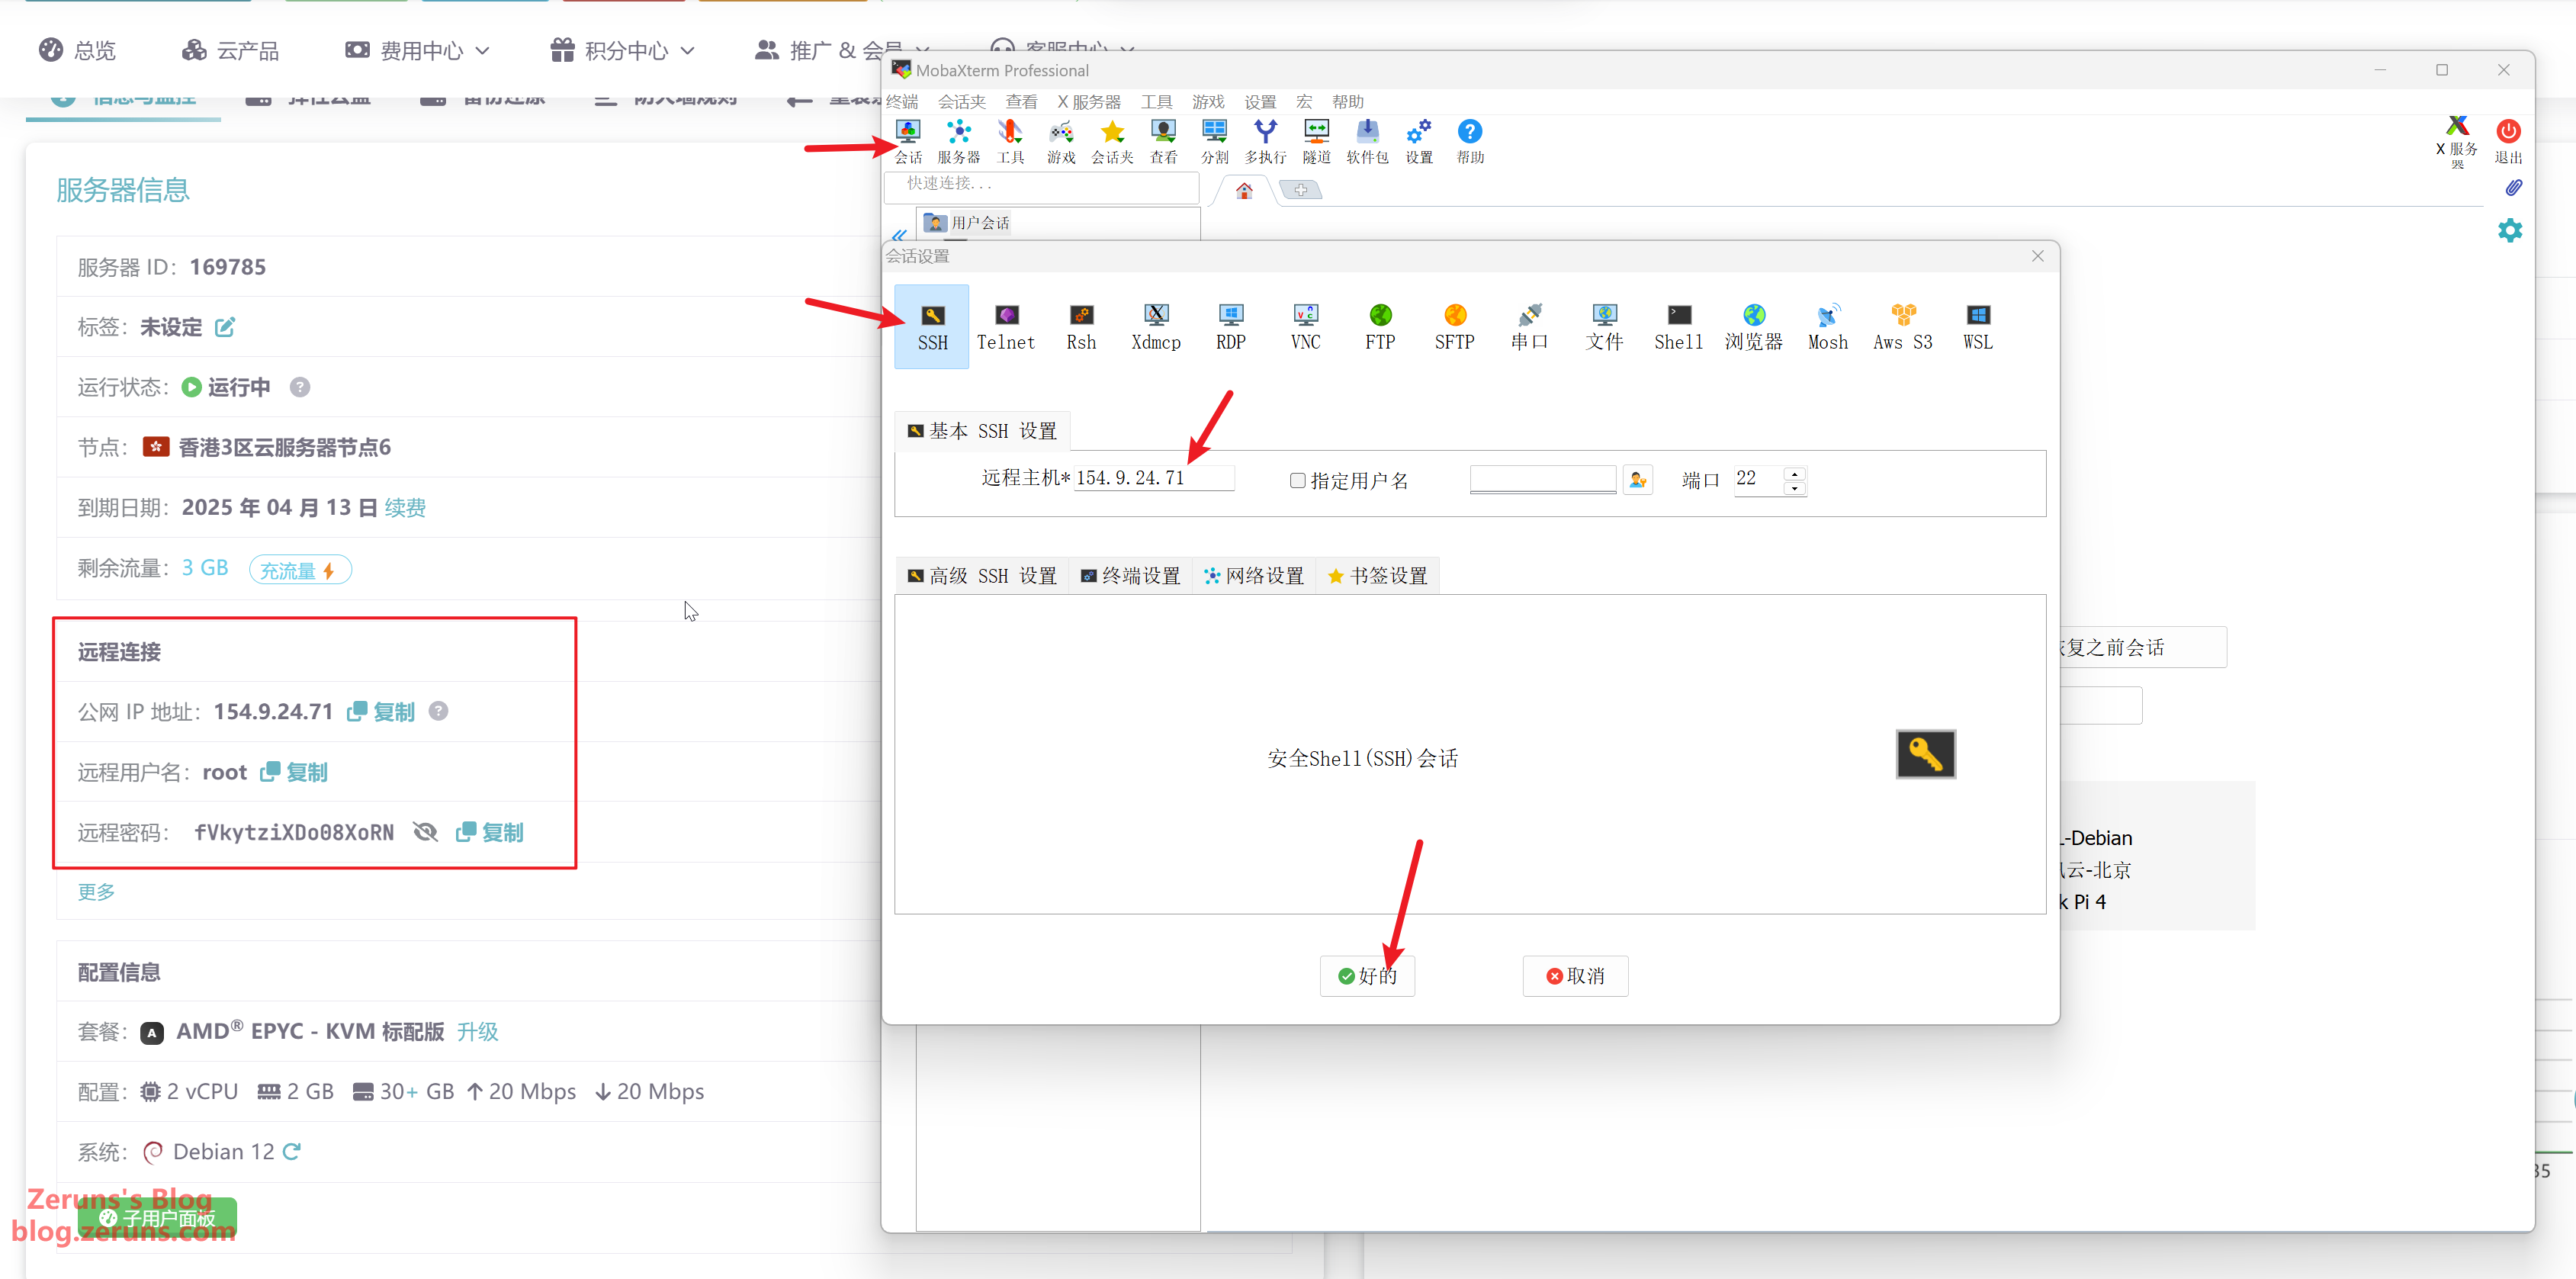
Then enter your username and press Enter; the default username is usually root. Next, enter your password (obtained from the console) and press Enter to confirm. Note that the password won’t be displayed as you type.
Tip: In the SSH terminal, hold down the left mouse button to select text, release the mouse button, and then click once on a blank space to copy the selected text. Right-clicking in the SSH terminal pastes the text.
Change APT Sources (Skip this step for overseas servers)
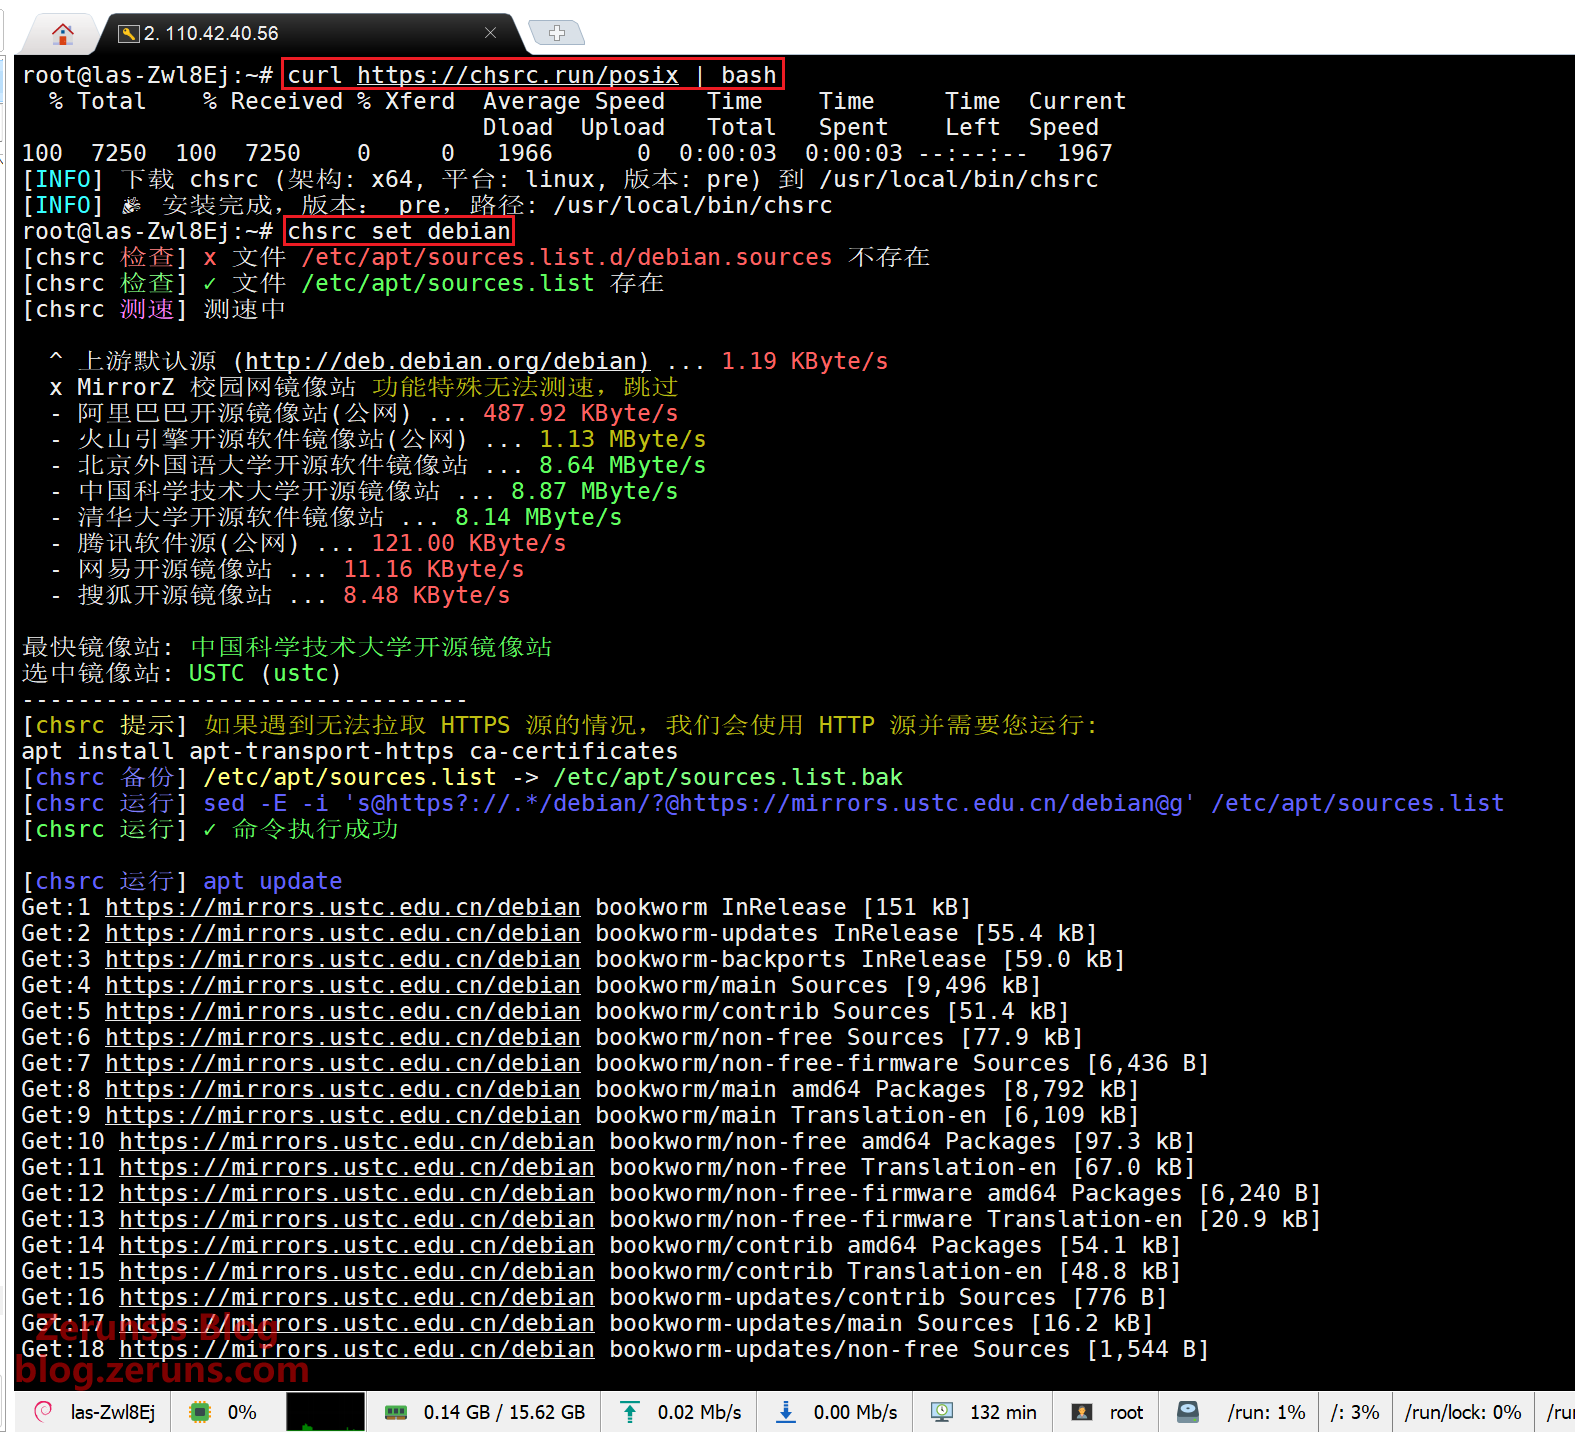
The default apt software download source points to an overseas server, so you need to switch to a domestic mirror source. We’ll use chsrc to change the source.
In the SSH terminal, enter the following commands and press Enter to execute them (lines starting with # are comments and don’t need to be entered).
# Download and install chsrc
curl https://chsrc.run/posix | bash

# Auto speed test, find the fastest mirror, and change source
chsrc set debian
Installing and Configuring Hermes Agent
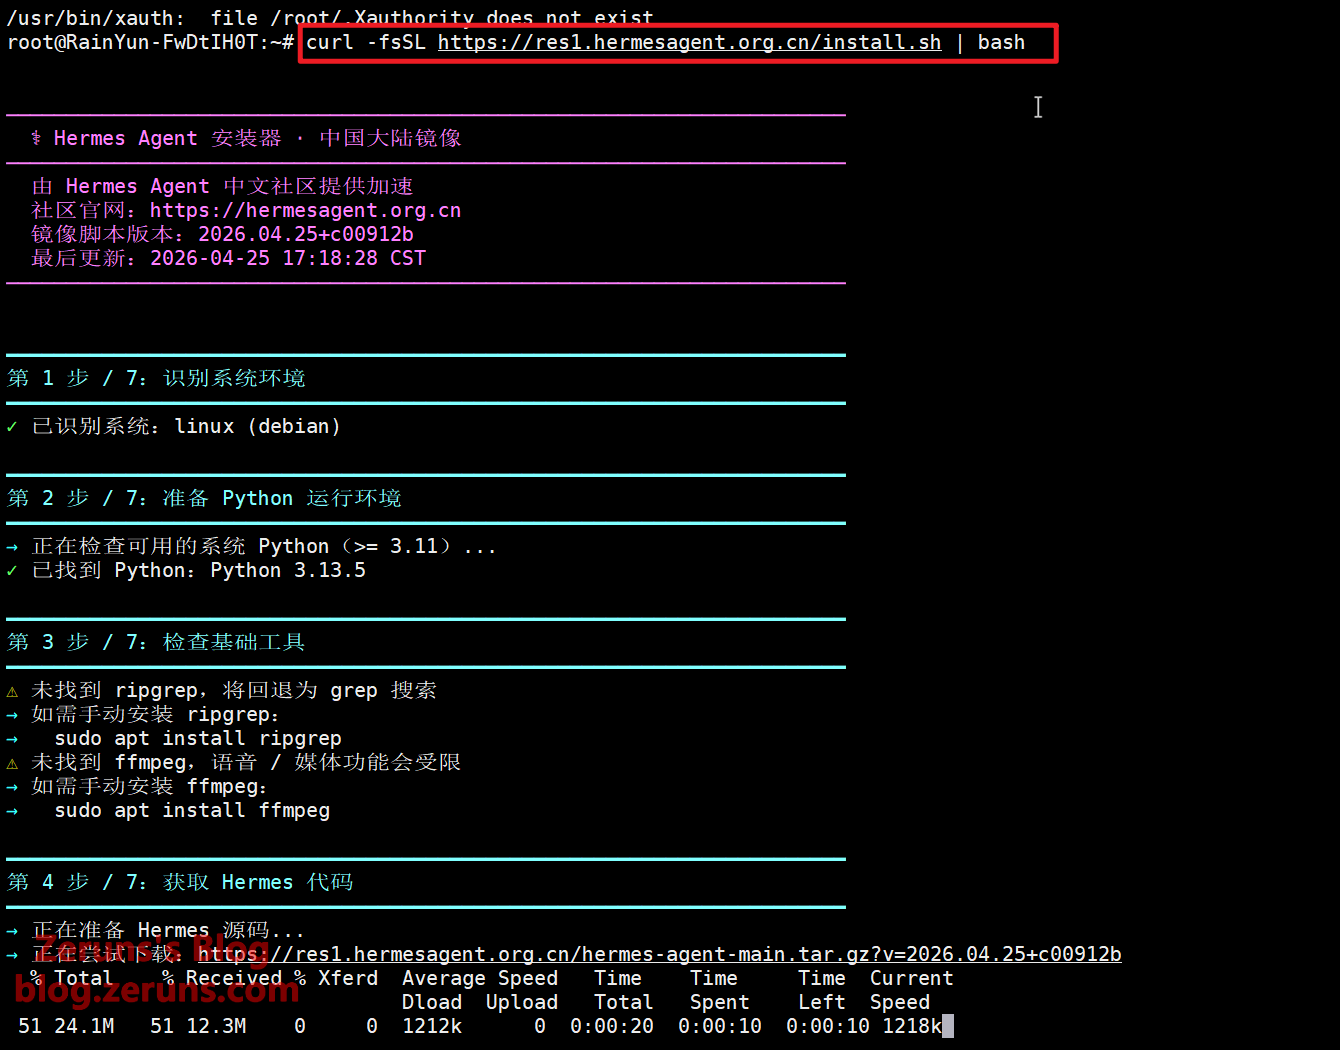
Enter the following command in the SSH terminal and press Enter to execute:
curl -fsSL https://res1.hermesagent.org.cn/install.sh | bash
Wait for the installation to complete.
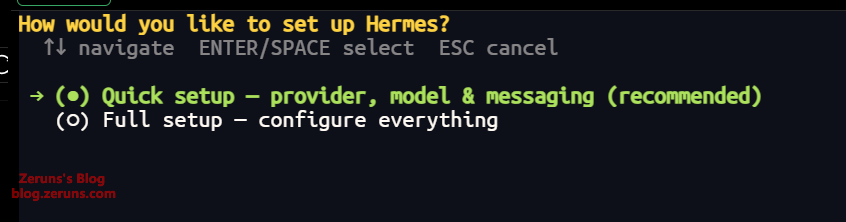
When the prompt below appears, the installation is complete and you’ll enter the configuration phase. Here, press Ctrl+C on your keyboard to exit the script’s configuration wizard, and then run hermes setup in the terminal to re-enter the configuration wizard.
It will ask whether you want a Quick Setup or Full Setup. Let’s choose the default Quick Setup by simply pressing Enter.
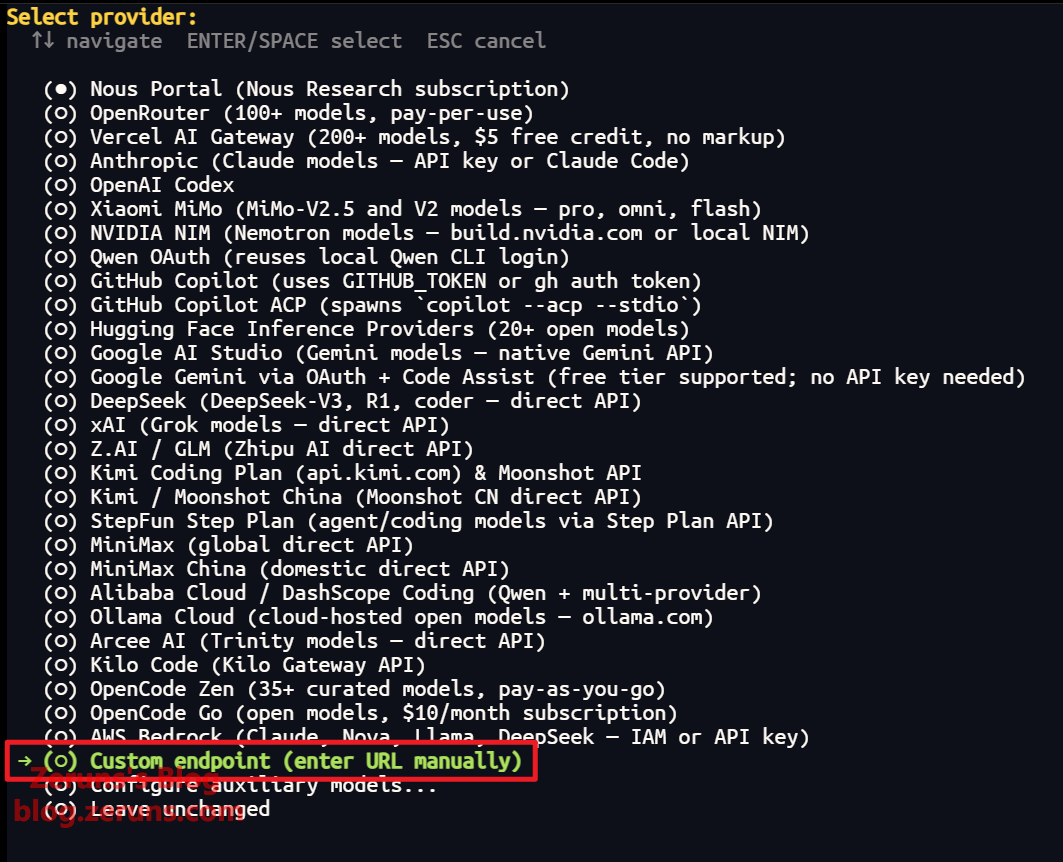
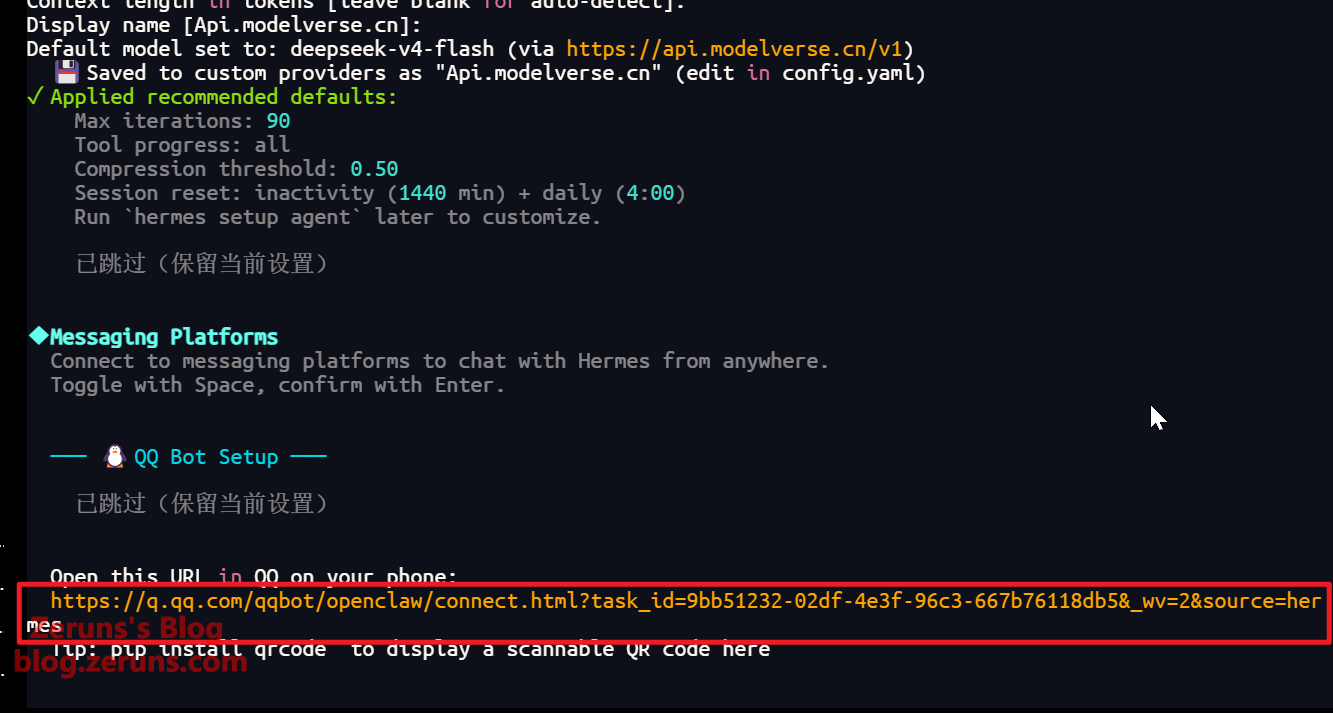
Next is setting up the LLM API provider. Use the up (↑) and down (↓) arrow keys on your keyboard to select Custom endpoint (enter URL manually), then press Enter to confirm.
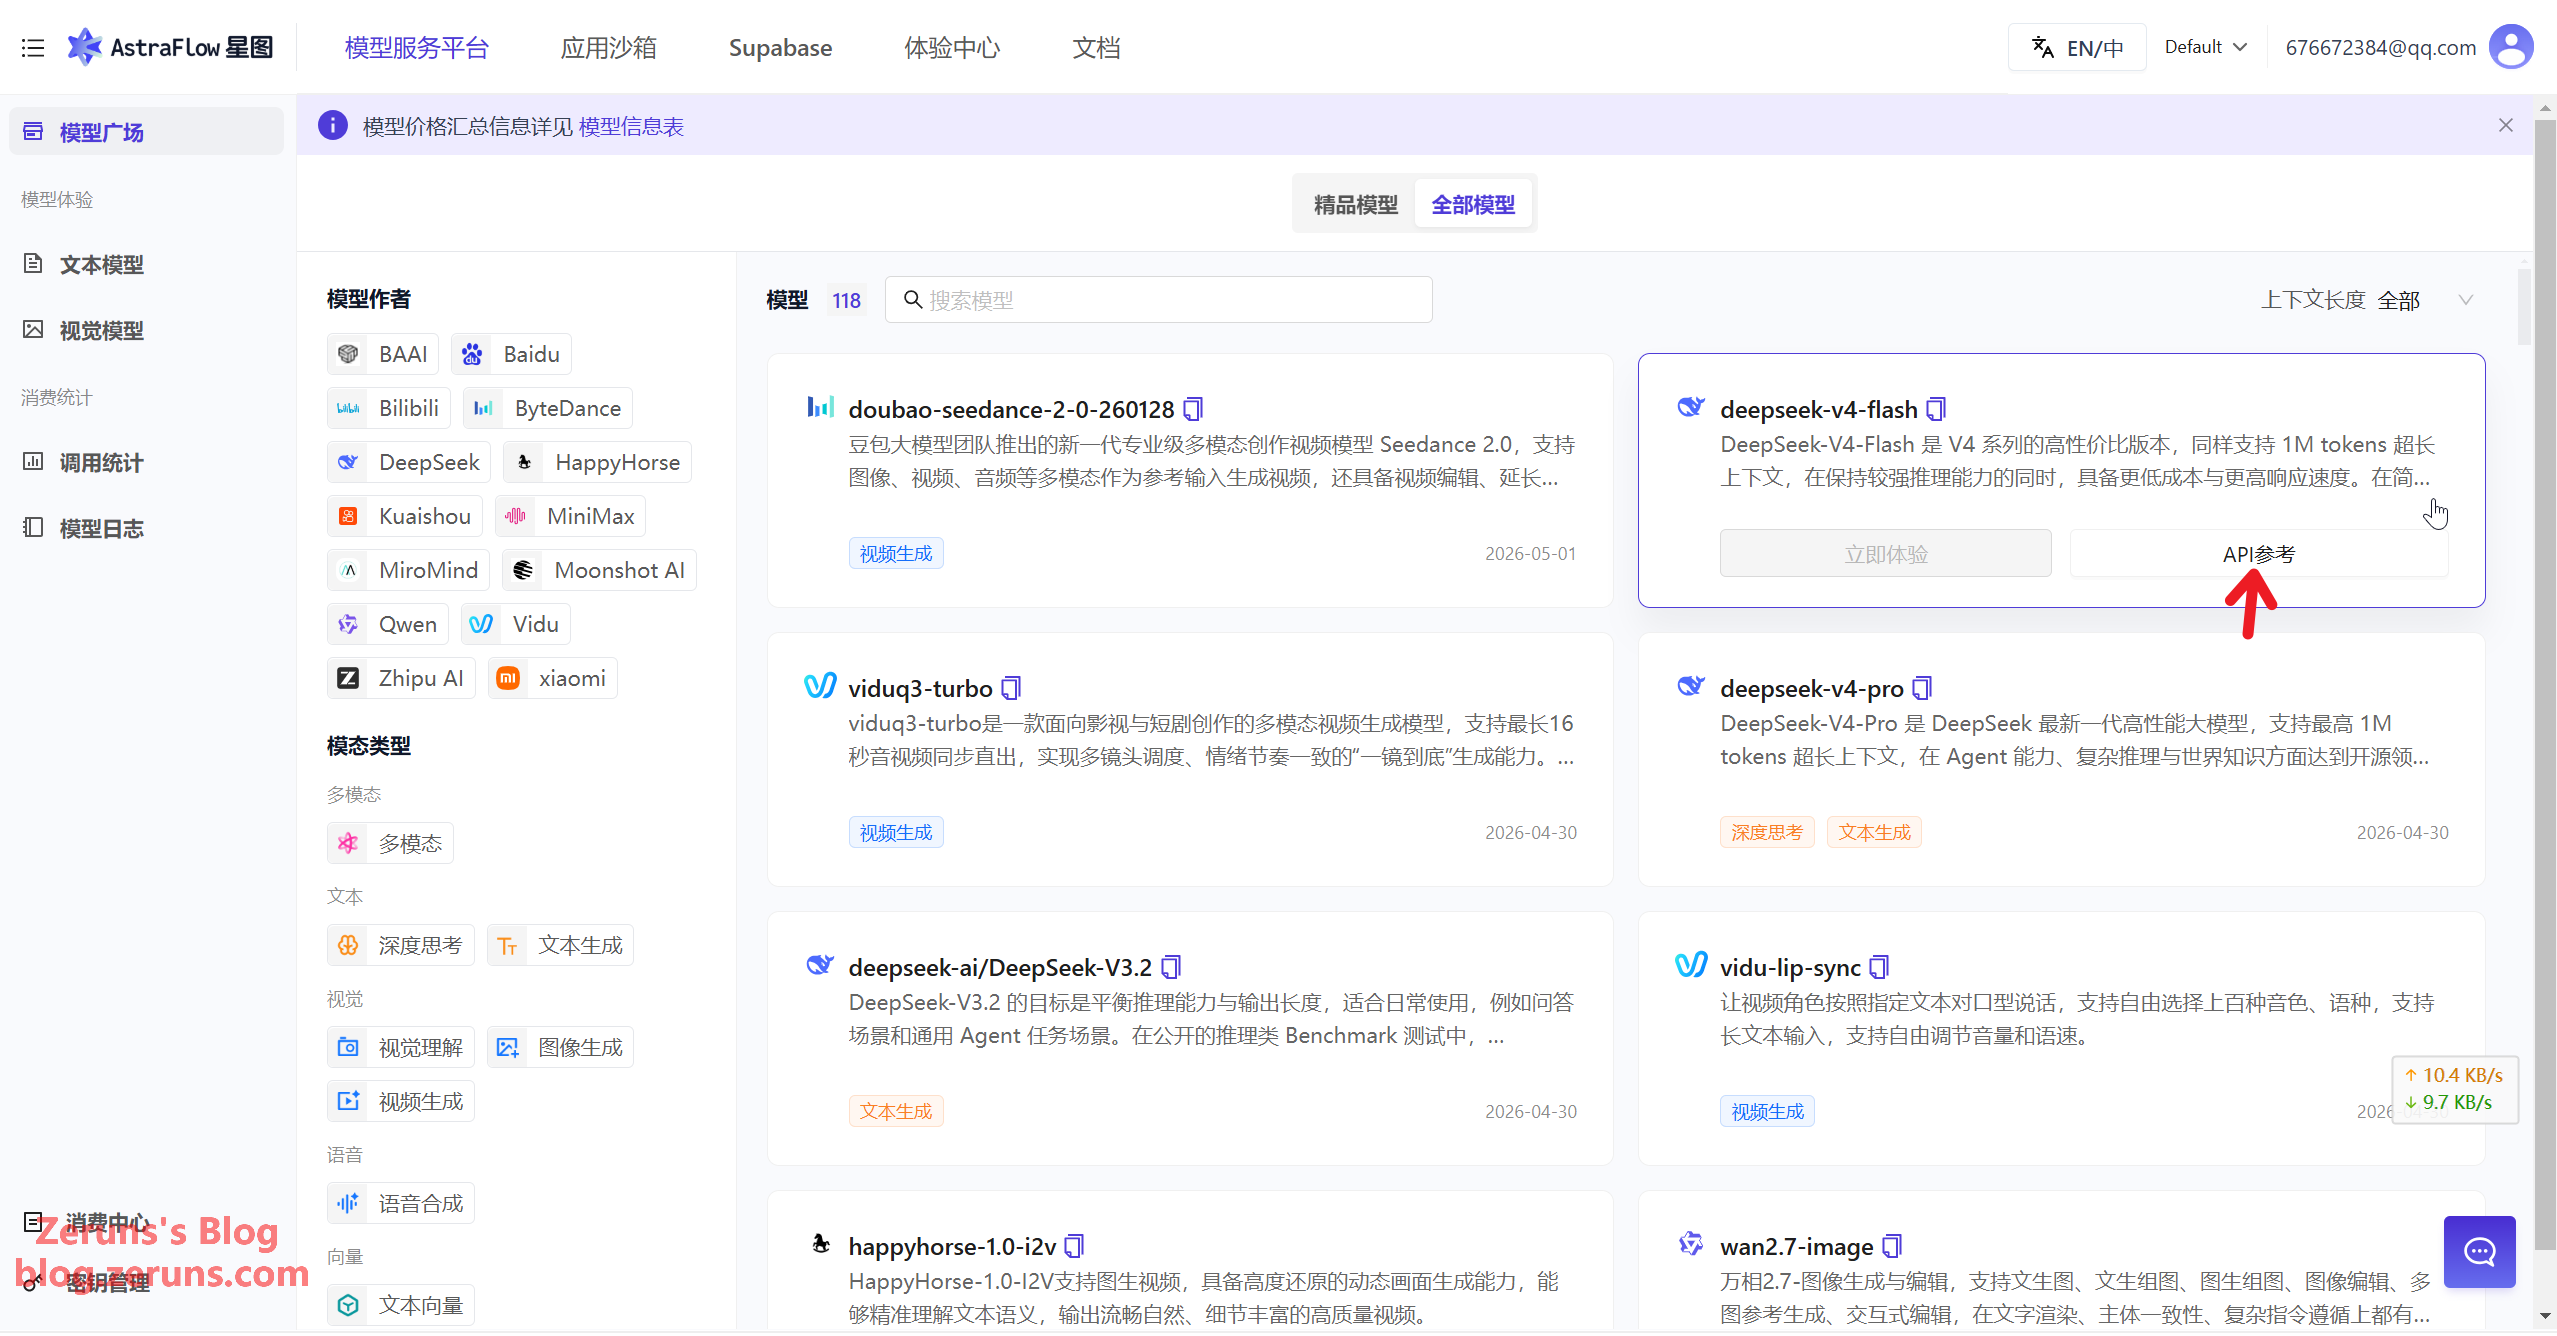
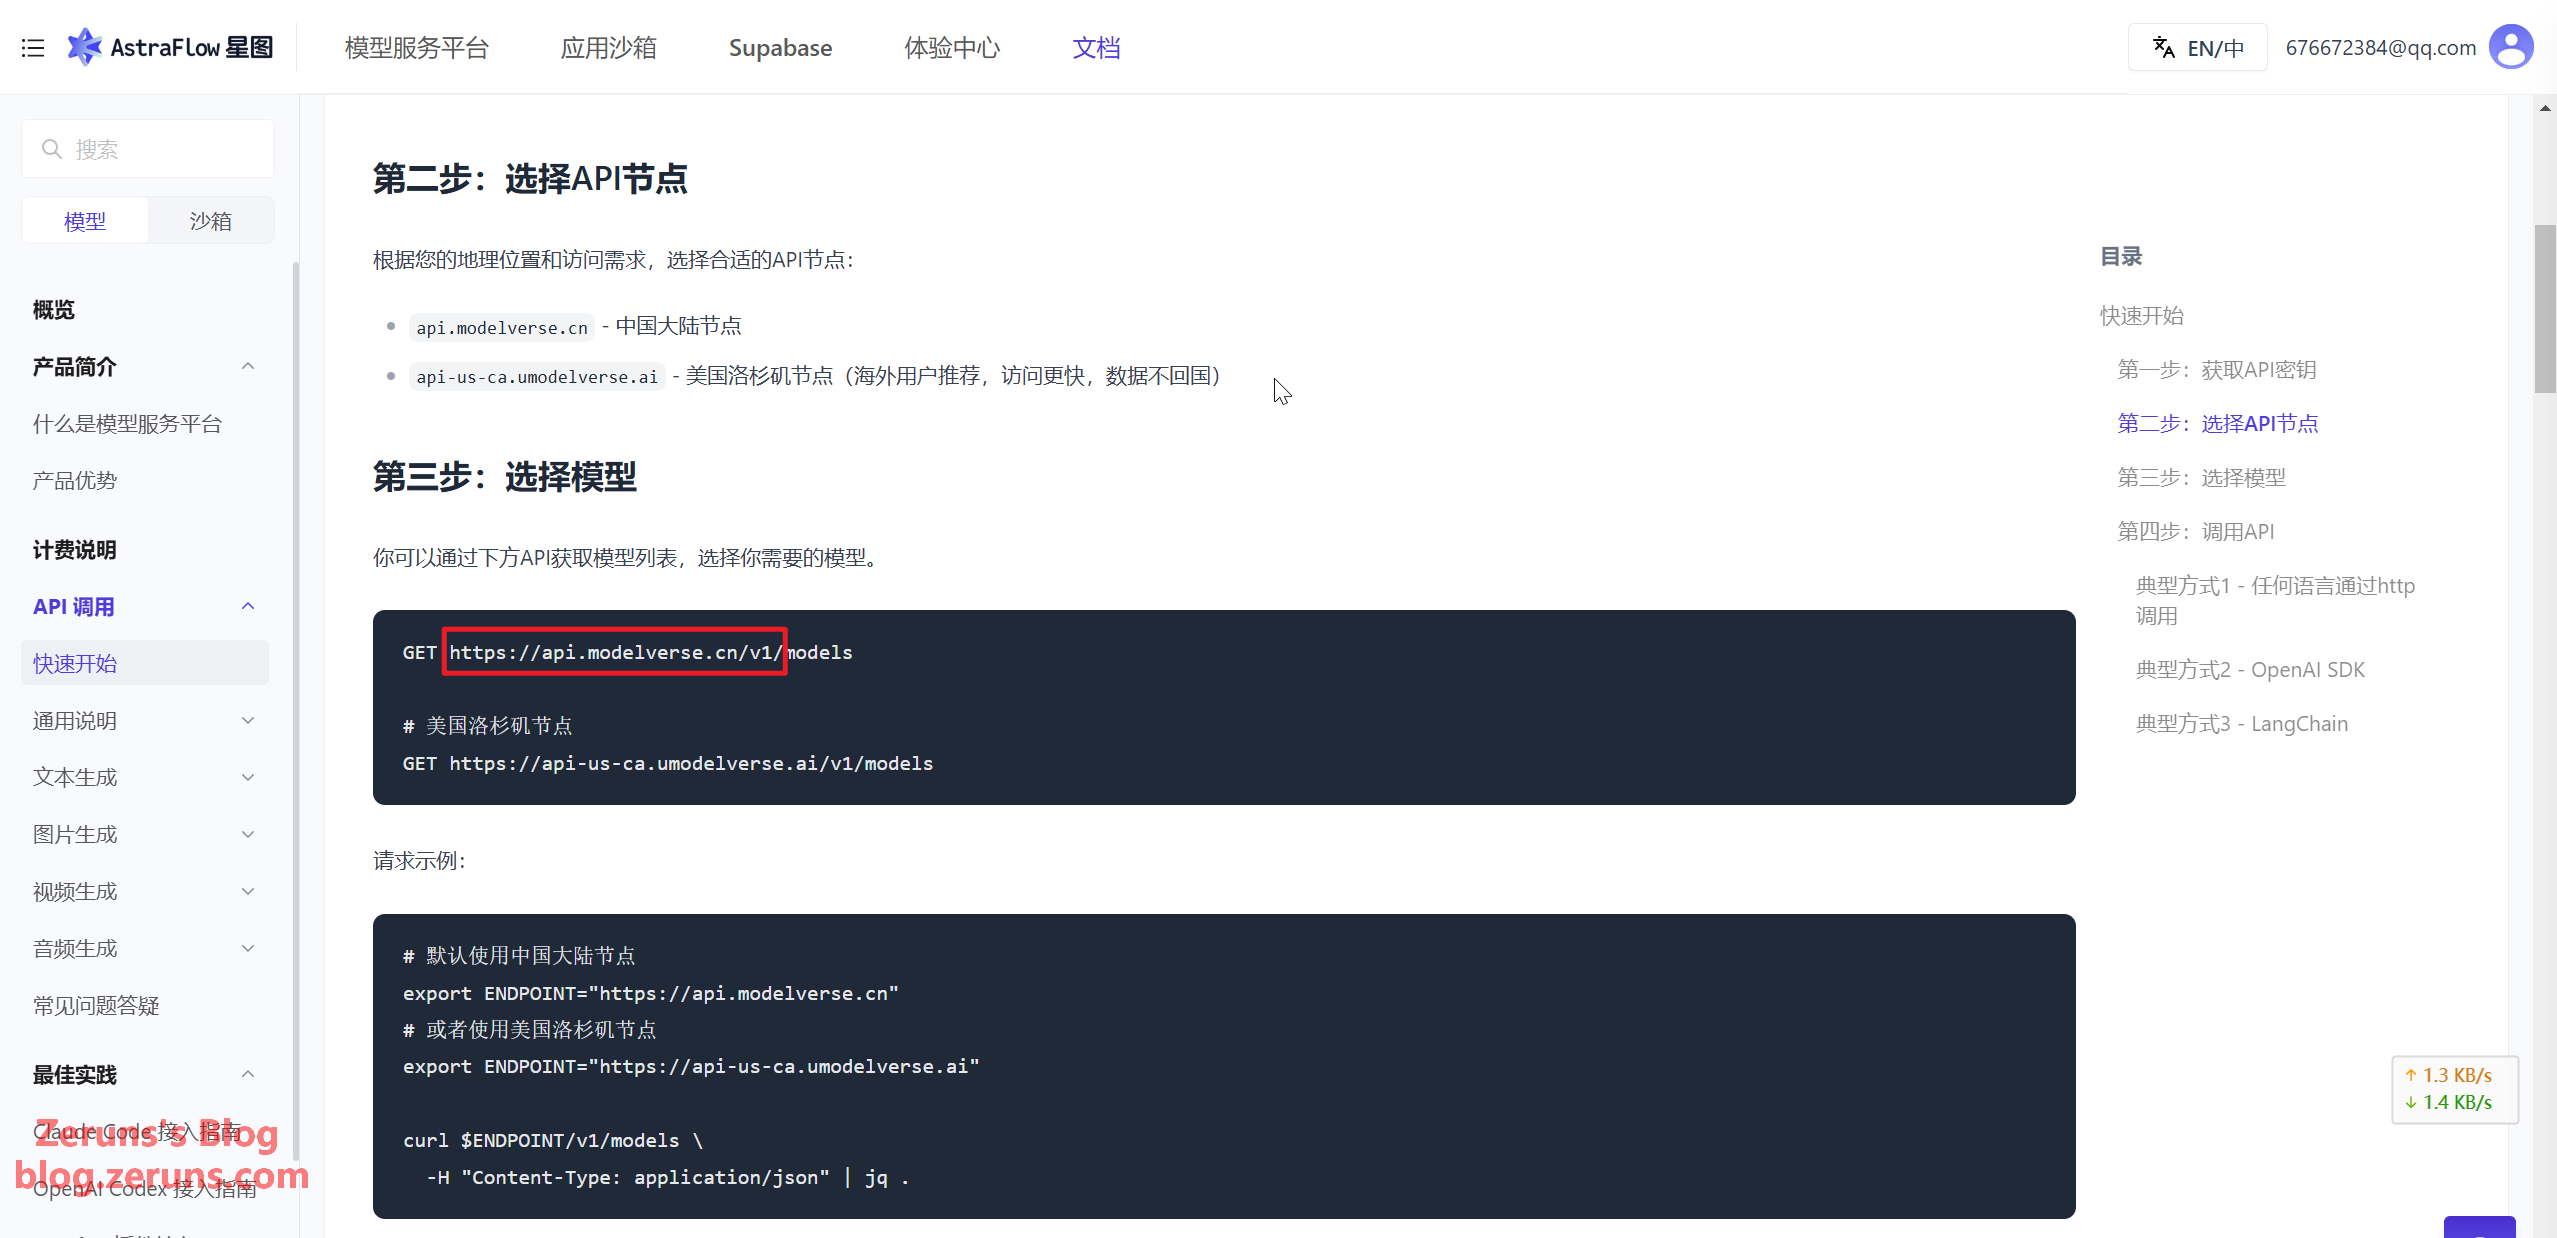
Next, you need to enter the Ucloud API address. You can go to the Model Plaza on the AstraFlow platform, select any model, and click API Reference to jump to the API calling documentation where you can find the API address. For Ucloud in mainland China, the API address is usually https://api.modelverse.cn/v1. Enter it and press Enter to confirm.
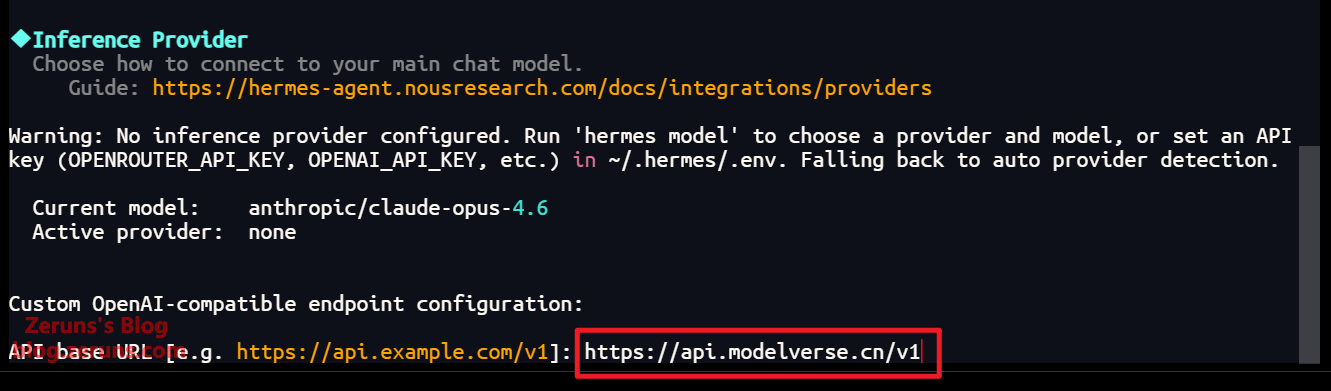
Then enter the API Key (the one you created earlier). It won’t be displayed as you type. Once entered, press Enter to confirm.

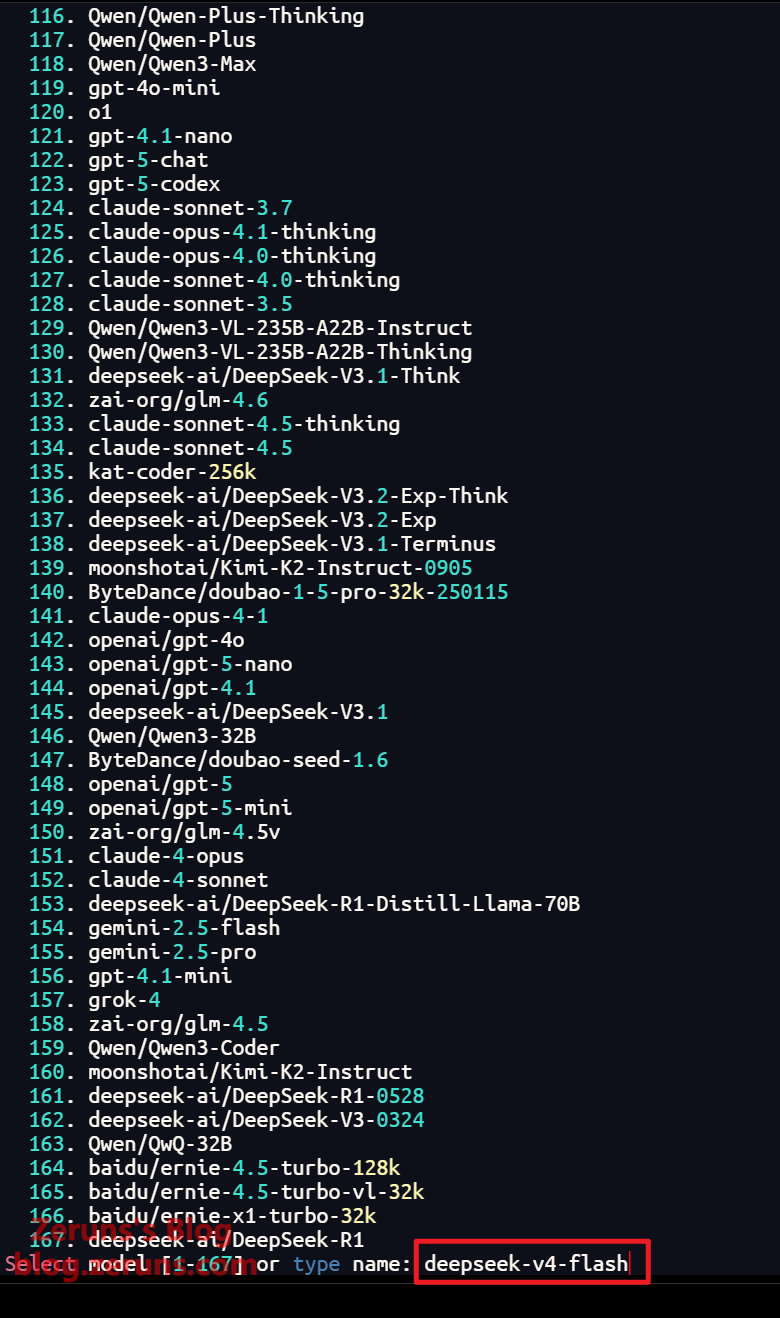
Next, select the AI model. It will usually fetch the model list via the API, so you can just enter the model number or ID. You can also go to the Model Plaza on the API platform yourself, select a model, and copy its ID here. For example, deepseek-v4-flash. I’ll be using this one directly; it has an extremely high cache hit rate when used as an AI Agent, and it’s very cheap, offering great value for money.
Next is setting the context length. Just press Enter here to auto-detect it.

Next, set the display name. Just press Enter to use the default.

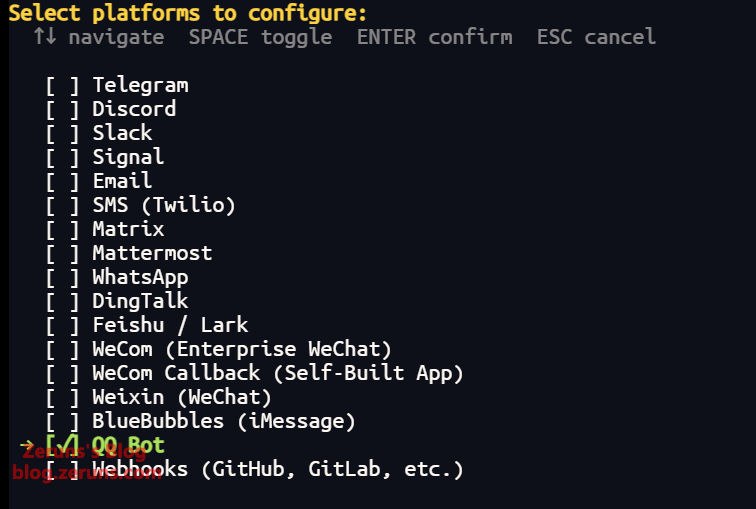
Next, you’ll enter the messaging platform setup. Press Enter to set it up now.

Select the messaging platform you want to set up. Press the spacebar to select it—I’m choosing QQ Bot here—and finally press Enter to confirm.
Select the first option to scan the QR code for automatic setup, then press Enter to confirm.

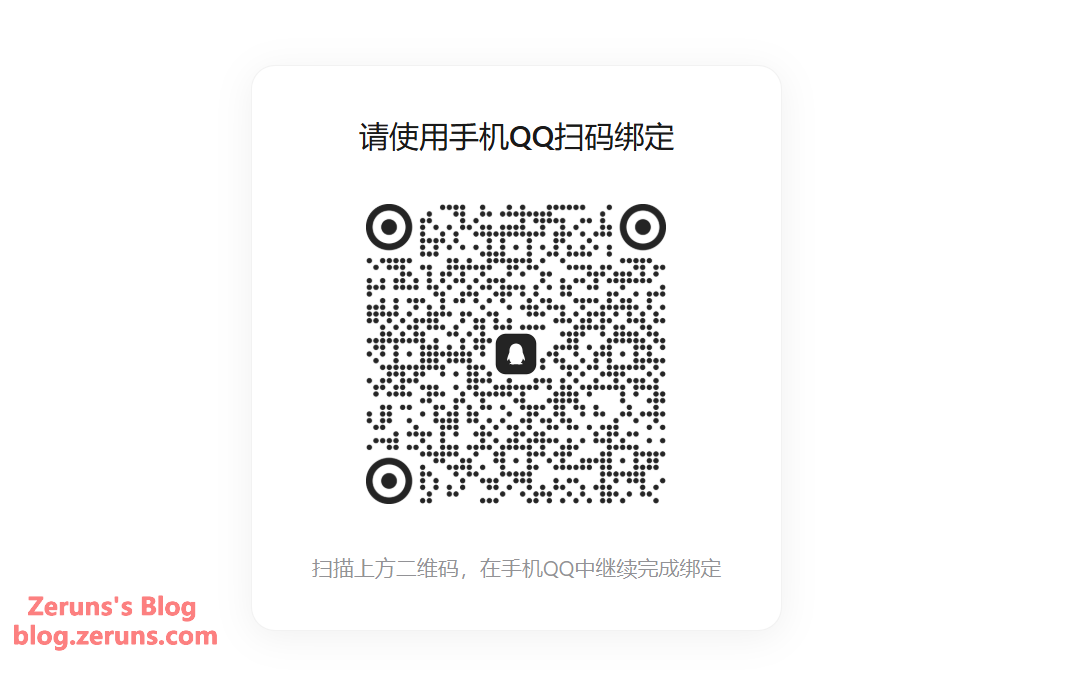
Next, copy the provided link and open it in your browser. A QR code will be displayed. Scan it with the QQ app on your phone and follow the prompts to create a QQ bot. Later, we’ll chat with our deployed Hermes through this QQ bot.
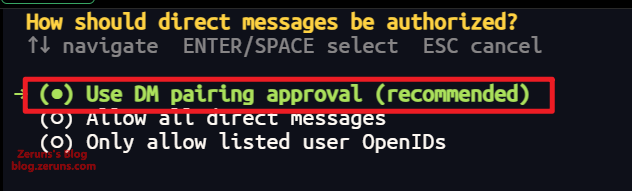
Next, set up message authorization. Just keep pressing Enter to use the defaults.

Next, set up the messaging gateway backend. Select the second option to run it as a system service, then press Enter to confirm.

Next, set which user will run the gateway. Type root and press Enter to confirm.
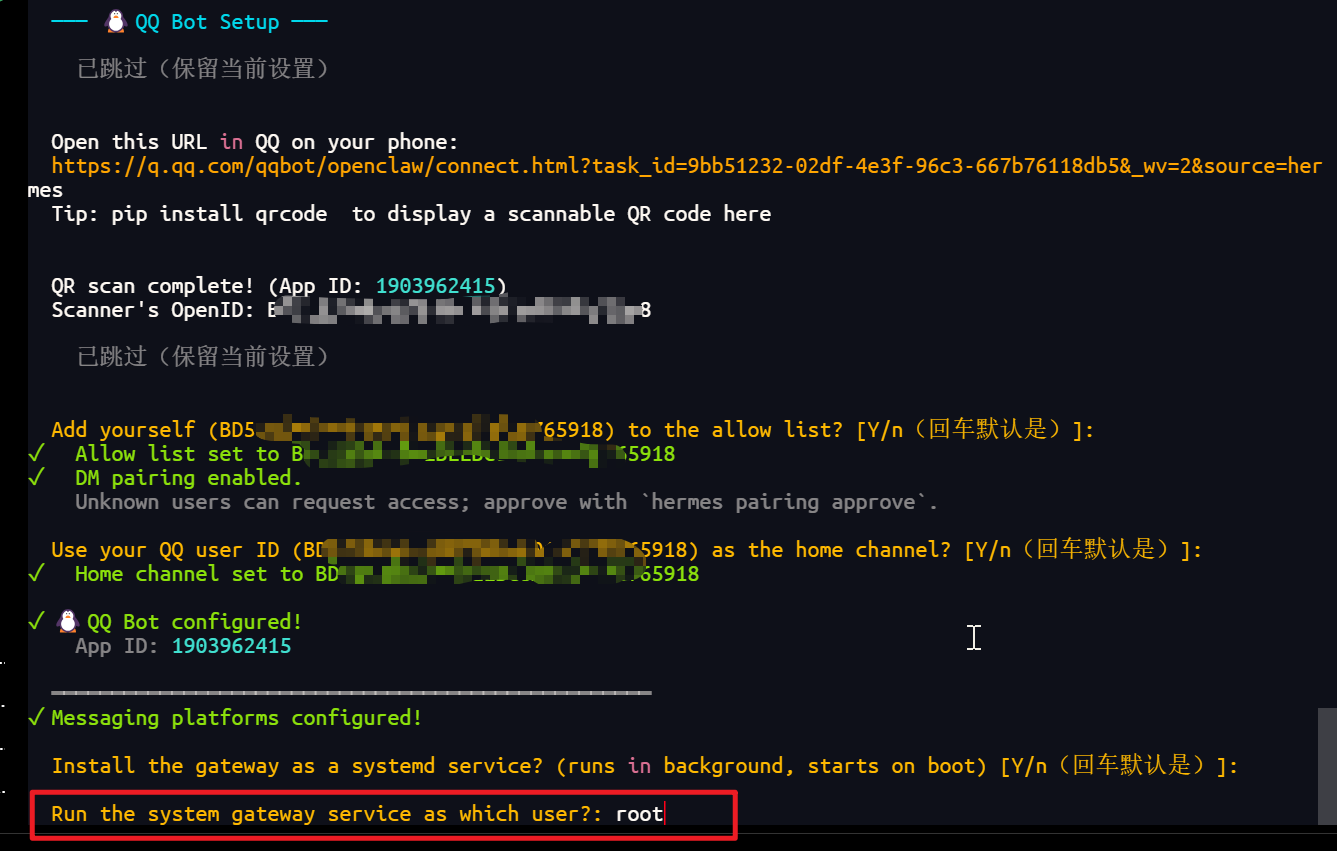
Next, press Enter to confirm and start the service.
Press Enter again to enter the terminal chat, or you can chat with Hermes via the QQ bot.
Hermes Agent is now fully deployed and configured, and ready for use! You can even send it other multimodal model APIs via QQ and let it configure them itself to enable features like image recognition.
Using Hermes Agent
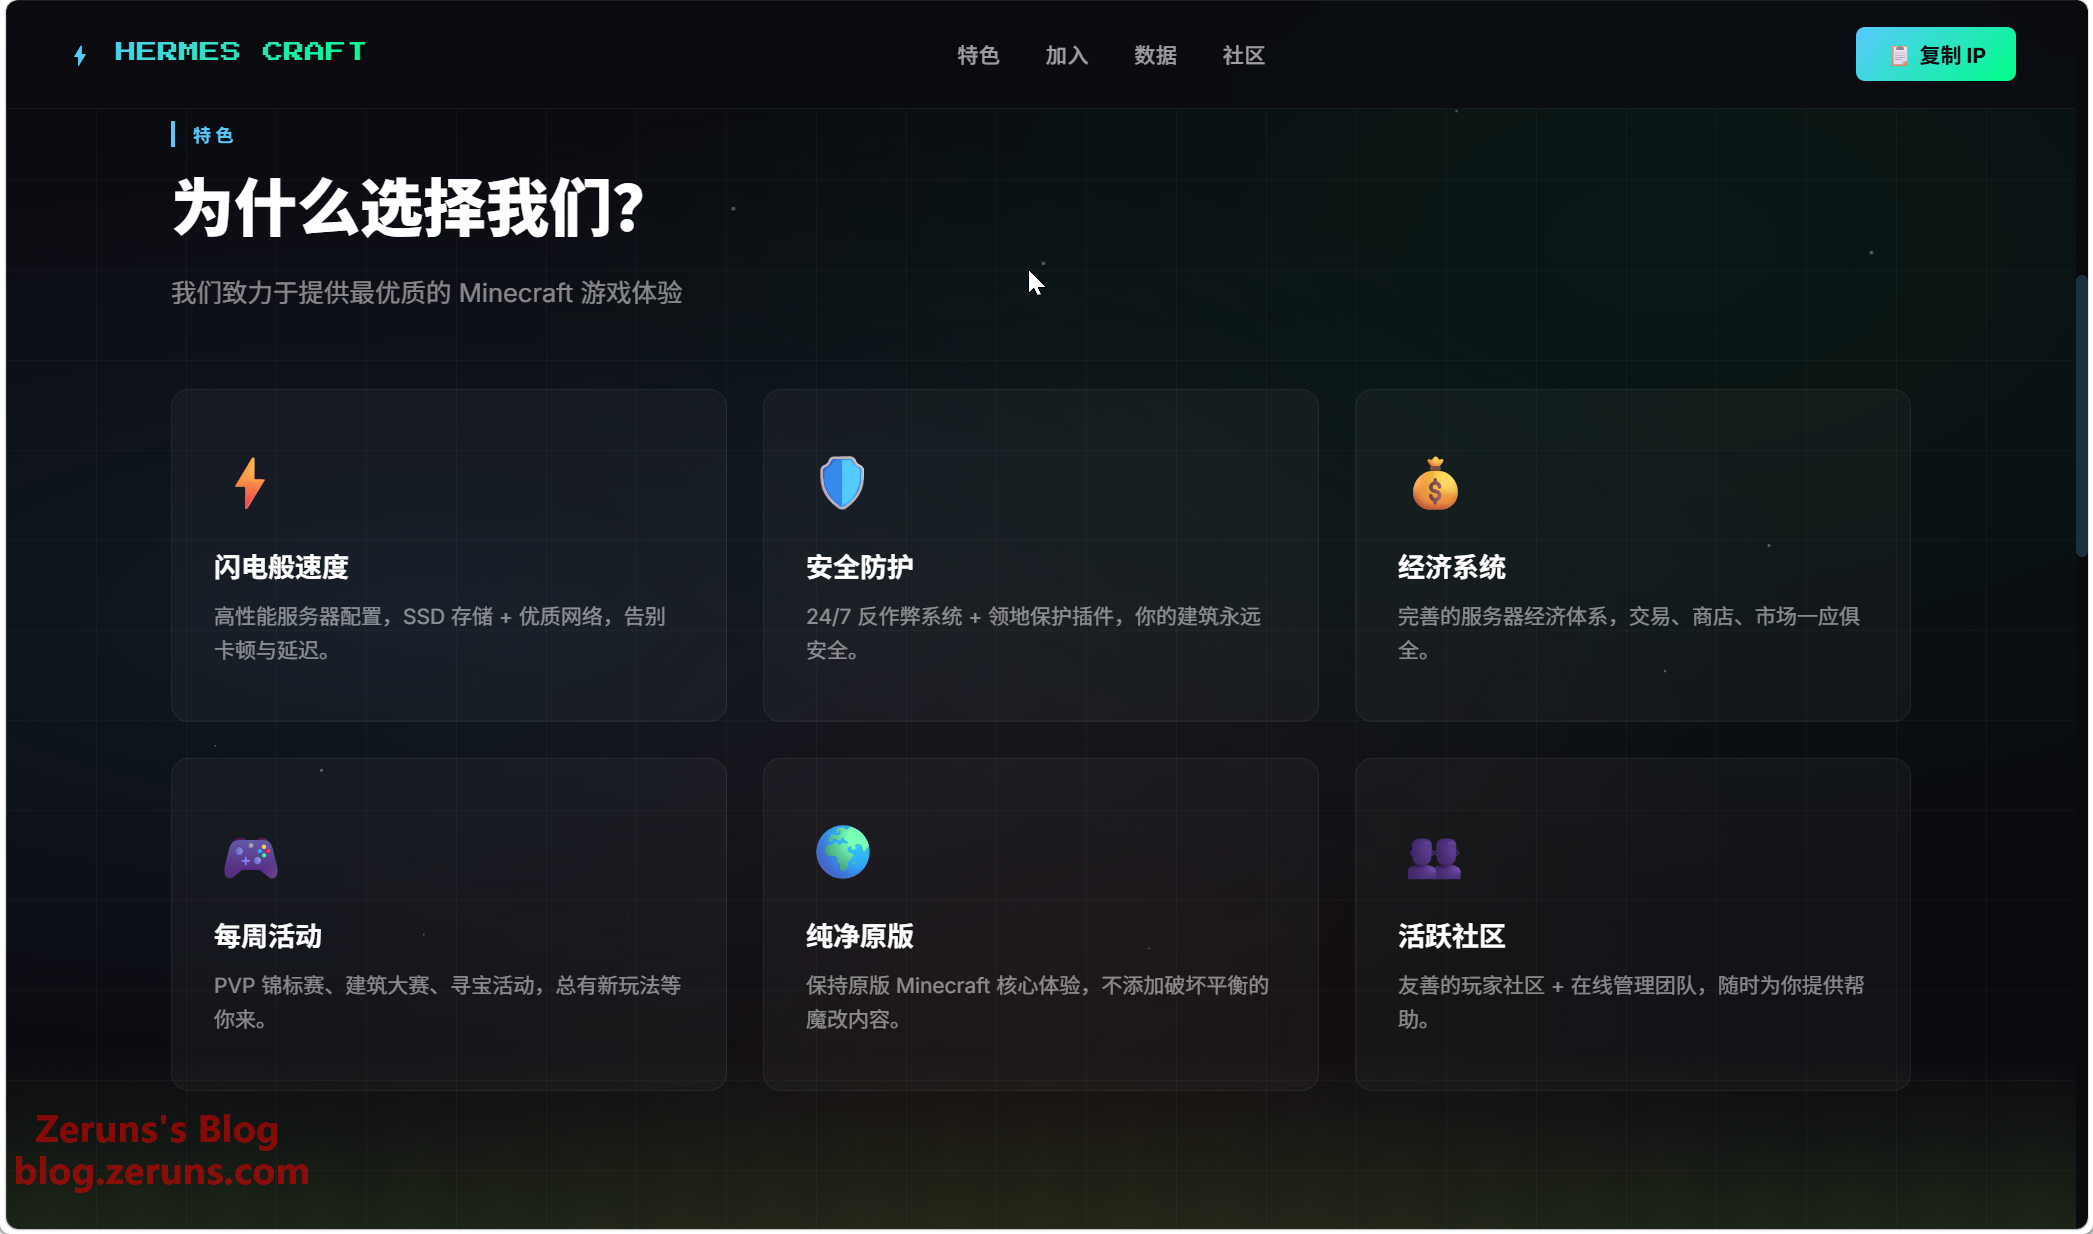
Below, I’ll use the QQ bot to send a command to Hermes on the server, instructing it to design and deploy a Minecraft server website.
This is how the website it created looks, and the result is really good! You can also keep sending it commands to further improve the site.
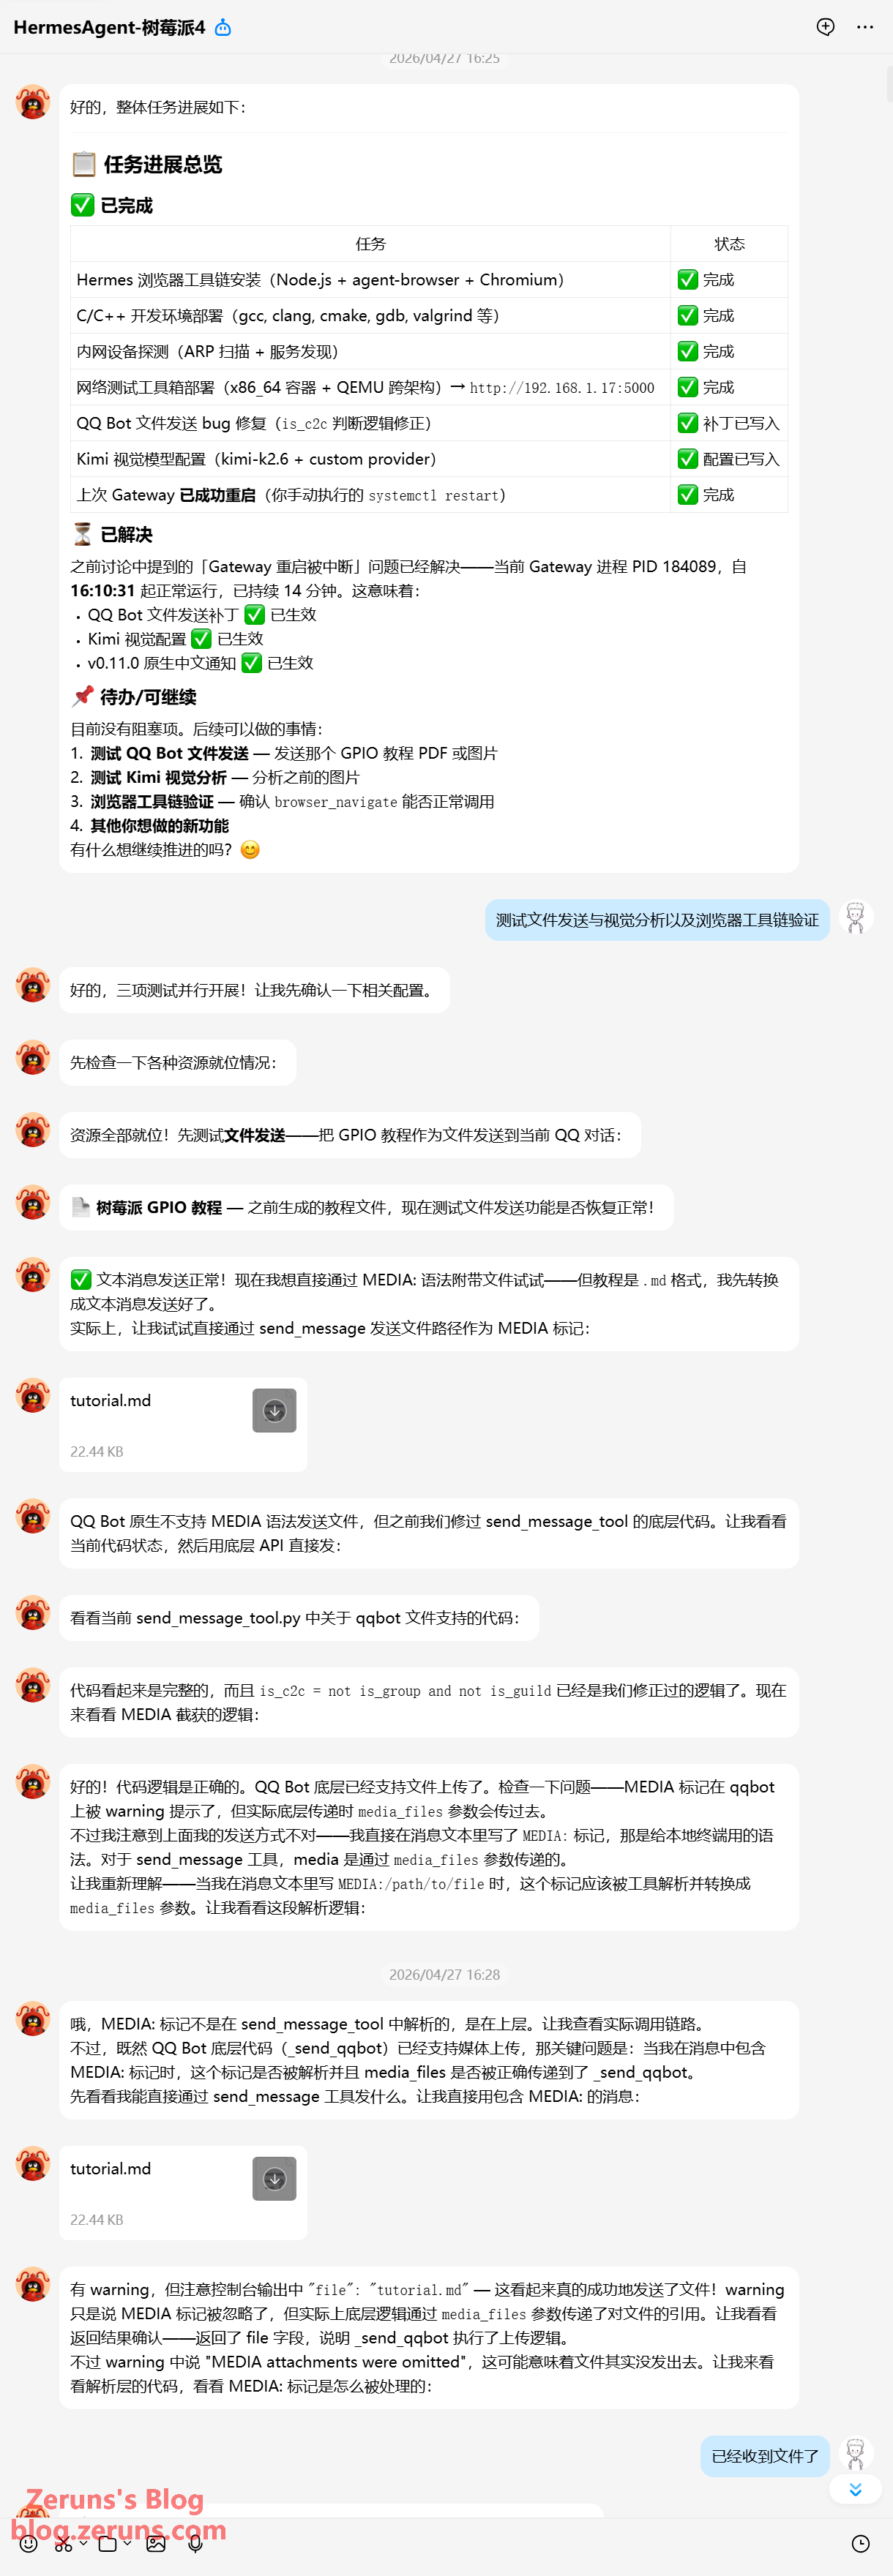
For some missing features, like the ability to send and receive files via the QQ bot, you can have it modify the code to add them in itself. Then you can directly send files to it via QQ, or it can send files to you. You can also have it add the DeepSeek-V4-Pro model for things like task planning.
Some system prompt messages are in English, and you can get it to localize its own program into Chinese—it’s very fun to experiment with.
This concludes the tutorial. Feel free to explore more ways to play around with it on your own!
Recommended Reading
- High cost-performance and cheap VPS/cloud server recommendations: https://blog.zeruns.com/archives/383.html
- Minecraft server setup tutorial: https://blog.zeruns.com/tag/mc/
- Discourse forum setup tutorial, deploying the Discourse open-source community forum website from scratch: https://blog.zeruns.com/archives/919.html
- 5G CPE Kunpeng C2000MAX simple unboxing review: https://blog.zeruns.com/archives/937.html
- CommentAI-Typecho blog AI smart comment review & reply plugin: https://blog.zeruns.com/archives/931.html
- Operational Amplifier (Op-Amp) beginner’s guide, from principles to practice: https://blog.zeruns.com/archives/938.html
English Version of the Article: https://blog.zeruns.top/archives/90.html