Introduction
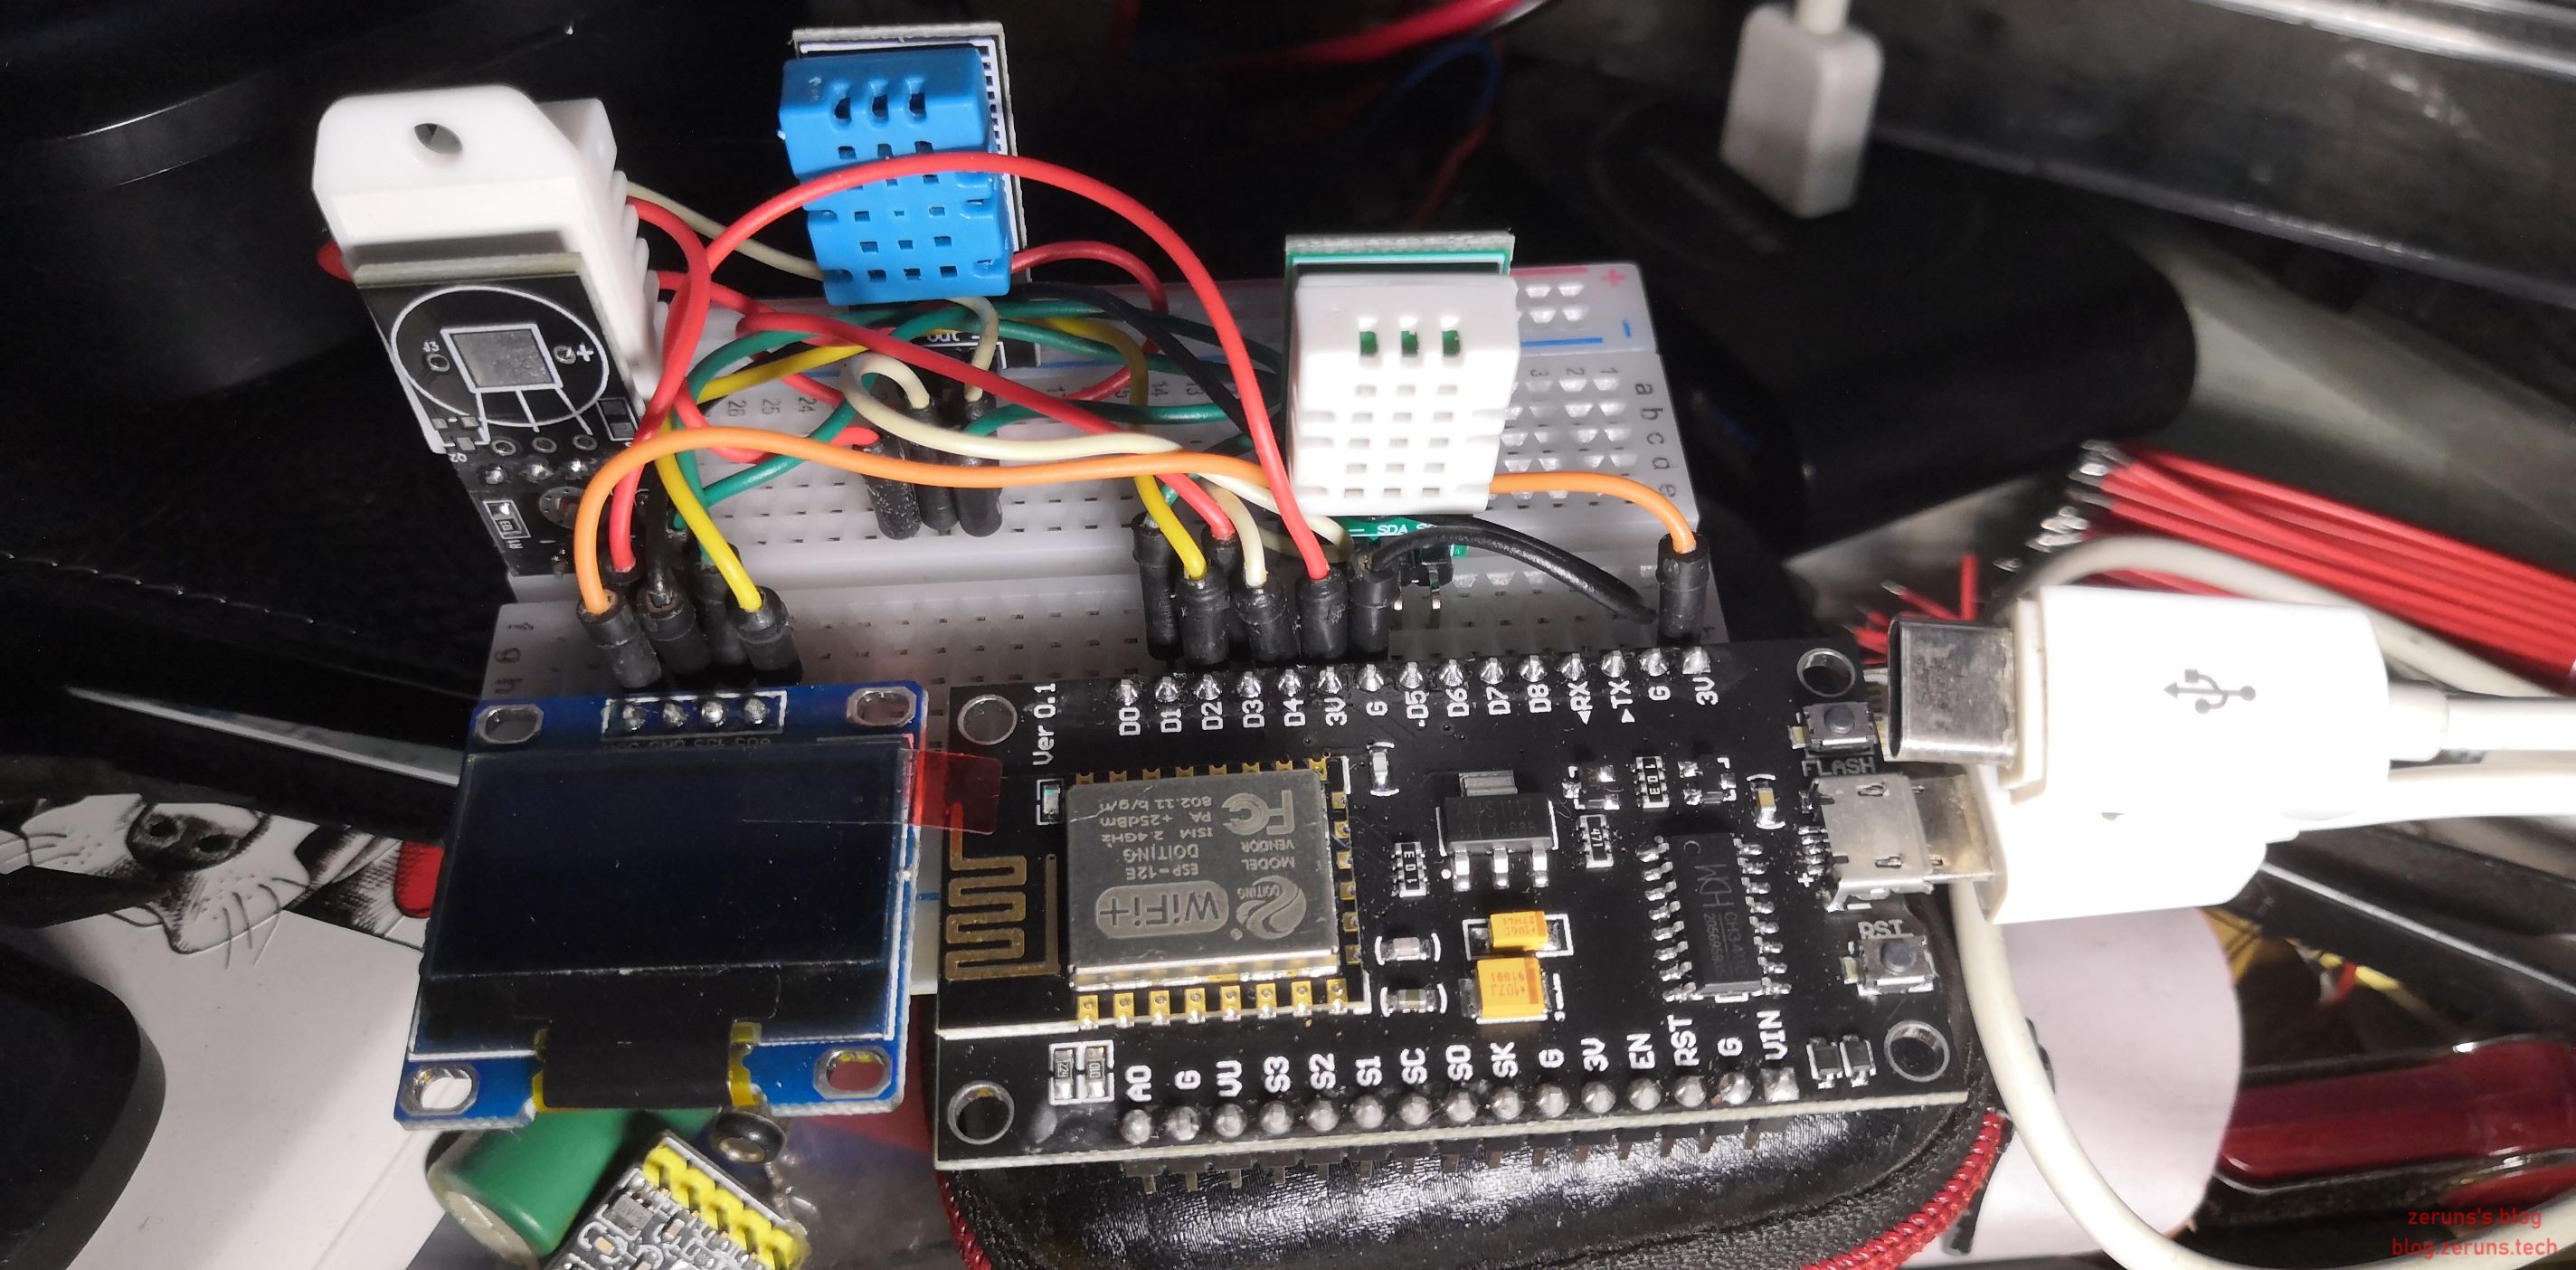
This article uses a NodeMCU (ESP8266) development board and an SHTC3 temperature and humidity sensor to connect to Alibaba Cloud IoT Platform and upload the collected temperature and humidity data. Temperature and humidity data are read once per second, and the average values over each 30-second interval are uploaded every 30 seconds. You can modify the program to use other temperature and humidity sensors. This project is developed using Arduino IDE.
Program for reading data from DHT11 and DHT22 temperature and humidity sensors: https://blog.zeruns.com/archives/527.html
ESP8266 development environment setup tutorial: https://blog.zeruns.com/archives/526.html
Connect the SHTC3 SDA pin to NodeMCU’s D5 pin, and the SCL pin to NodeMCU’s D6 pin.
Setting Up the IoT Platform
First, register an Alibaba Cloud account and activate the IoT Platform: https://www.aliyun.com/product/iot?source=5176.11533457&userCode=jdjc69nf&type=copy
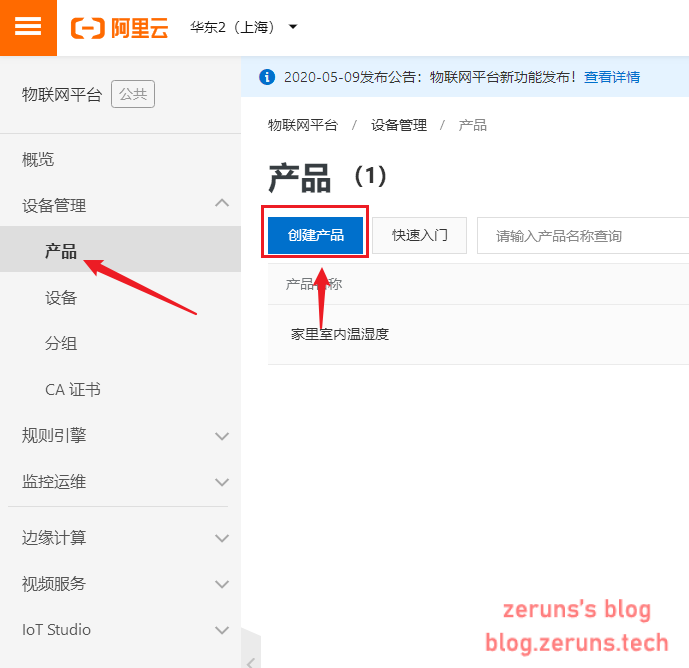
Then open the IoT Platform console: https://iot.console.aliyun.com/product
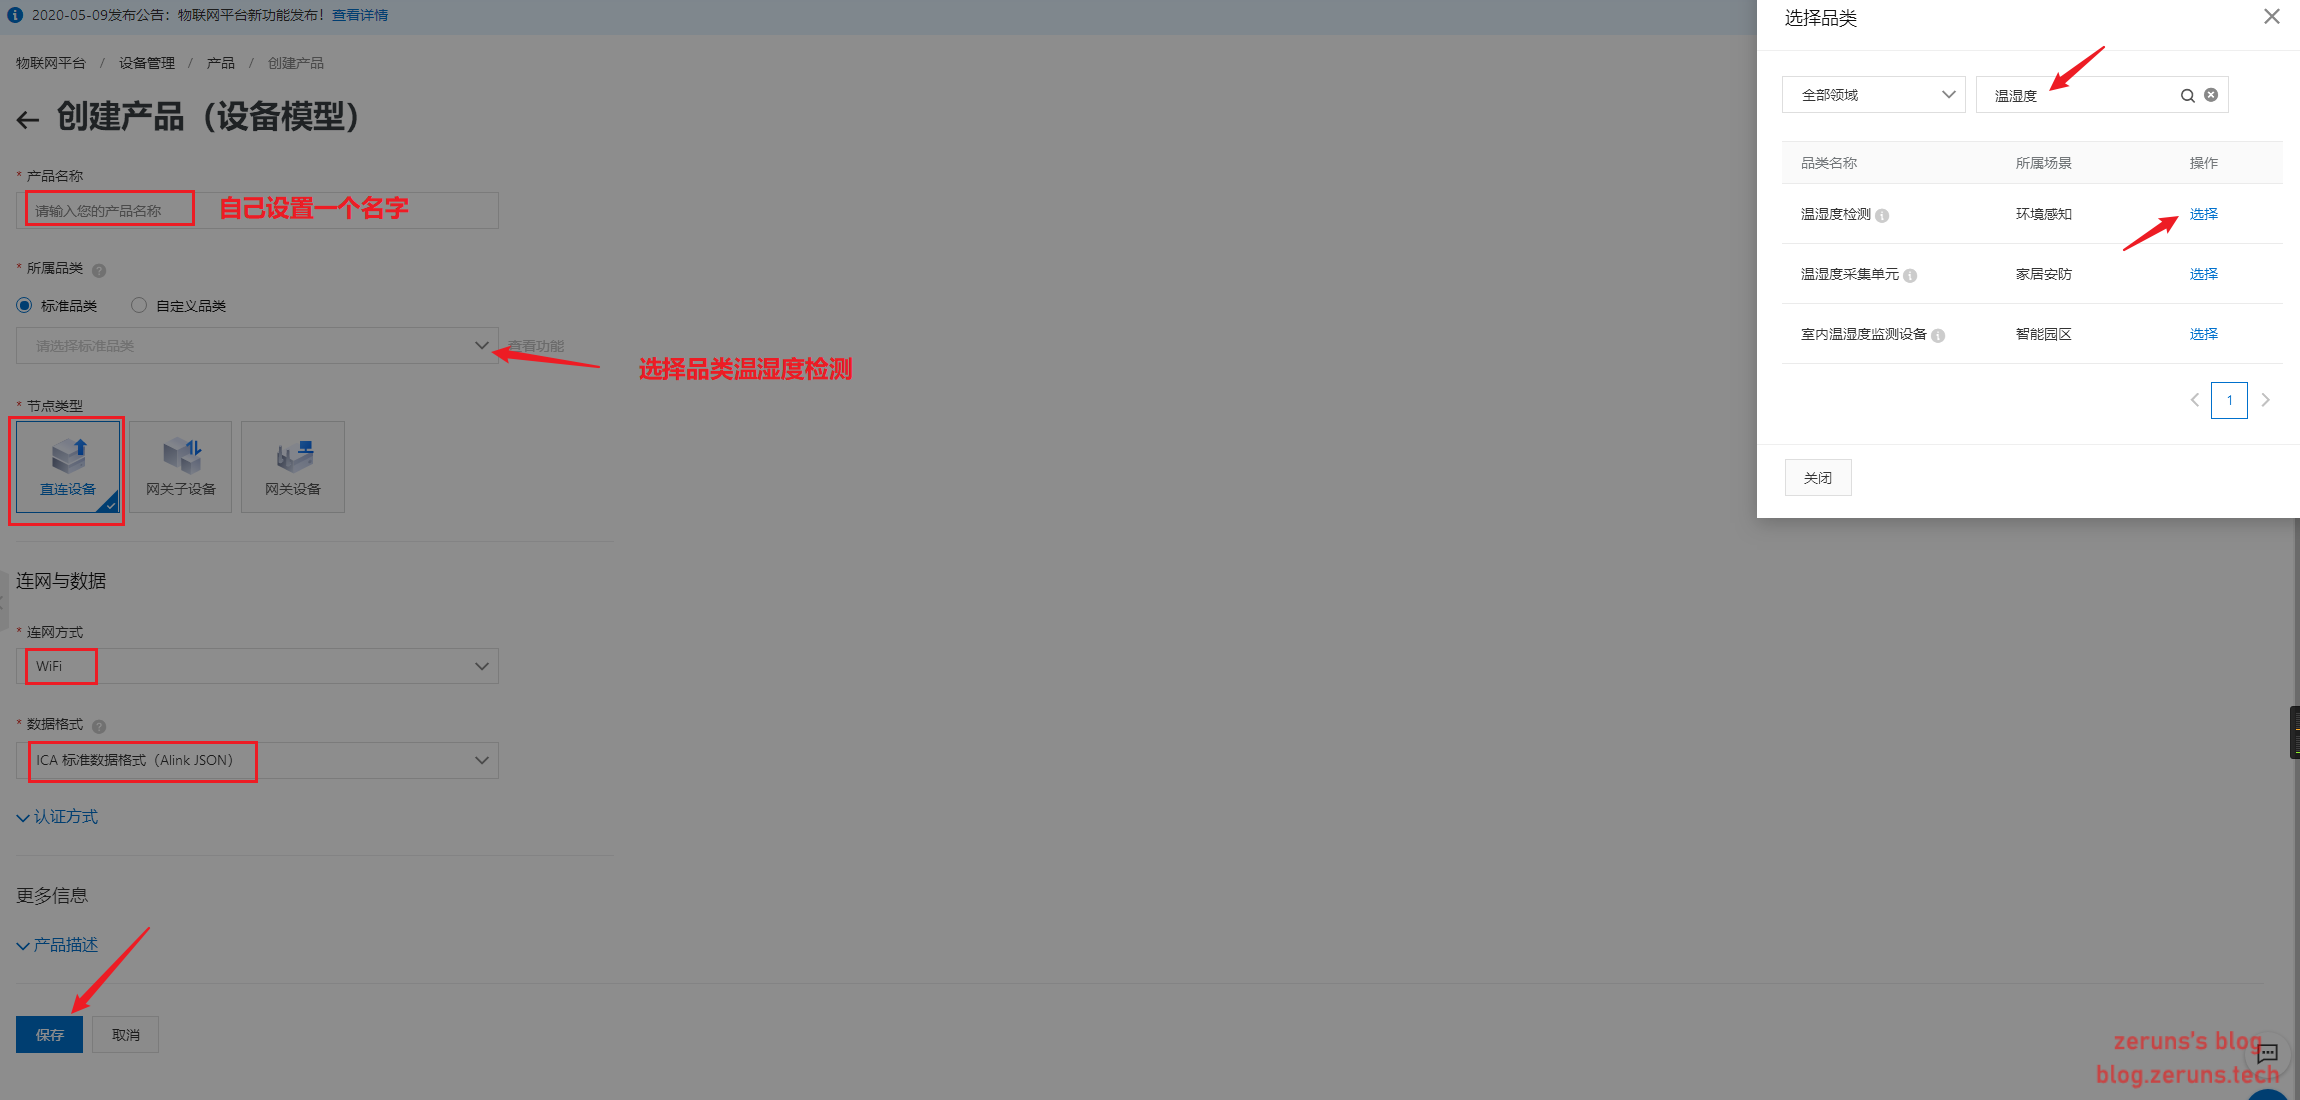
Follow the instructions in the images below to create a product:
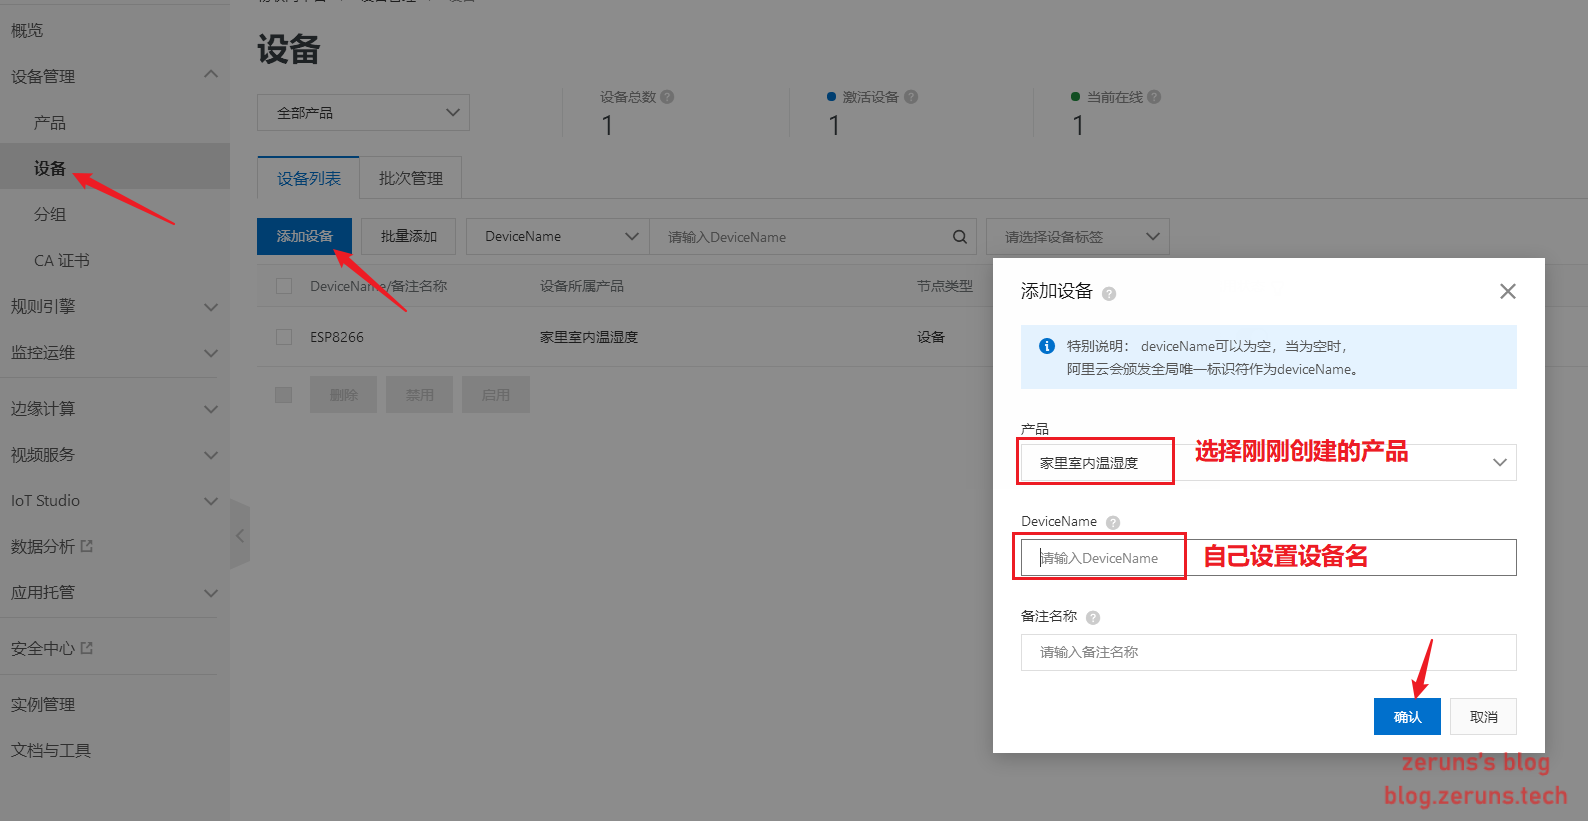
Follow the instructions in the images below to add a device:
Source Code
First, install the following three libraries: PubSubClient, ArduinoJson, and SparkFun SHTC3.
Then modify PubSubClient.h according to the instructions below.
Modify the parameters as indicated in the code comments:
#include <ESP8266WiFi.h>
/* Requires PubSubClient 2.4.0 */
#include <PubSubClient.h>
/* Requires ArduinoJson 5.13.4 */
#include <ArduinoJson.h>
#include <SparkFun_SHTC3.h>

/* Enter your WiFi SSID and password */
#define WIFI_SSID         "Router_SSID"
#define WIFI_PASSWD       "password"

/* Device triple information */
#define PRODUCT_KEY       "your_device_PRODUCT_KEY"
#define DEVICE_NAME       "replace_DEVICE_NAME"
#define DEVICE_SECRET     "replace_DEVICE_SECRET"
#define REGION_ID         "cn-shanghai"

/* Online environment domain and port — do not modify */
#define MQTT_SERVER       PRODUCT_KEY ".iot-as-mqtt." REGION_ID ".aliyuncs.com"
#define MQTT_PORT         1883
#define MQTT_USRNAME      DEVICE_NAME "&" PRODUCT_KEY

#define CLIENT_ID         "ESP8266|securemode=3,timestamp=1234567890,signmethod=hmacsha1|"
// Use this tool to generate password: http://iot-face.oss-cn-shanghai.aliyuncs.com/tools.htm
// Password tutorial: https://www.yuque.com/cloud-dev/iot-tech/mebm5g
#define MQTT_PASSWD       "Refer to the password tutorial above, generate using the tool. If the tutorial is unclear, see below."

#define ALINK_BODY_FORMAT         "{\"id\":\"ESP8266\",\"version\":\"1.0\",\"method\":\"thing.event.property.post\",\"params\":%s}"
#define ALINK_TOPIC_PROP_POST     "/sys/" PRODUCT_KEY "/" DEVICE_NAME "/thing/event/property/post"

unsigned long lastMs = 0;
float RH,T,RH_sum,T_sum;
unsigned char count=0;
WiFiClient espClient;
PubSubClient  client(espClient);
SHTC3 mySHTC3;

void callback(char *topic, byte *payload, unsigned int length)
{
    Serial.print("Message arrived [");
    Serial.print(topic);
    Serial.print("] ");
    payload[length] = '\0';
    Serial.println((char *)payload);

}

void wifiInit()
{
    WiFi.mode(WIFI_STA);
    WiFi.begin(WIFI_SSID, WIFI_PASSWD);   // Connect to WiFi
    while (WiFi.status() != WL_CONNECTED)
    {
        delay(1000);
        Serial.println("WiFi not Connect");
    }
    Serial.println("Connected to AP");
    Serial.println("IP address: ");
    Serial.println(WiFi.localIP());
    Serial.print("espClient [");
    client.setServer(MQTT_SERVER, MQTT_PORT);   // Connect to MQTT server after WiFi connection
    client.setCallback(callback);
}


void mqttCheckConnect()
{
    while (!client.connected())
    {
        Serial.println("Connecting to MQTT Server ...");
        if (client.connect(CLIENT_ID, MQTT_USRNAME, MQTT_PASSWD))
        {
            Serial.println("MQTT Connected!");
        }
        else
        {
            Serial.print("MQTT Connect err:");
            Serial.println(client.state());
            delay(5000);
        }
    }
}


void mqttIntervalPost()
{
    char param[32];
    char jsonBuf[128];
    sprintf(param, "{\"CurrentTemperature\":%f}",T_sum/count);
    sprintf(jsonBuf, ALINK_BODY_FORMAT, param);
    Serial.println(jsonBuf);
    boolean d = client.publish(ALINK_TOPIC_PROP_POST, jsonBuf);
    if(d){
      Serial.println("publish Temperature success");
    }else{
      Serial.println("publish Temperature fail");
    }
    //https://blog.zeruns.com
    sprintf(param, "{\"CurrentHumidity\":%f}",RH_sum/count);
    sprintf(jsonBuf, ALINK_BODY_FORMAT, param);
    Serial.println(jsonBuf);
    d = client.publish(ALINK_TOPIC_PROP_POST, jsonBuf);
    if(d){
      Serial.println("publish Humidity success");
    }else{
      Serial.println("publish Humidity fail");
    }
}

void errorDecoder(SHTC3_Status_TypeDef message) // The errorDecoder function prints "SHTC3_Status_TypeDef" results in a human-friendly way
{
  switch(message)
  {
    case SHTC3_Status_Nominal : Serial.print("Nominal"); break;
    case SHTC3_Status_Error : Serial.print("Error"); break;
    case SHTC3_Status_CRC_Fail : Serial.print("CRC Fail"); break;
    default : Serial.print("Unknown return code"); break;
  }
}
//https://blog.zeruns.com
void setup()
{
    /* initialize serial for debugging */
    Serial.begin(115200);
    Serial.println("Demo Start");
    wifiInit();
    Wire.begin(D5,D6);           // Initialize Wire (I2C) library
    unsigned char i=0;
    errorDecoder(mySHTC3.begin());
}


// the loop function runs over and over again forever
void loop()
{
  delay(1000);                  // Delay 1000 milliseconds
  SHTC3_Status_TypeDef result = mySHTC3.update();
  if(mySHTC3.lastStatus == SHTC3_Status_Nominal)   // Check if SHTC3 status is normal
  {
    RH = mySHTC3.toPercent();   // Read humidity data
    T = mySHTC3.toDegC();       // Read temperature data
    RH_sum+=RH;
    T_sum+=T;
    count+=1;
  }else{
    Serial.print("Update failed, error: ");
    errorDecoder(mySHTC3.lastStatus); // Output error reason
    Serial.println();
  }
  Serial.print("Humidity:");  // Print "Humidity:" to serial
  Serial.print(RH);           // Print humidity data
  Serial.print("%");
  Serial.print("  Temperature:");
  Serial.print(T);            // Print temperature data
  Serial.println("C");
  Serial.println("https://blog.zeruns.com");
  if (millis() - lastMs >= 30000)
  {
    lastMs = millis();
    mqttCheckConnect();

    /* Upload data */
    mqttIntervalPost();
    count=0;
    RH_sum=0;
    T_sum=0;
  }
  client.loop();
}
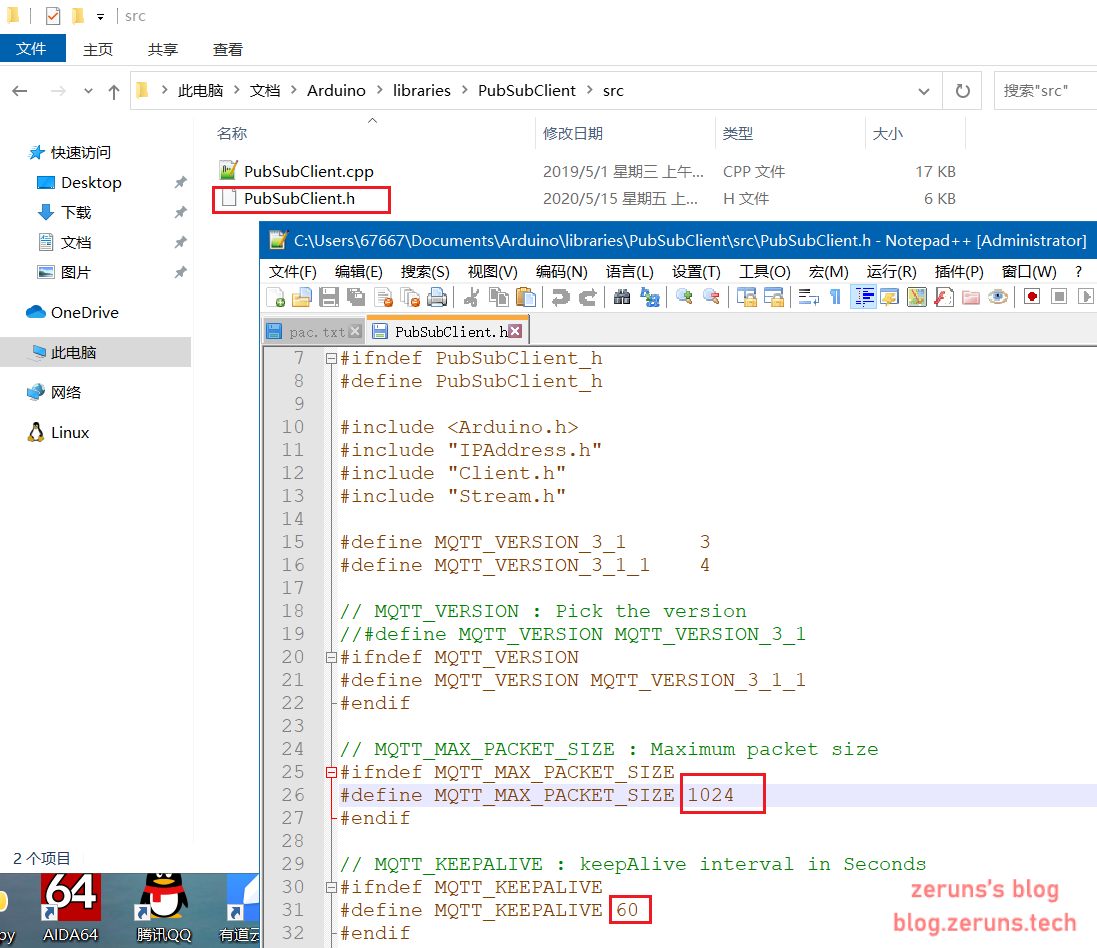
Modify PubSubClient.h
Locate the PubSubClient.h file and change the number after #define MQTT_MAX_PACKET_SIZE to 1024, and change the number after #define MQTT_KEEPALIVE to 60.
Password Generation Tutorial
Password generation tool: http://iot-face.oss-cn-shanghai.aliyuncs.com/tools.htm
Assume your device triple information is as follows:
Device Triple
ProductKey = a14Xib5kdYd
DeviceName = ESP8266
DeviceSecret = oLyaKqVxtRvjH284LdhqVgVUx1UPy6zq

Parameters for MQTT connection (this is CLIENT_ID in code, can be customized):
clientId = ESP8266
timestamp = 1234567890
signmethod = hmacsha1
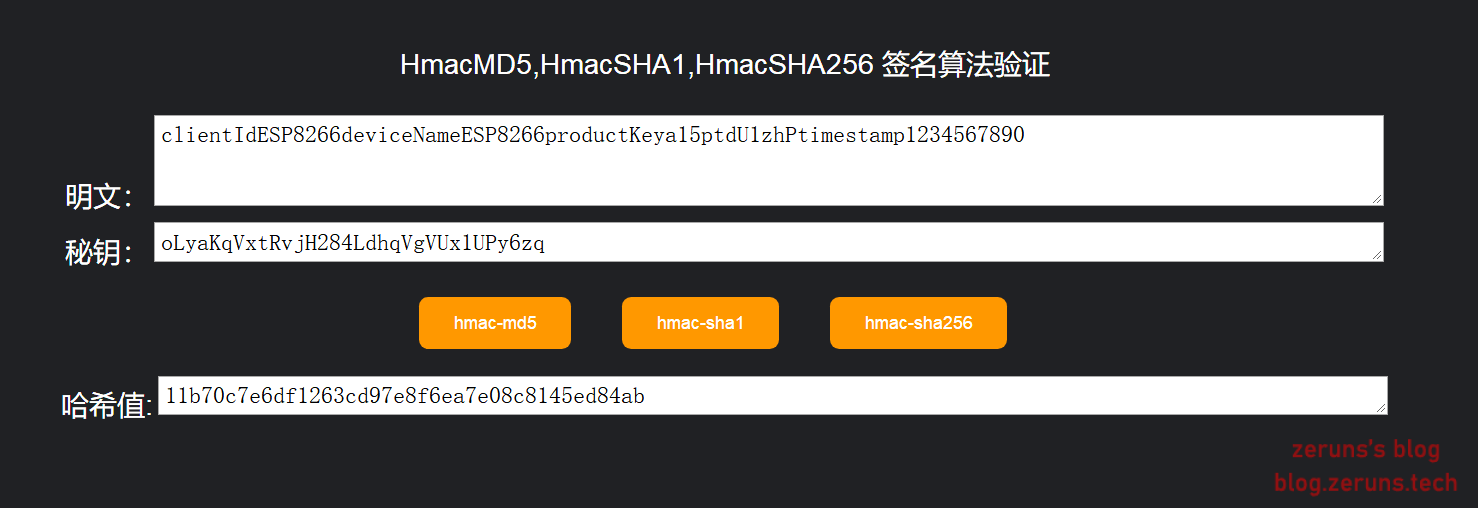
Then generate the password content as follows:
clientIdESP8266deviceNameESP8266productKeya15ptdU1zhPtimestamp1234567890
Enter the plaintext content and the secret key (DeviceSecret), then click “hmac-sha1” to generate the password.
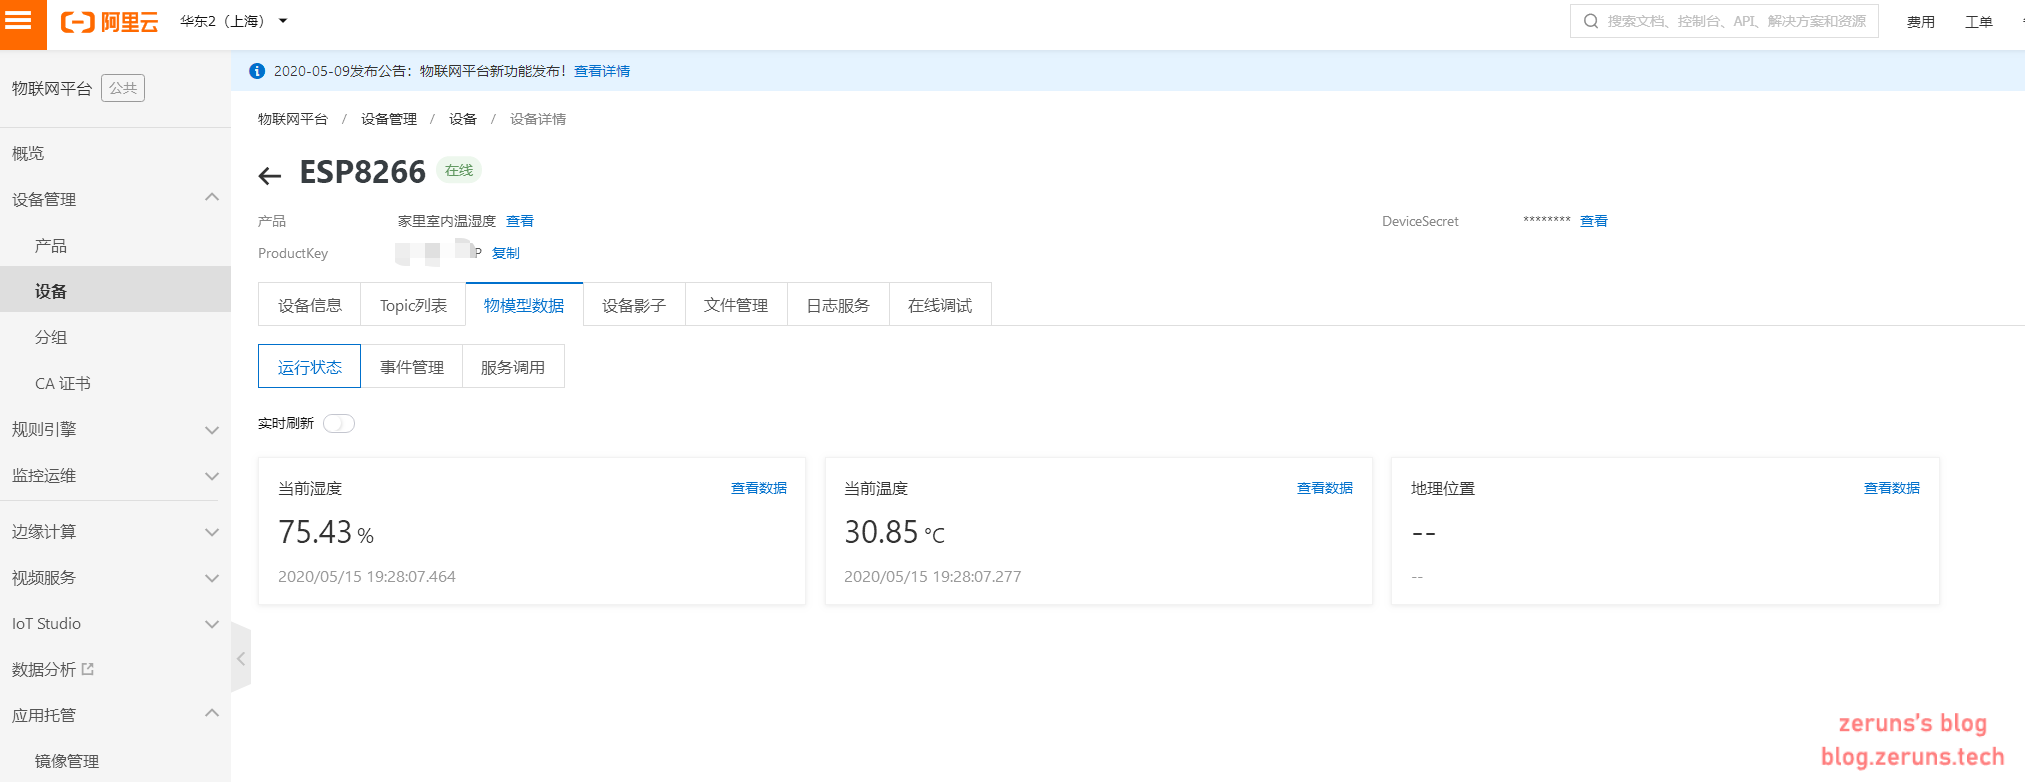
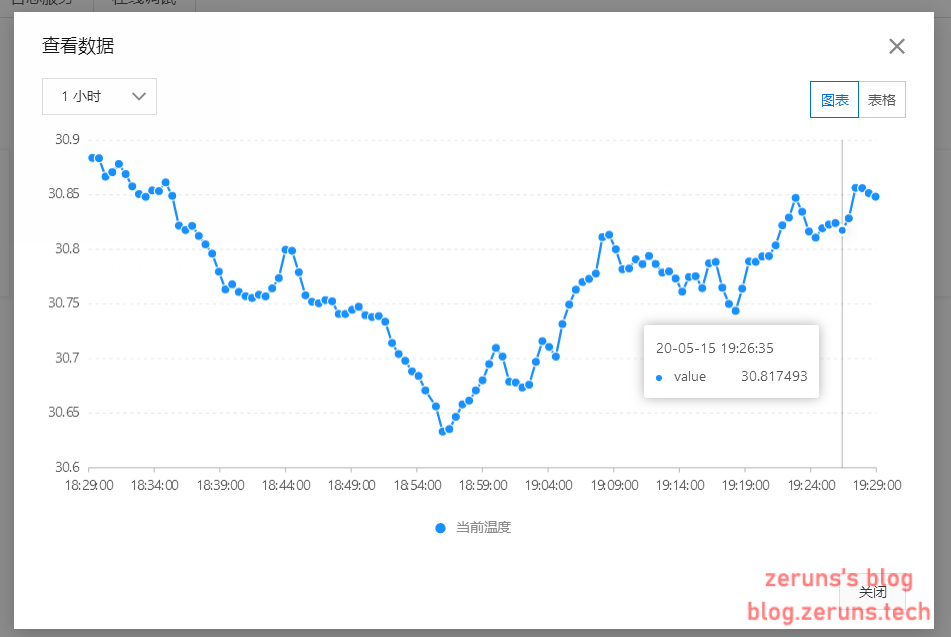
Result Screenshots
Recommended Reading:
- Recommended high-cost-performance and affordable VPS/cloud servers: https://blog.zeruns.com/archives/383.html
- Set up an internal network penetration server with a web panel: https://blog.zeruns.com/archives/397.html
- Build your own cloud storage using Cloudreve: https://blog.zeruns.com/archives/515.html
- How to set up a personal blog: https://blog.zeruns.com/archives/218.html
- Comprehensive student discount benefits: https://blog.zeruns.com/archives/321.html