Python Implementation of Microsecond (μs) Level Delay/Timing
Preface
Recently, I’ve been learning about Raspberry Pi’s GPIO and wanted to use Python to read data from a DHT11 temperature and humidity sensor. The DHT11 uses a single-wire communication protocol, which requires microsecond-level delays. The sleep() function seems insufficient for this requirement. I discovered that timestamps can be precise up to seven decimal places—that is, 0.1 microseconds. Although actual precision may not reach this level, it should still be adequate.
This method is only applicable to Linux systems. On Windows, no matter how you try, the minimum delay result is always around 1000 microseconds.
1 second (s) = 1000 milliseconds (ms) = 1,000,000 microseconds (μs)
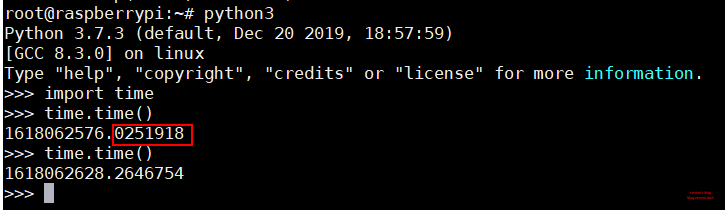
What Is a Timestamp?
A timestamp refers to the total number of seconds elapsed since 00:00:00 UTC on January 1, 1970 (which corresponds to 08:00:00 Beijing Time on January 1, 1970).
Implementation Method
Record the initial timestamp, then enter a loop. In each iteration, record the current timestamp. The loop continues as long as the difference between the current timestamp and the initial timestamp is less than the desired delay time, until the difference becomes greater than or equal to the target time.
Source code:
import time    # Import the time module
# https://blog.zeruns.com/
def delayMicrosecond(t):    # Microsecond-level delay function
    start, end = 0, 0       # Declare variables
    start = time.time()     # Record start time
    t = (t - 3) / 1000000   # Convert input t from microseconds to seconds; -3 is a time compensation
    while end - start < t:  # Loop until the time difference is greater than or equal to the target value
        end = time.time()   # Record end time
Usage: Copy and paste the above code into your program, then call the function delayMicrosecond(t), where t is the delay time in microseconds.
In the above code, t - 3 is a time compensation factor. Function calls and loop execution consume time. You can adjust this value based on your own testing. On my Raspberry Pi 4, I found that approximately 3 microseconds of overhead were introduced, so I subtract 3.
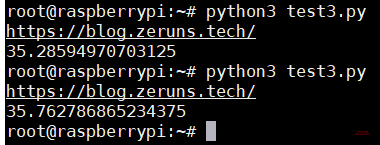
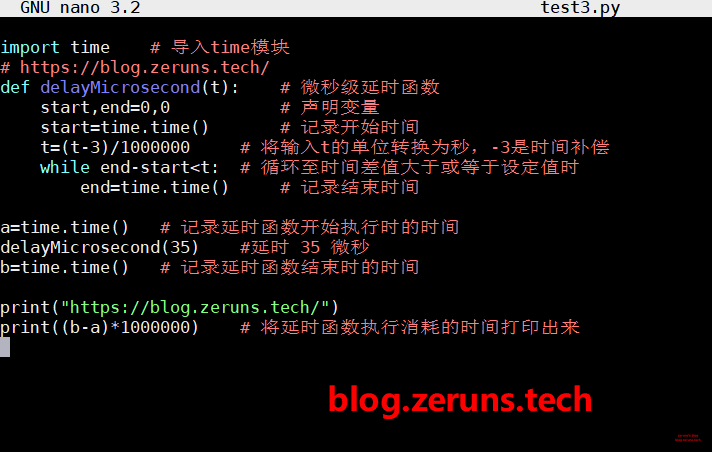
Example
import time    # Import the time module
# https://blog.zeruns.com/
def delayMicrosecond(t):    # Microsecond-level delay function
    start, end = 0, 0       # Declare variables
    start = time.time()     # Record start time
    t = (t - 3) / 1000000   # Convert input t from microseconds to seconds; -3 is a time compensation
    while end - start < t:  # Loop until the time difference is greater than or equal to the target value
        end = time.time()   # Record end time

a = time.time()   # Record the time when the delay function starts
delayMicrosecond(35)  # Delay for 35 microseconds
b = time.time()   # Record the time when the delay function ends

print("https://blog.zeruns.com/")
print((b - a) * 1000000)  # Print the actual time consumed by the delay function
Result:
Recommended Reading
- Recommended high-performance and affordable VPS/cloud servers: https://blog.zeruns.com/archives/383.html
- Python-related articles: https://blog.zeruns.com/category/Python/
- Reading DHT11, DHT22, SHTC3 temperature/humidity data with Arduino: https://blog.zeruns.com/archives/527.html
- Student-exclusive discount benefits and education offers: https://blog.zeruns.com/archives/557.html
- How to build a personal blog: https://blog.zeruns.com/archives/218.html